
https://wesshelp.wessconnect.com/2021/06/17/how-to-add-appointment/
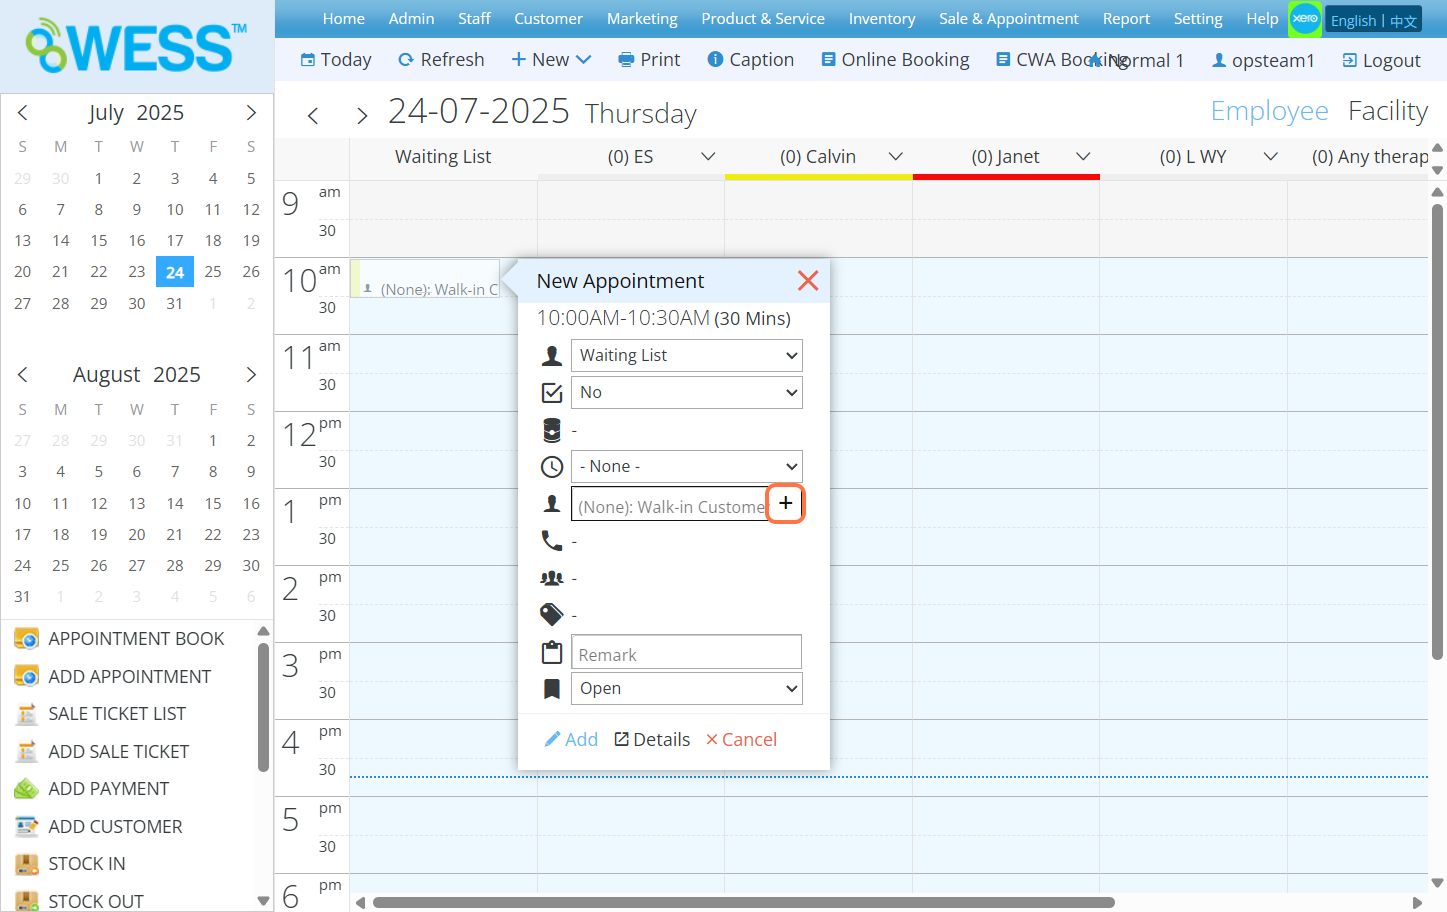
Step 1: Click on “APPOINTMENT BOOK”

Step 2: Select the date
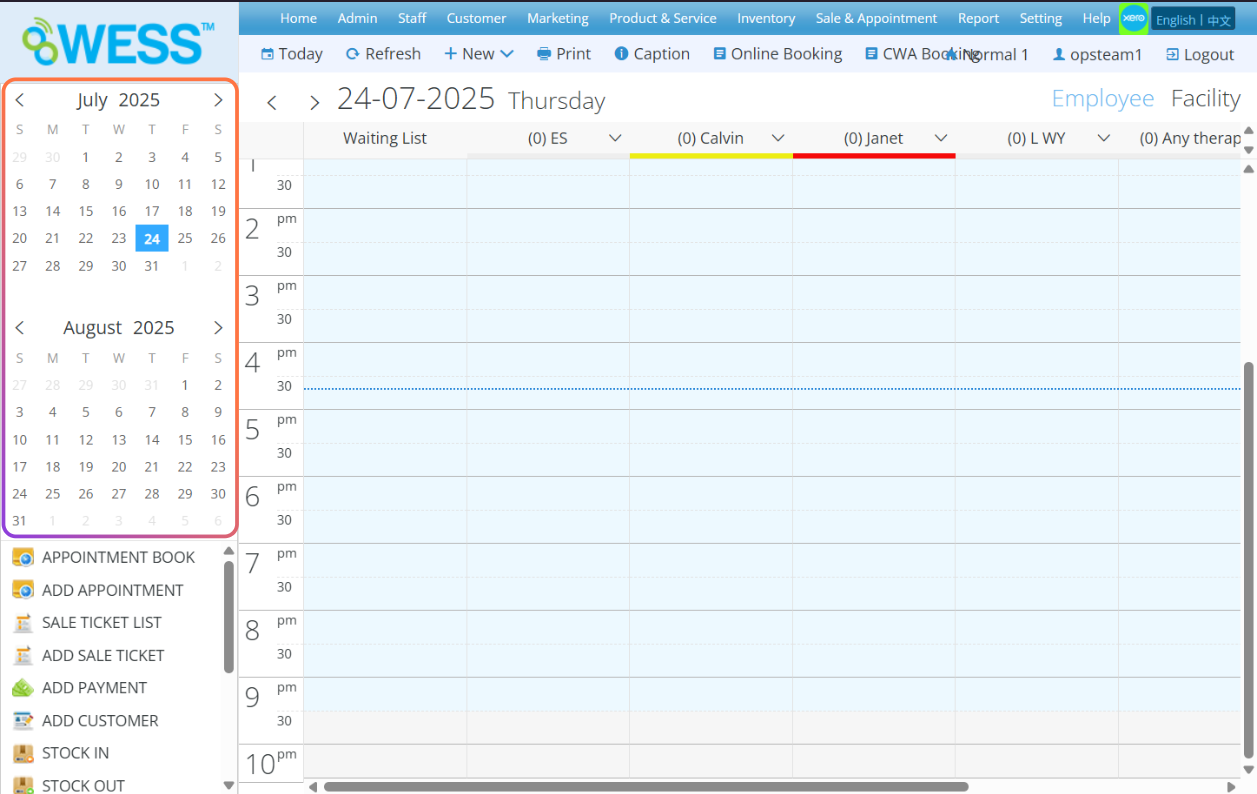
Step 3: Select the time that customer want to booking

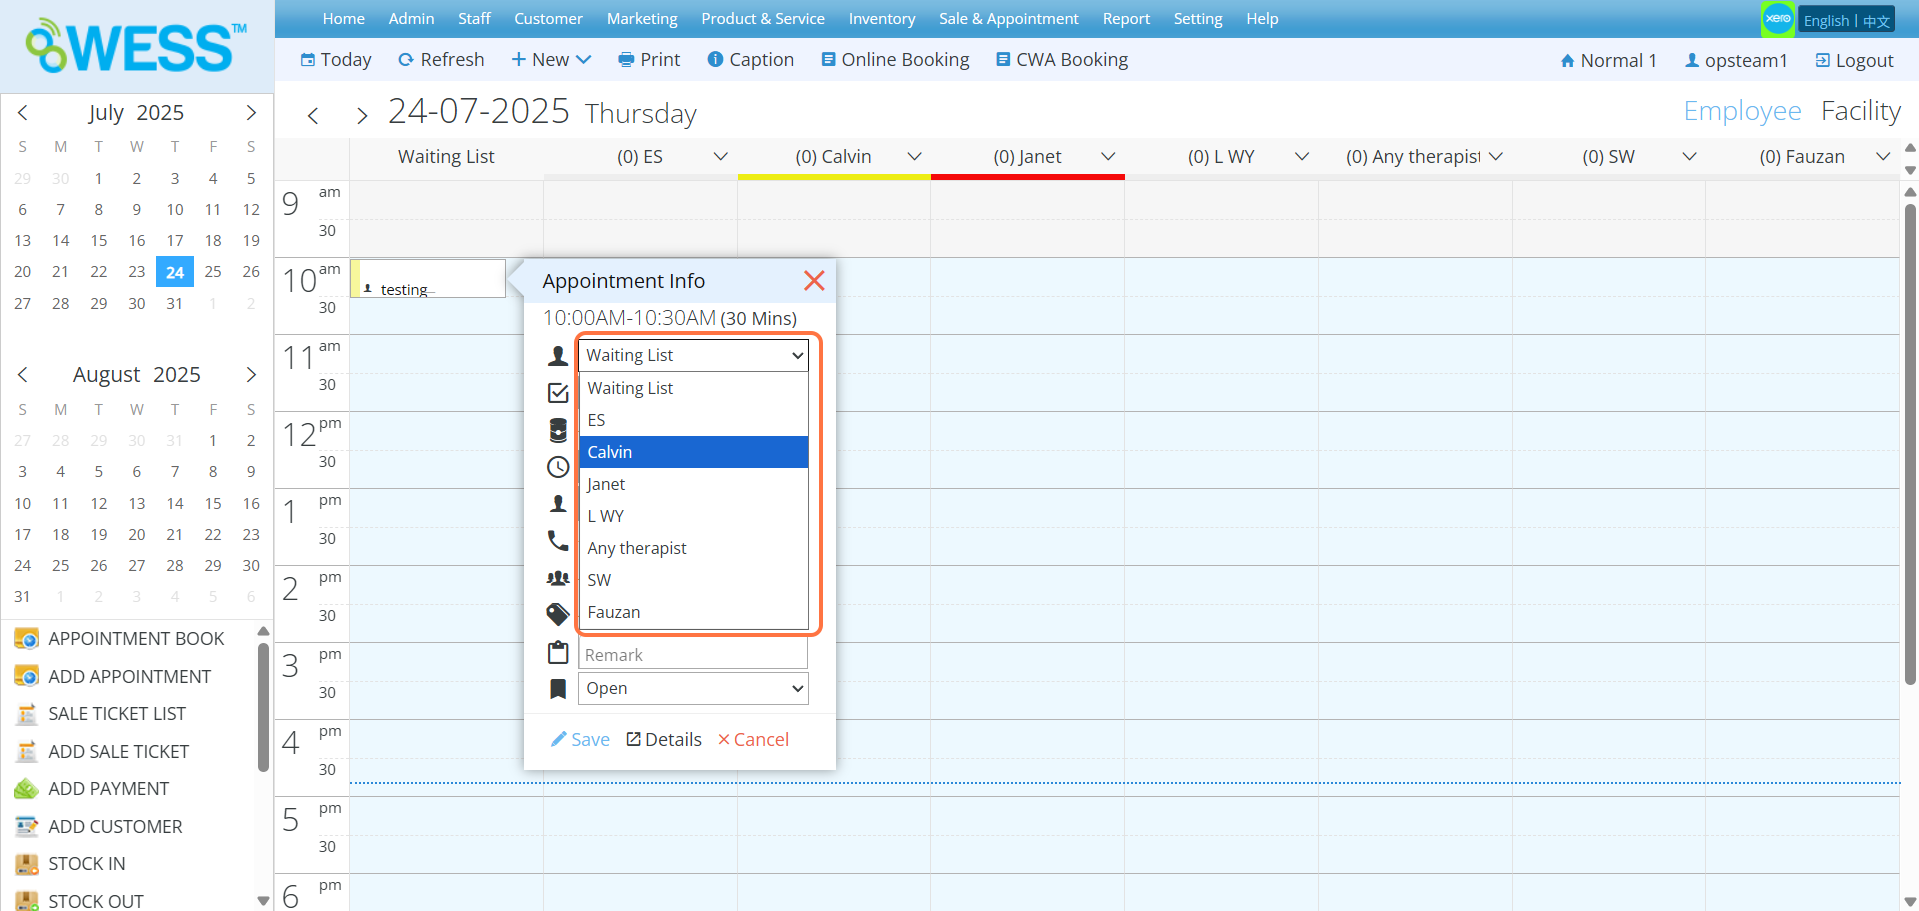
Step 4: Click and select an employee
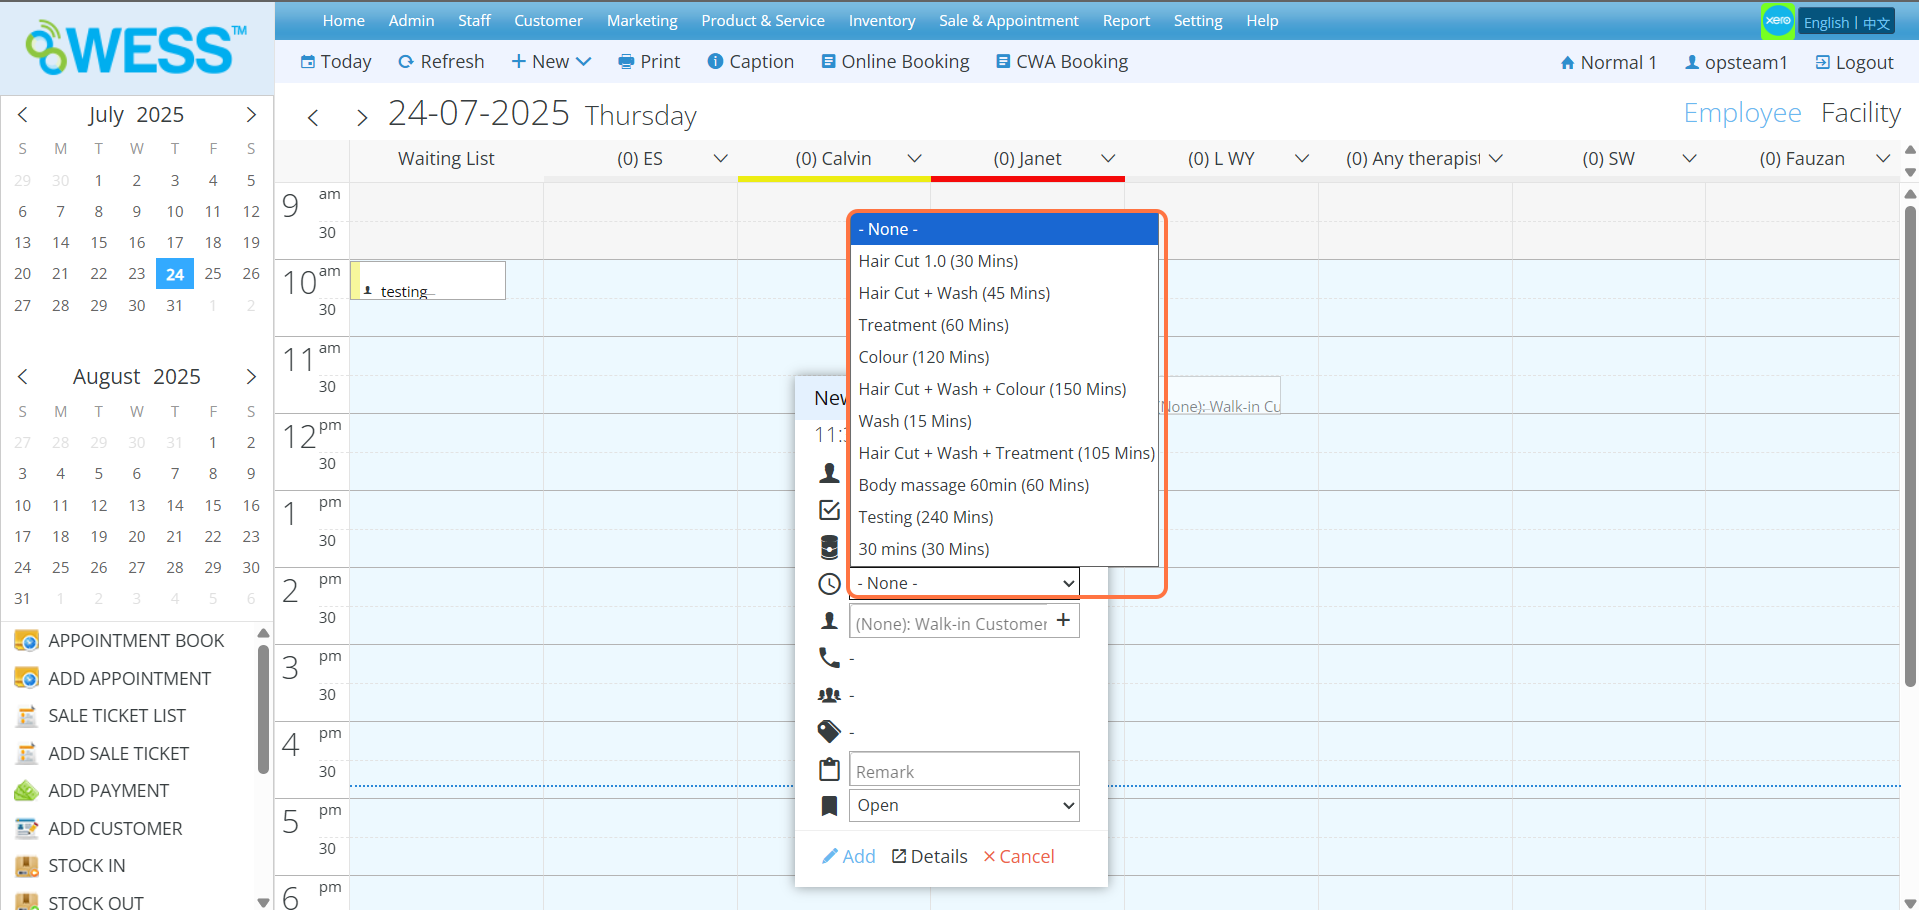
Step 5: Click and select a programme
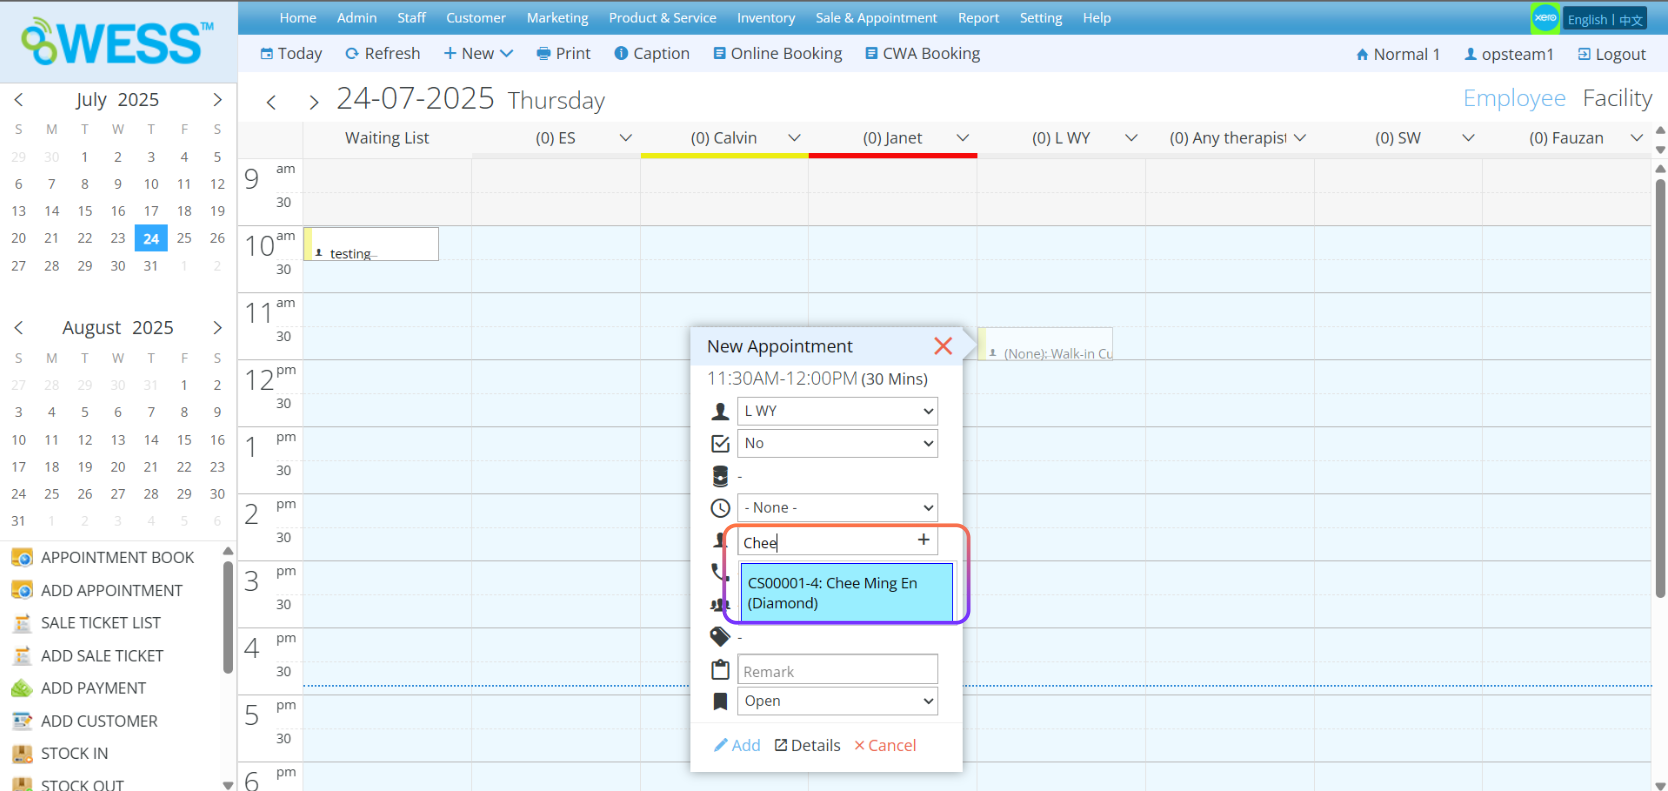
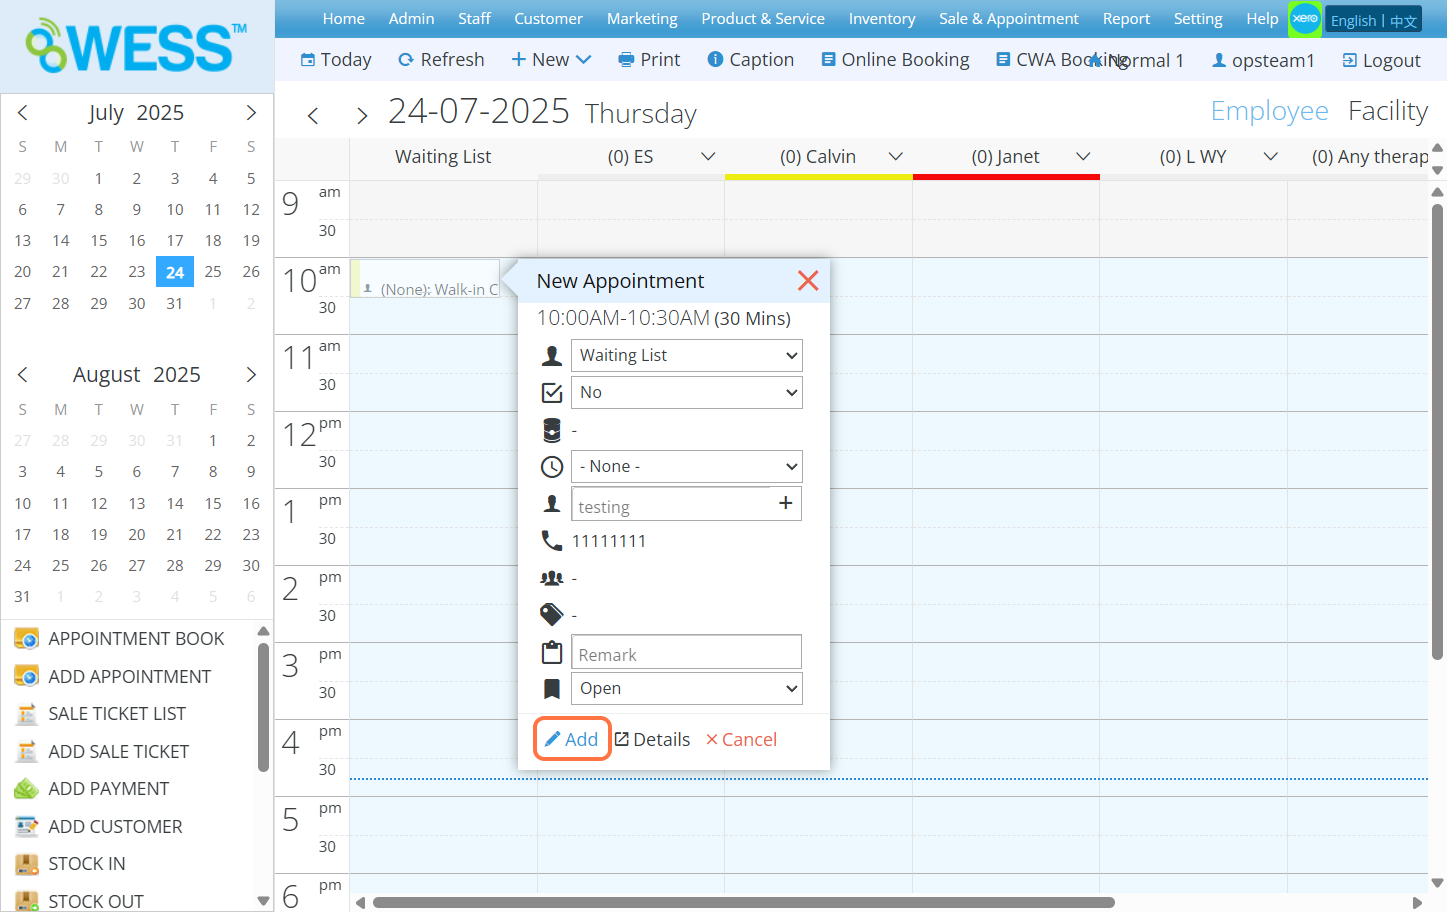
Step 6: Enter the customer name
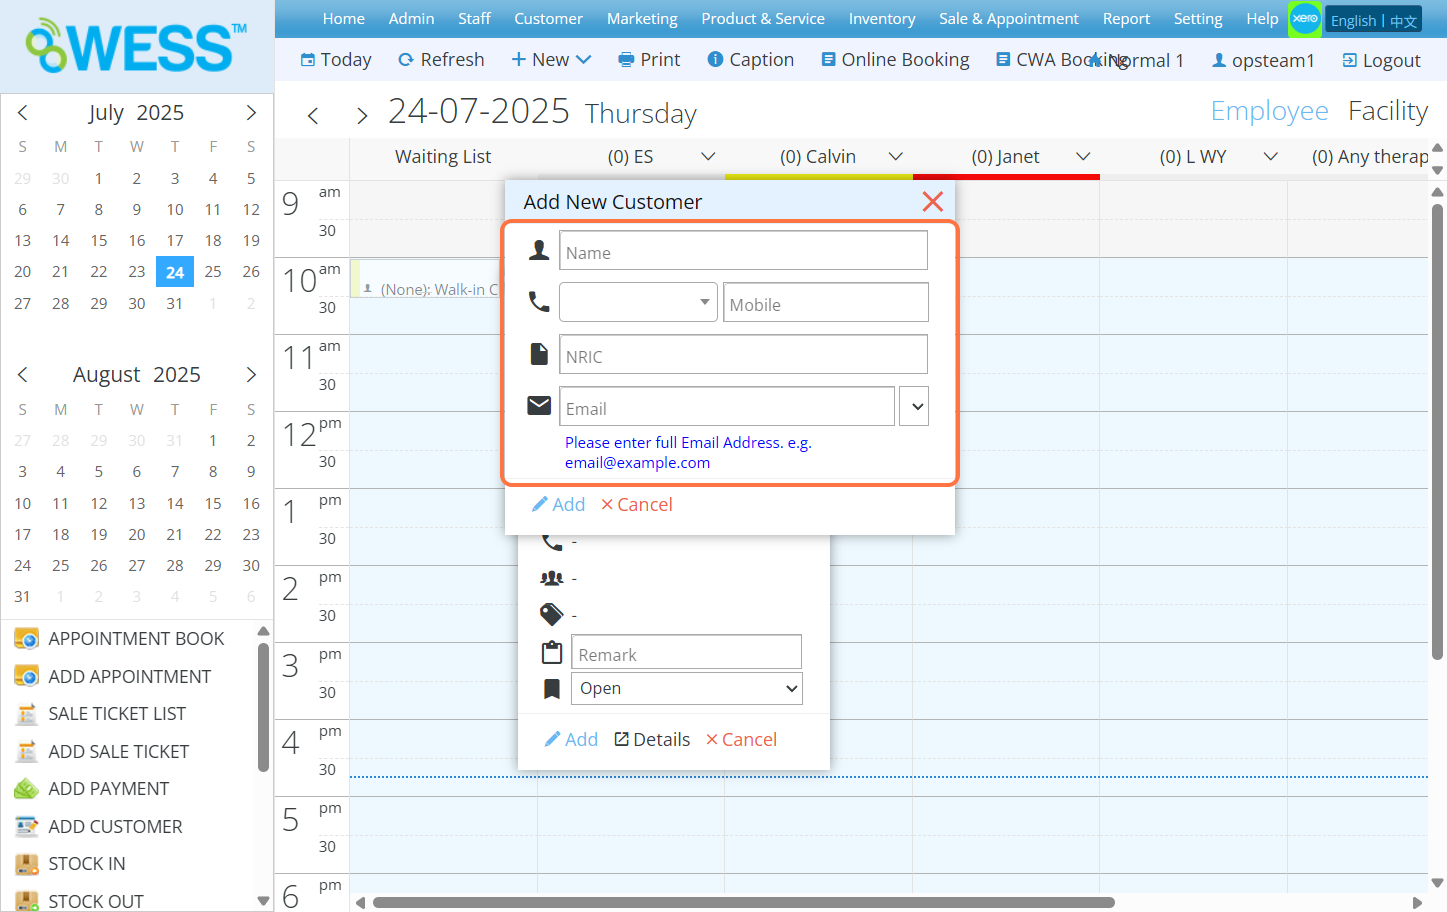
Step 7: [Optional] Click “+” button if said customer is new and doesn’t exist in the record
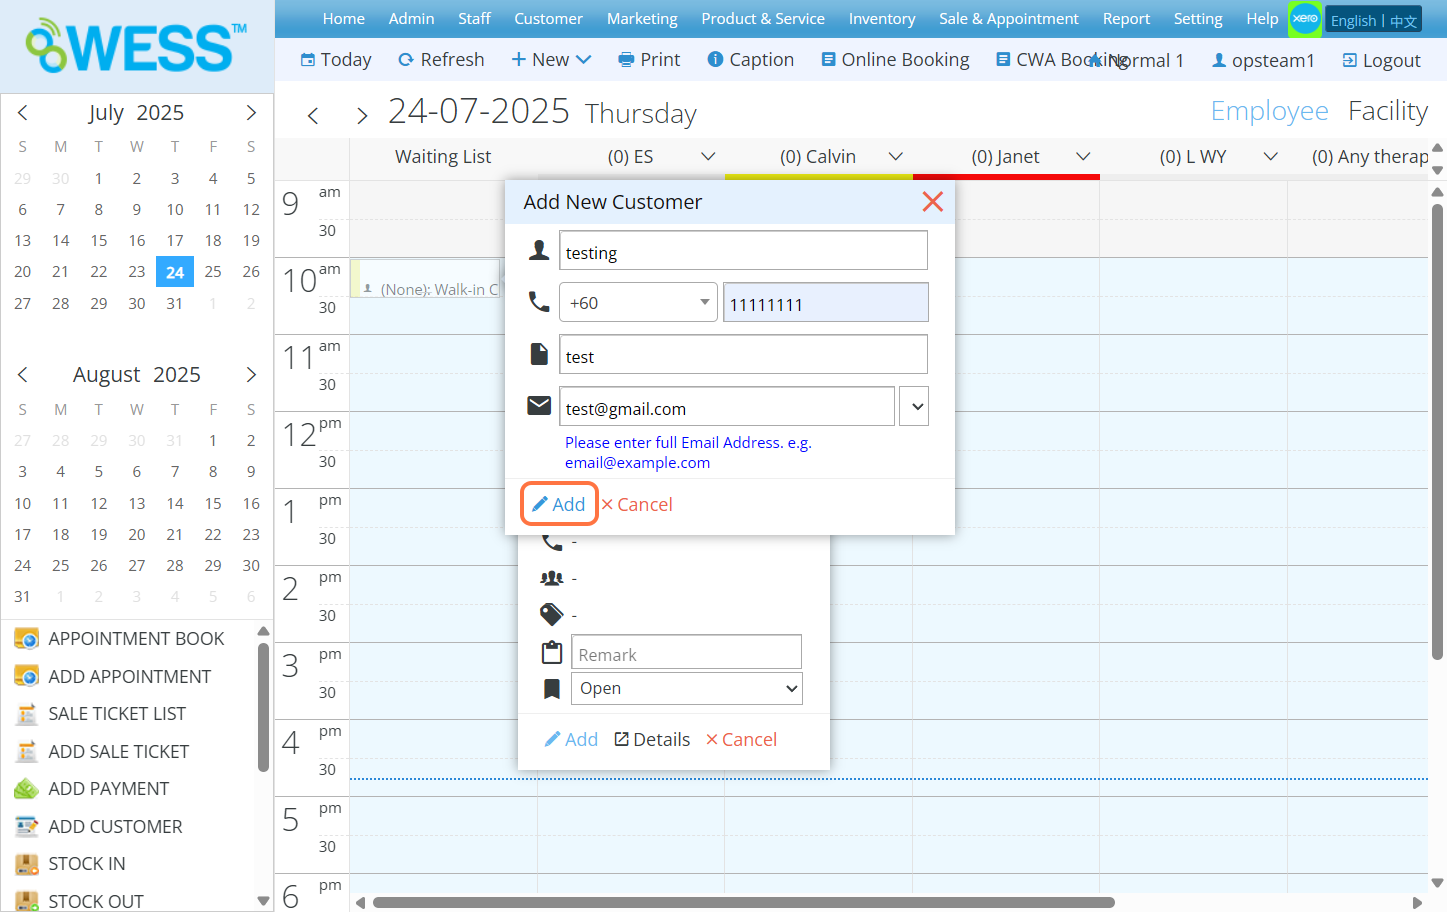
Step 8: [Optional] Fill in the blanks with information of said new customer
Step 9: [Optional] Click “ADD”
Step 10: Click “ADD”
Last Updated: July 2025
https://wesshelp.wessconnect.com/2021/06/17/how-to-set-2-appointment-in-the-same-time-slot/
Step 1: Click “APPOINTMENT BOOK”.
Step 2: Click on the empty space within the time slot where you want to add an entry.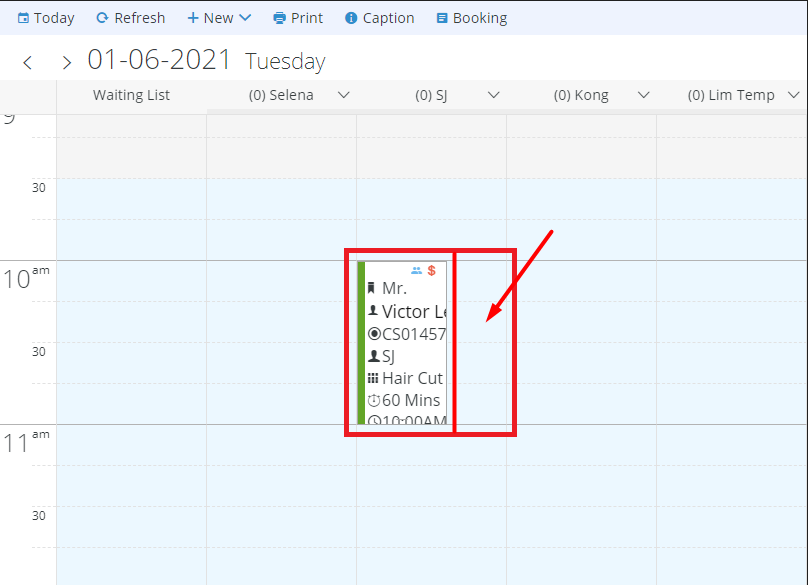
Step 3: Fill in the customer appointment details.
Step 4: Click “ADD”.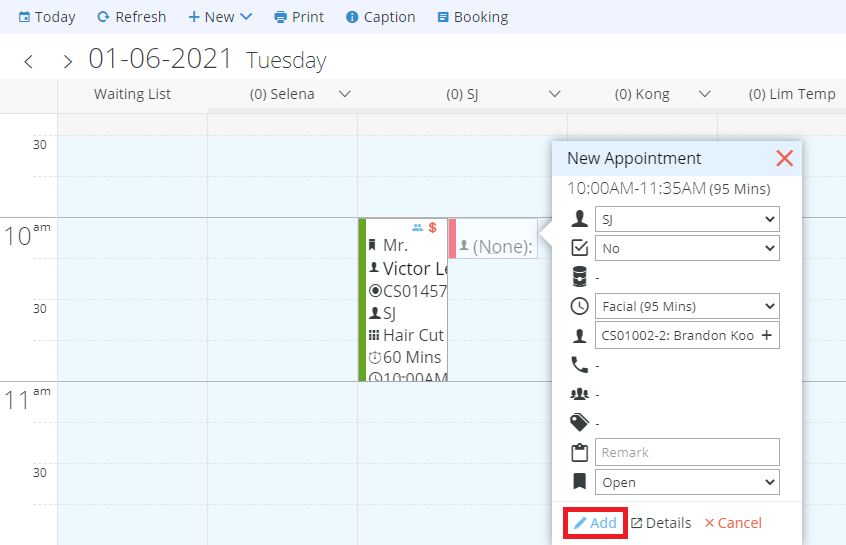
The appointment is added successfully in the same time slot.
Last update: July 2025
https://wesshelp.wessconnect.com/2021/06/17/how-to-change-staff-programme-time-in-the-same-day/
Step 1: Click “APPOINTMENT BOOK”.
Step 2: Click the time slot.
Step 3: Click “EMPLOYEE OPTION”.
Step 4: Select the employee want to change.
Step 5: Select the programme want to change.
Step 6: Click “SAVE”.
Step 7: Long click the appointment block and hold for 1 ~ 2 second.
Step 8: Drag and drop the appointment block to the time slot you want.
Last update: April 2021
https://wesshelp.wessconnect.com/2021/06/17/how-to-change-appointment-date-to-another-day/
Step 1: Click “APPOINTMENT BOOK”.
Step 2: Click the time slot.
Step 3: Click “DETAILS”.
Step 4: Select the date want to change.
Step 5: Click “LEAVE OPEN”.
Last update: April 2021
https://wesshelp.wessconnect.com/2021/06/17/how-to-void-appointment/
Step 1: Click “APPOINTMENT BOOK”.
Step 2: Click the time slot.
Step 3: Click “DETAILS”.
Step 4: Click “VOID”.
Last update: April 2021
https://wesshelp.wessconnect.com/2021/06/17/how-to-change-appointment-status/
ℹ️ Method 1
Step 1: Click “APPOINTMENT BOOK”
Step 2: Click the time slot
Step 3: Click “STATUS OPTION”
Step 4: Select the status want to change
Step 5: Click “SAVE”
ℹ️ Method 2
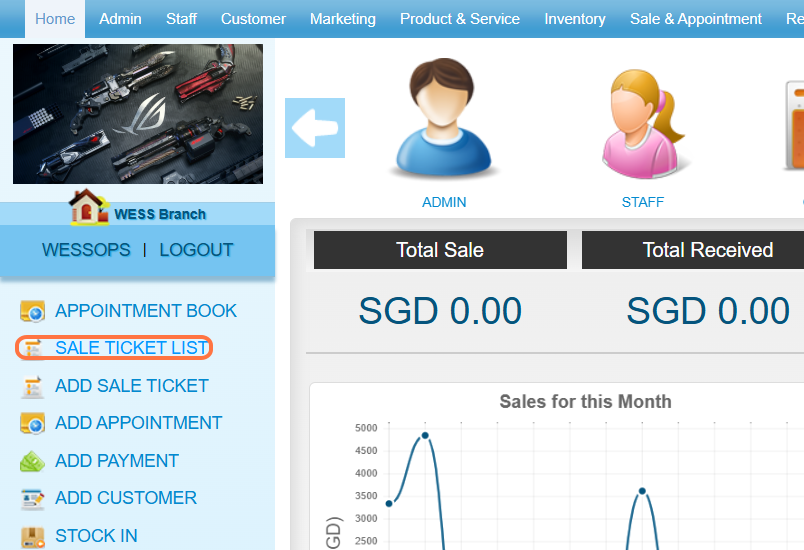
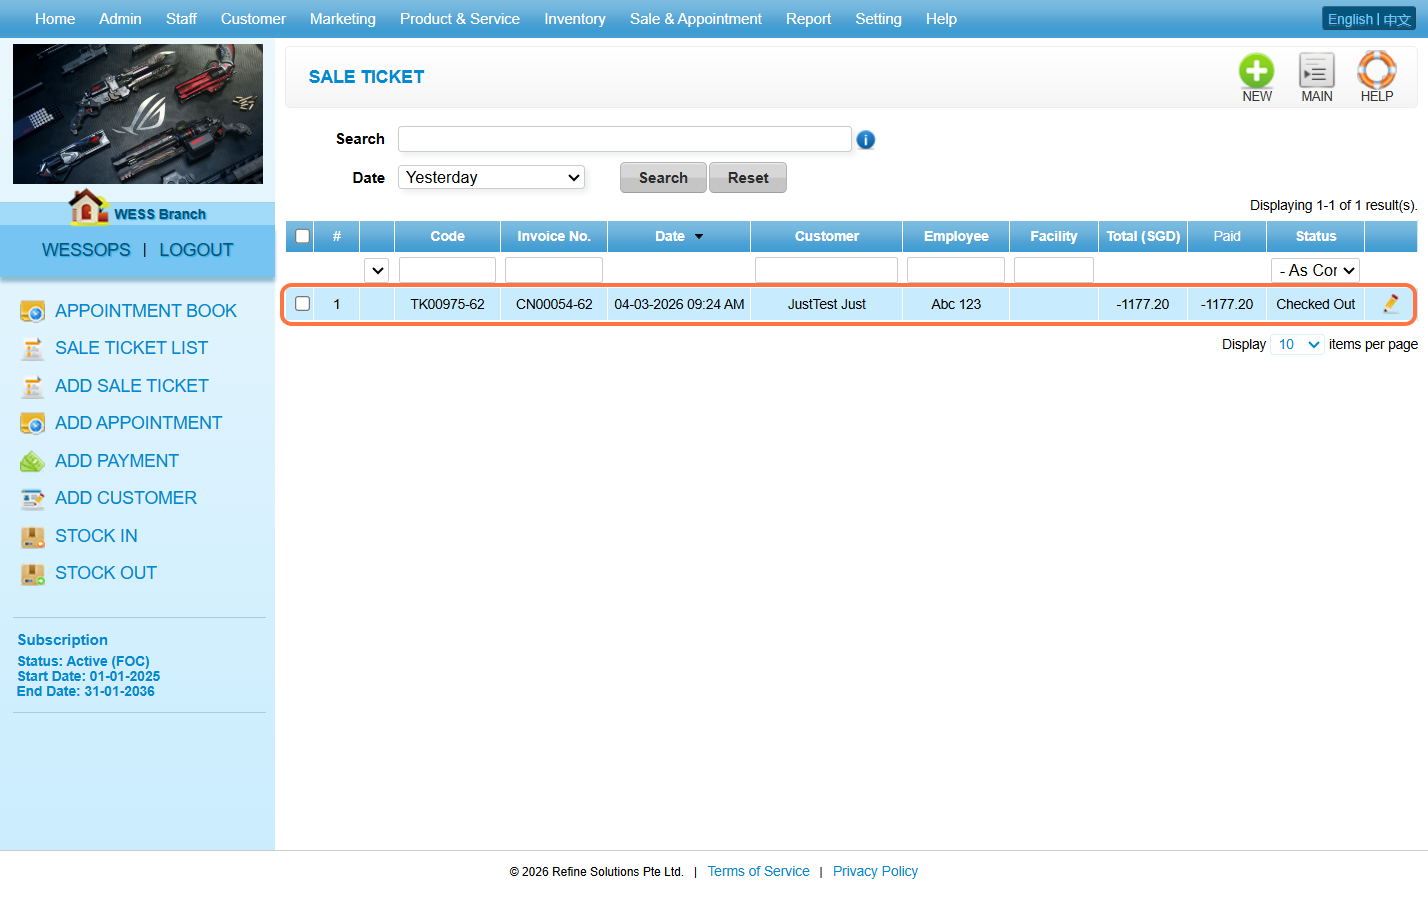
Step 1: Click on “SALE TICKET LIST”.
Note: To change the status, go to Sale Ticket List”.
Step 2: Select the sale ticket.
Step 3: Click on “EDIT”.
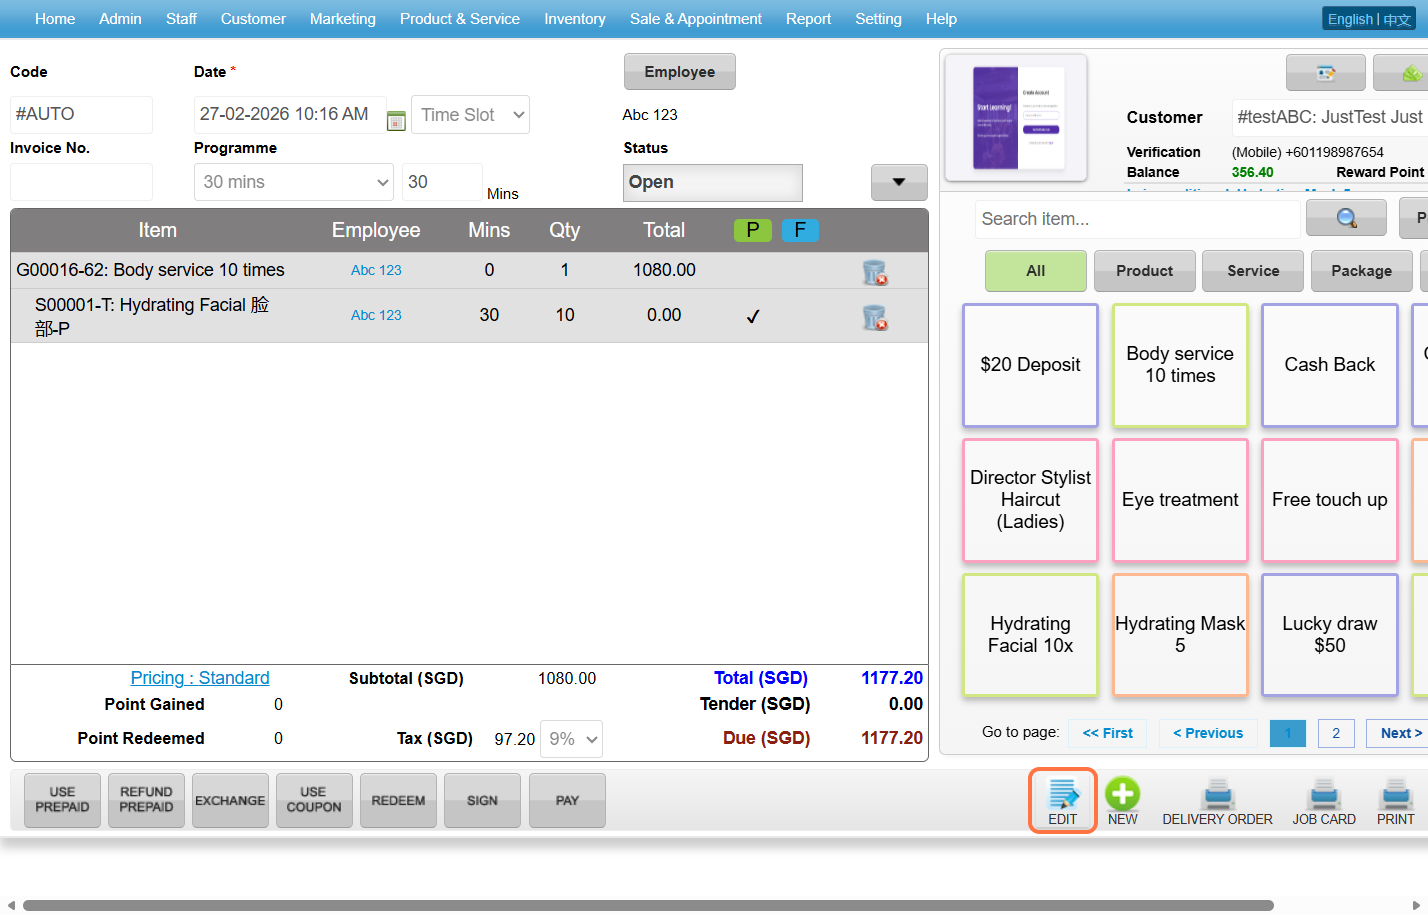
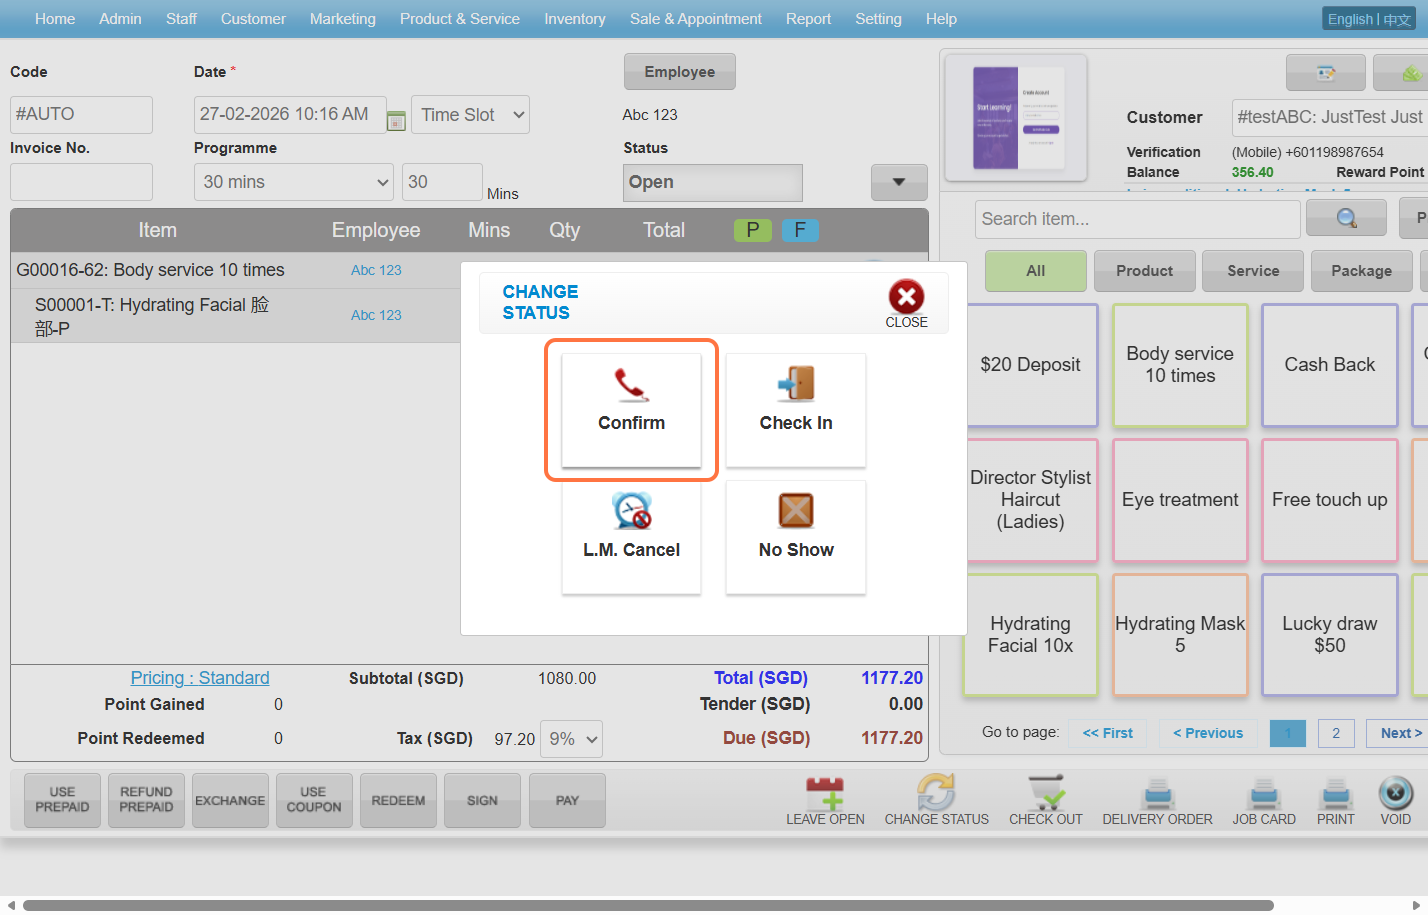
Step 4: Click on “CHANGE STATUS”.
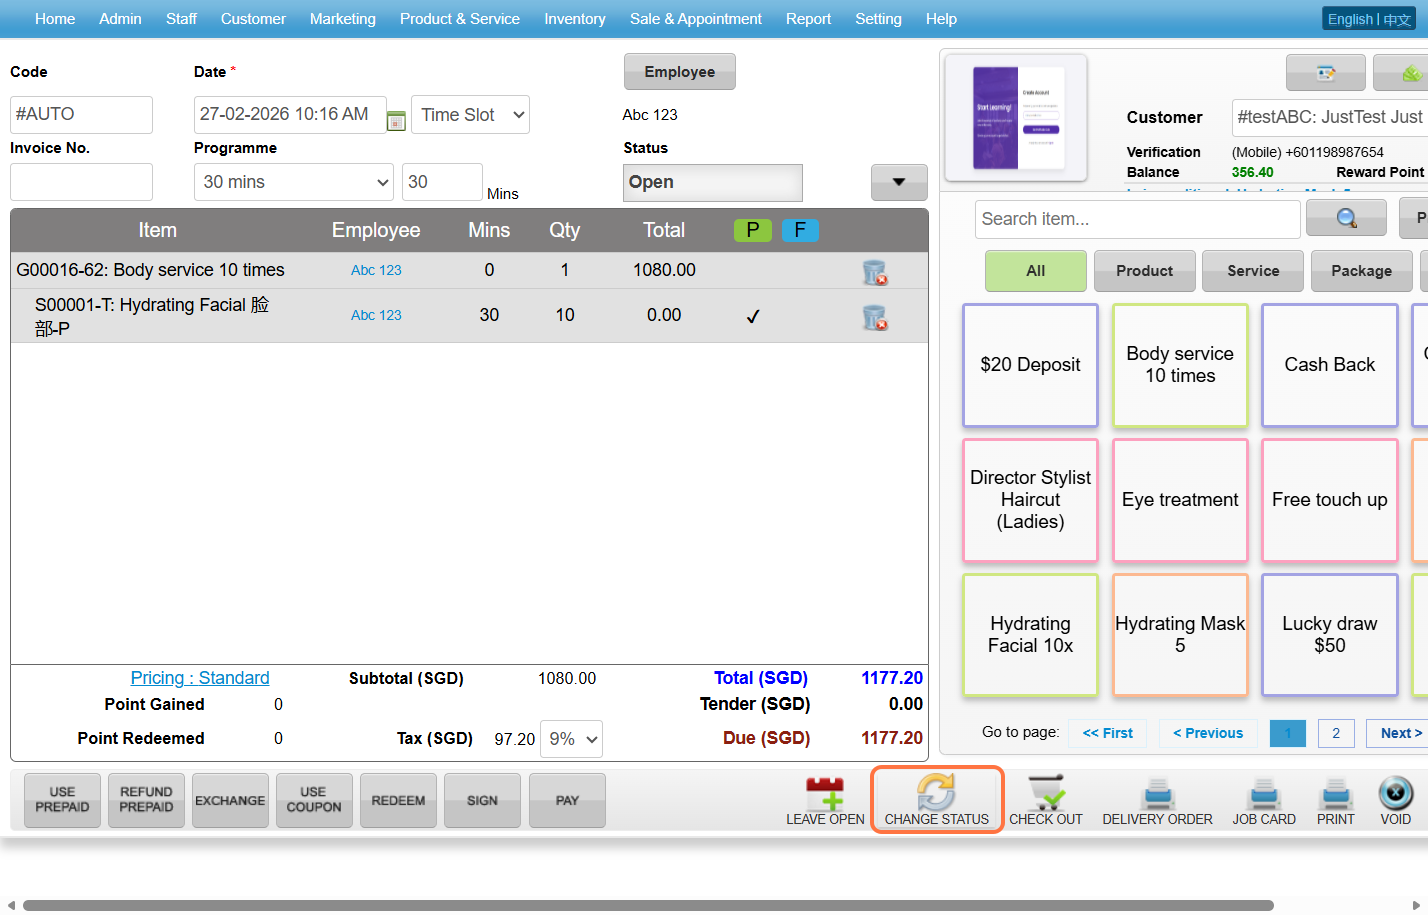
Step 5: Select the status.
Note: Select the relevant status to accurately represent the customer’s situation.
Last update: March 2026
https://wesshelp.wessconnect.com/2021/06/17/how-to-add-appointment-programme/
Step 1: Click “SETTING”.
Step 2: Click “PROGRAMME”.
Step 3: Click “NEW”.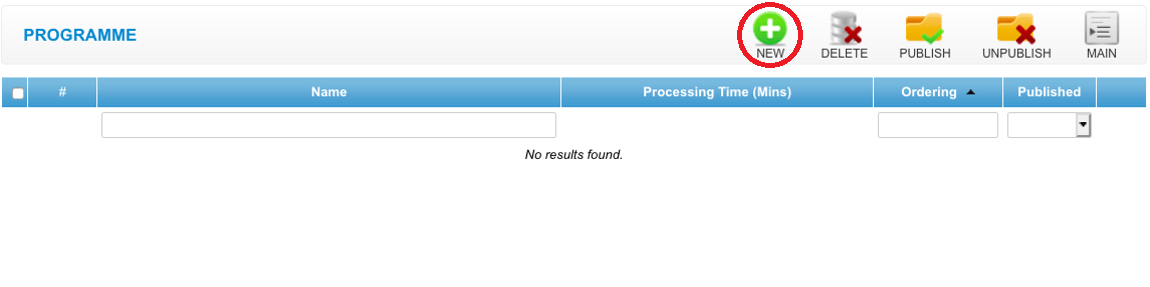
Step 4: Fill in programme details.
Click any Save icon “💾”.
Last update: April 2021
https://wesshelp.wessconnect.com/2024/10/10/how-to-edit-appointment-programme/
Step 1: Click “SETTING”.
Step 2: Click “PROGRAMME”.
Step 3: Click on the pen icon “✏️” to edit.
Step 4: Edit and fill in programme details.
Step 5: Click any Save icon “💾”.
Last update: October 2024
https://wesshelp.wessconnect.com/2023/08/07/how-to-enable-drag-and-drop-for-appointments/
Step 1: Click “Setting“.
Step 2: Click “APPOINTMENT SETTING“.
Step 3: Select “On” for “Drag & Drop Appointment“.
Step 4: Select which action to do when appointments are overlapping existing appointment.
- Ignore: Users can place another appointment on top of the current appointment.
- Warn: WESS will warn users when placing another appointment on top of an existing appointment.
- Do Not Allow: Users are restricted from placing another appointment on top of the current appointment.
 Step 5: Click any Save icon “💾”.
Step 6: Make sure the settings have been saved.
Step 7: Click “Sale & Appointment“.
Step 8: Click “APPOINTMENT“.
Step 9: Click and hold the appointment to move it to another employee or time.
Step 10: Make sure the change has been saved.
[!] You can click on Undo to reverse the action.
Last Update: Aug 2024
https://wesshelp.wessconnect.com/2023/09/13/how-to-assign-facility-for-appointment/
Step 1: Click on “Settings”
Step 2: Click on “FACILITY” 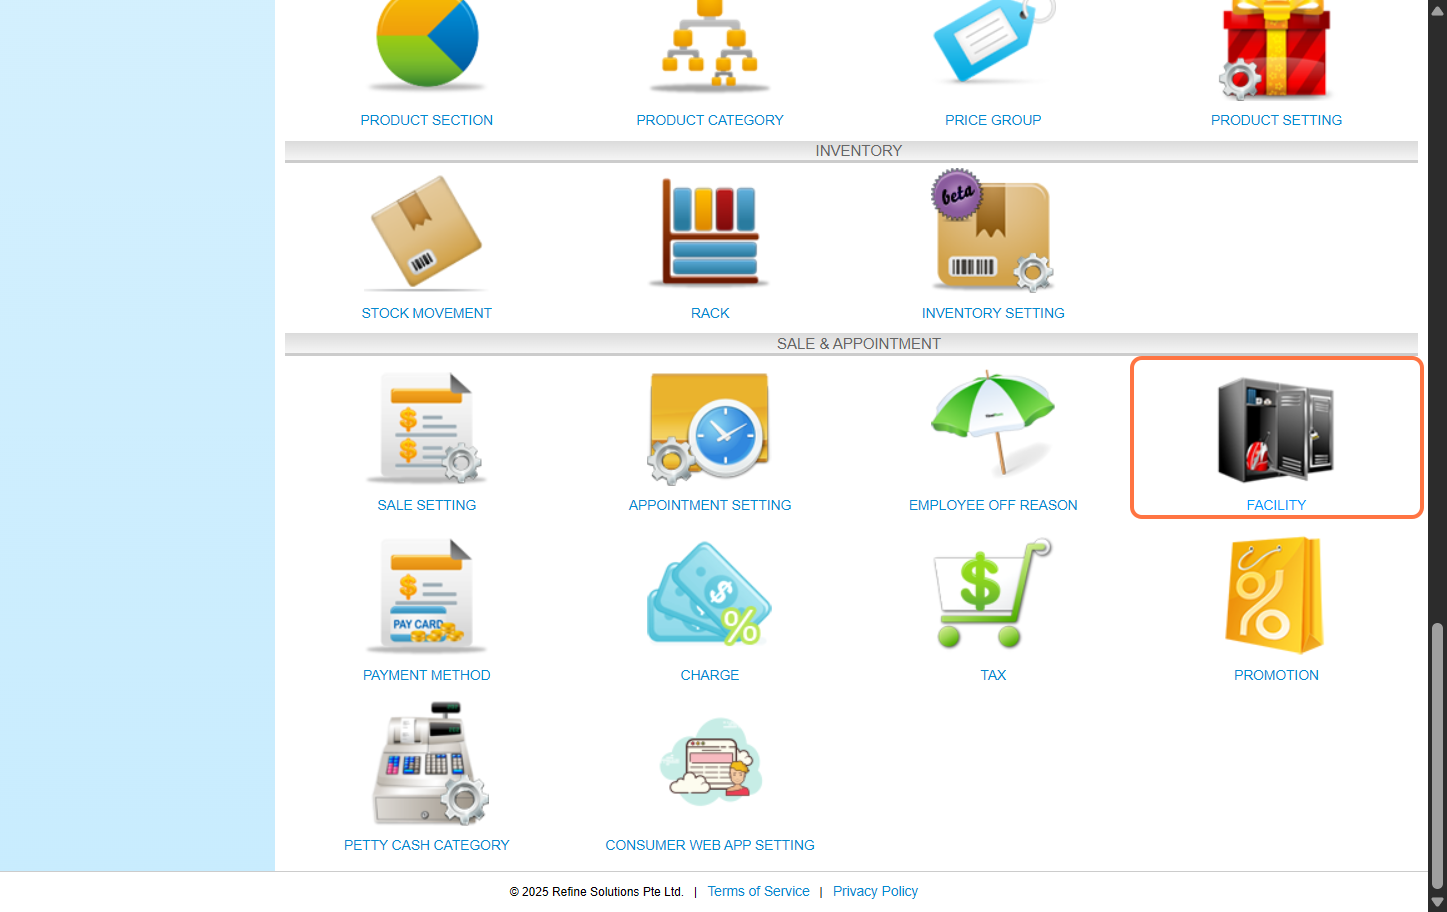
Step 3: Click on “NEW”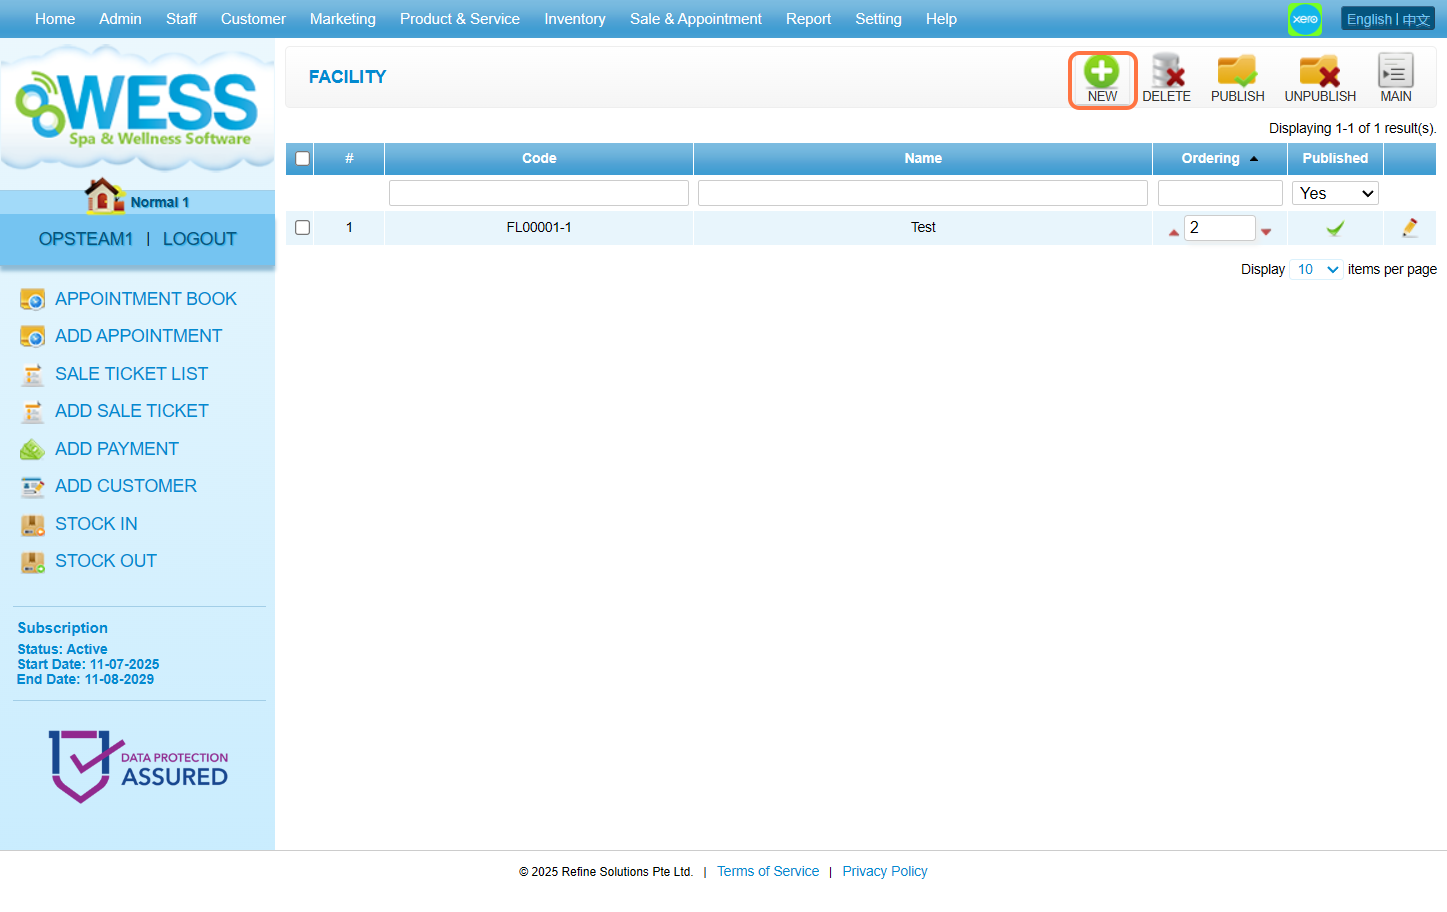
Step 4: Fill in the releavant information.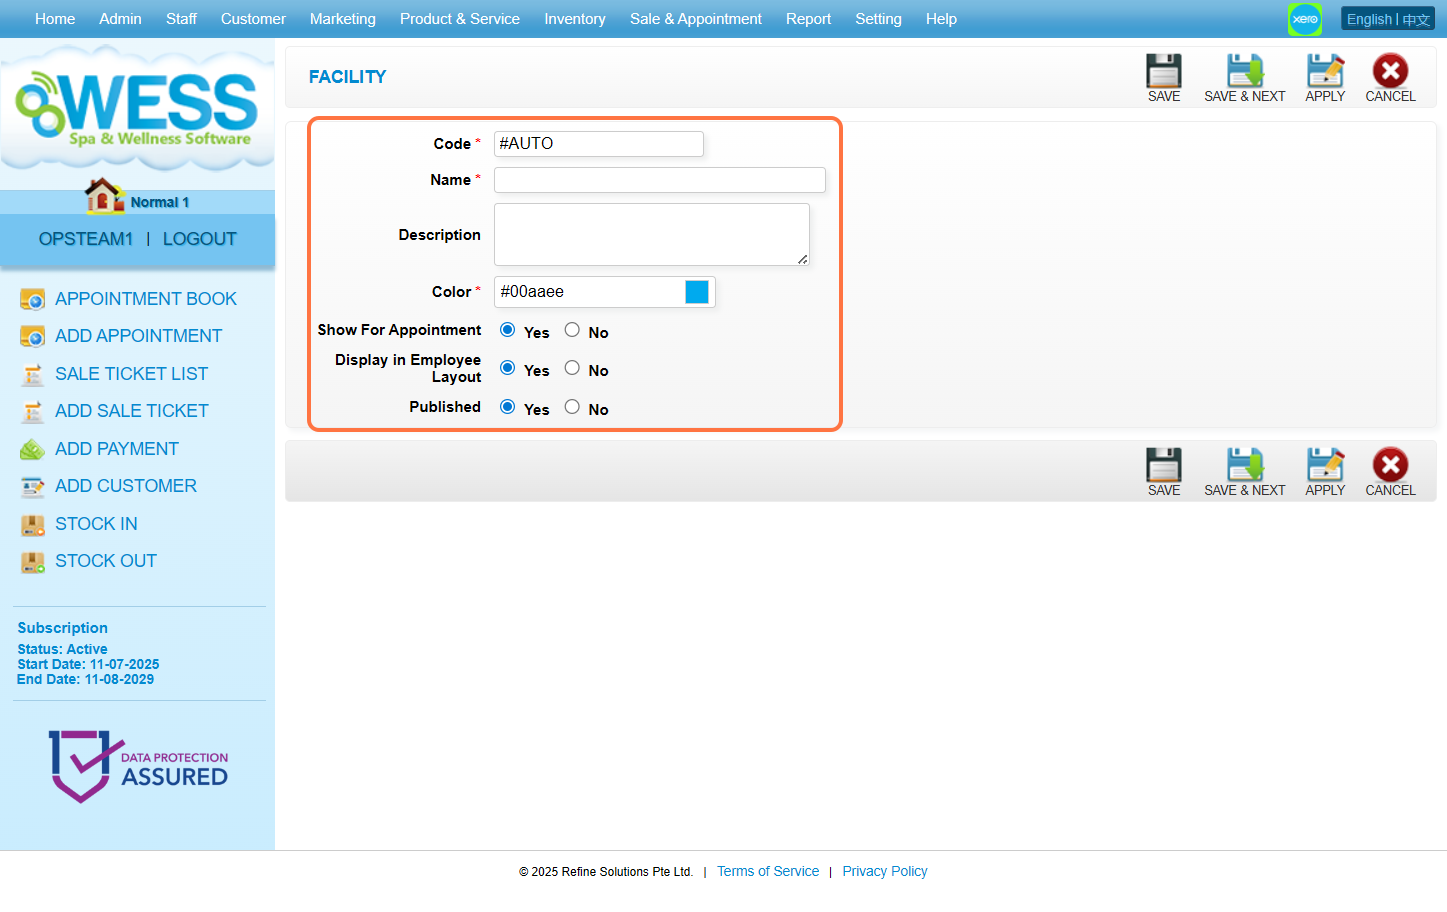
Step 5: Click on “SAVE”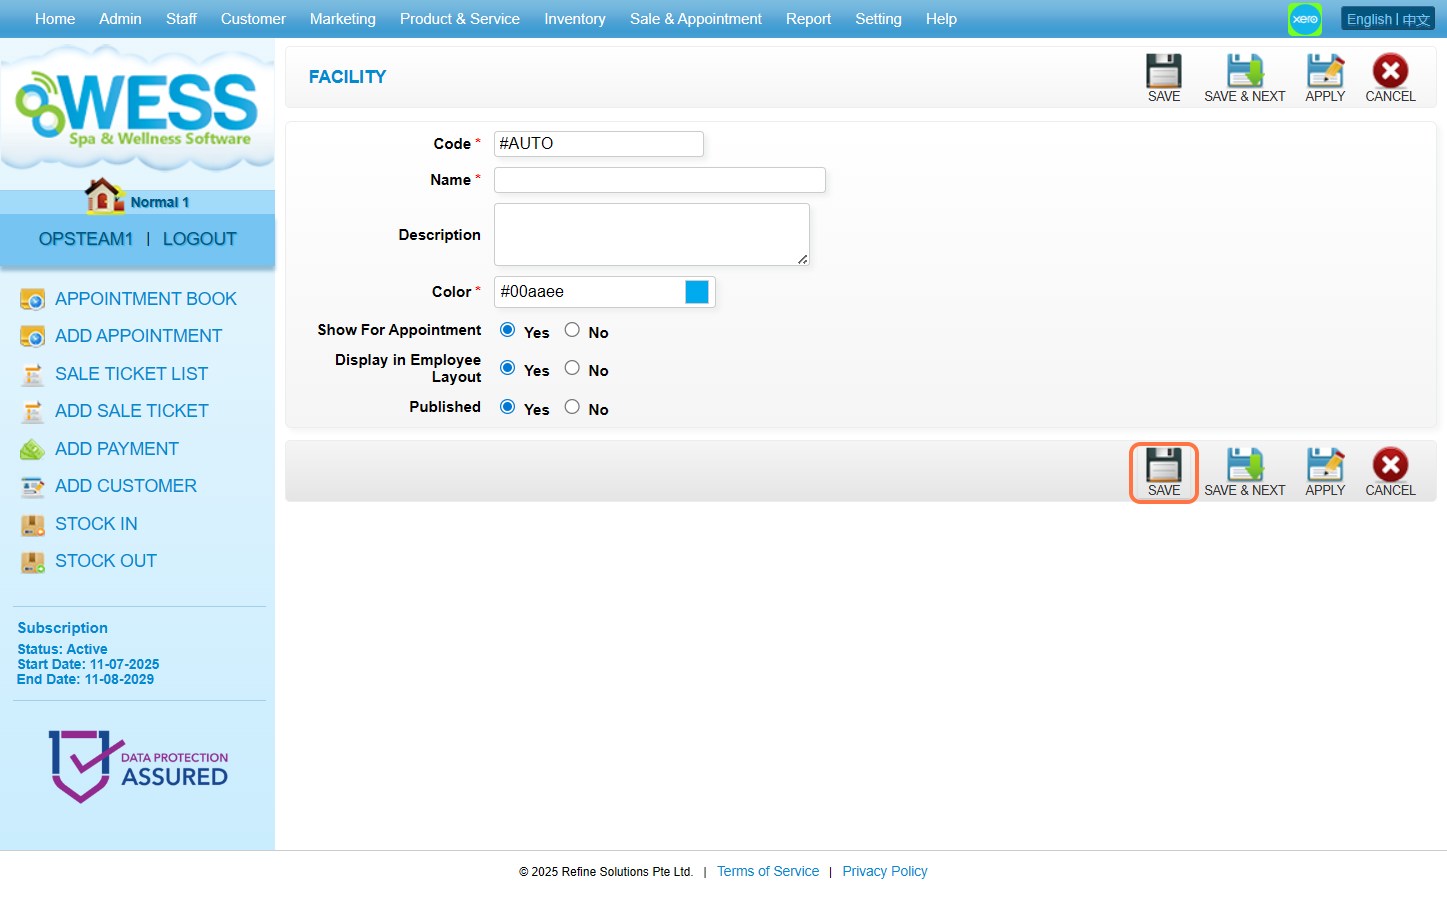
Step 6: Ensure the record is saved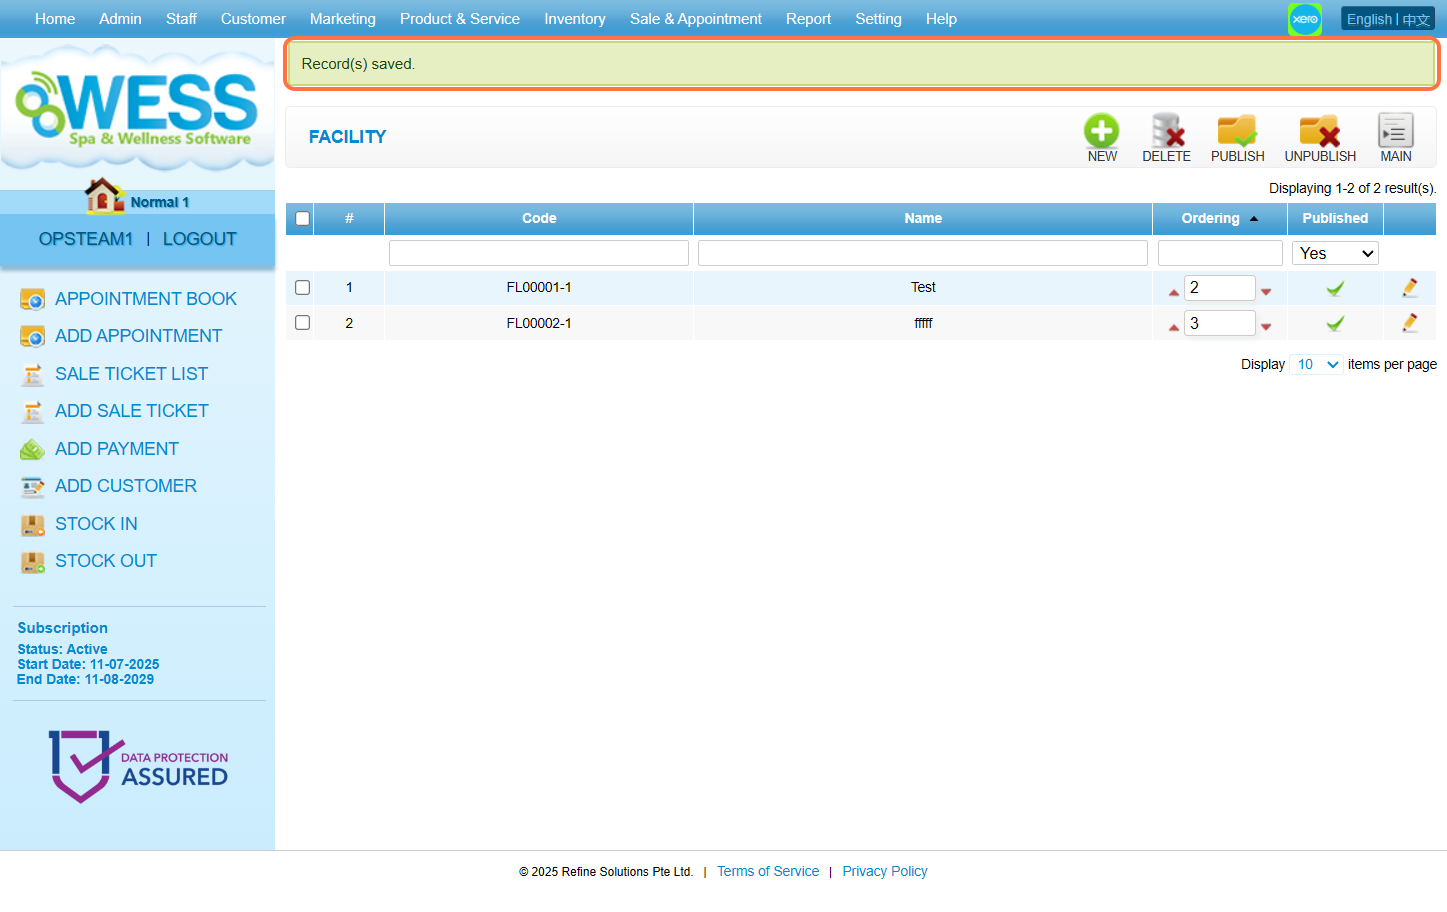
Step 7: Click “Sale & Appointment“.
Step 8: Click “APPOINTMENT“.
Step 9: Click on any appointment block to select it.
Step 10: Click on “Details” to show its related ticket.
Step 11: Click on triangle icon “▾” to expand additional information.
Step 12: Click “Facility“.
Step 13: Tick the checkbox “☑️” to select to-be-used facilities.
Step 14: Click “SET“.
Step 15: Make sure the changes has been saved.
Step 16: Click “LEAVE OPEN“.
Step 17: Make sure the changes has been saved.
Last Update: August 2025
https://wesshelp.wessconnect.com/2023/09/13/how-to-change-available-time-for-appointments/
Step 1: Click “Setting“.
Step 2: Click “APPOINTMENT SETTING“.
Step 3: Click “Start Time” field to start editing.
Step 4: Can change the time by moving the slider.
Step 5: Click “Done“.
Step 6: Click the End Time to start editing.
Step 7: Can change the time by moving the slider.
Step 8: Click “Done“.
Step 9: [Optional] Set the offset to see the schedule after the available time.
Step 10: Click “SAVE“.
Step 11: Make sure the changes has been saved.
Last Update: July 2024
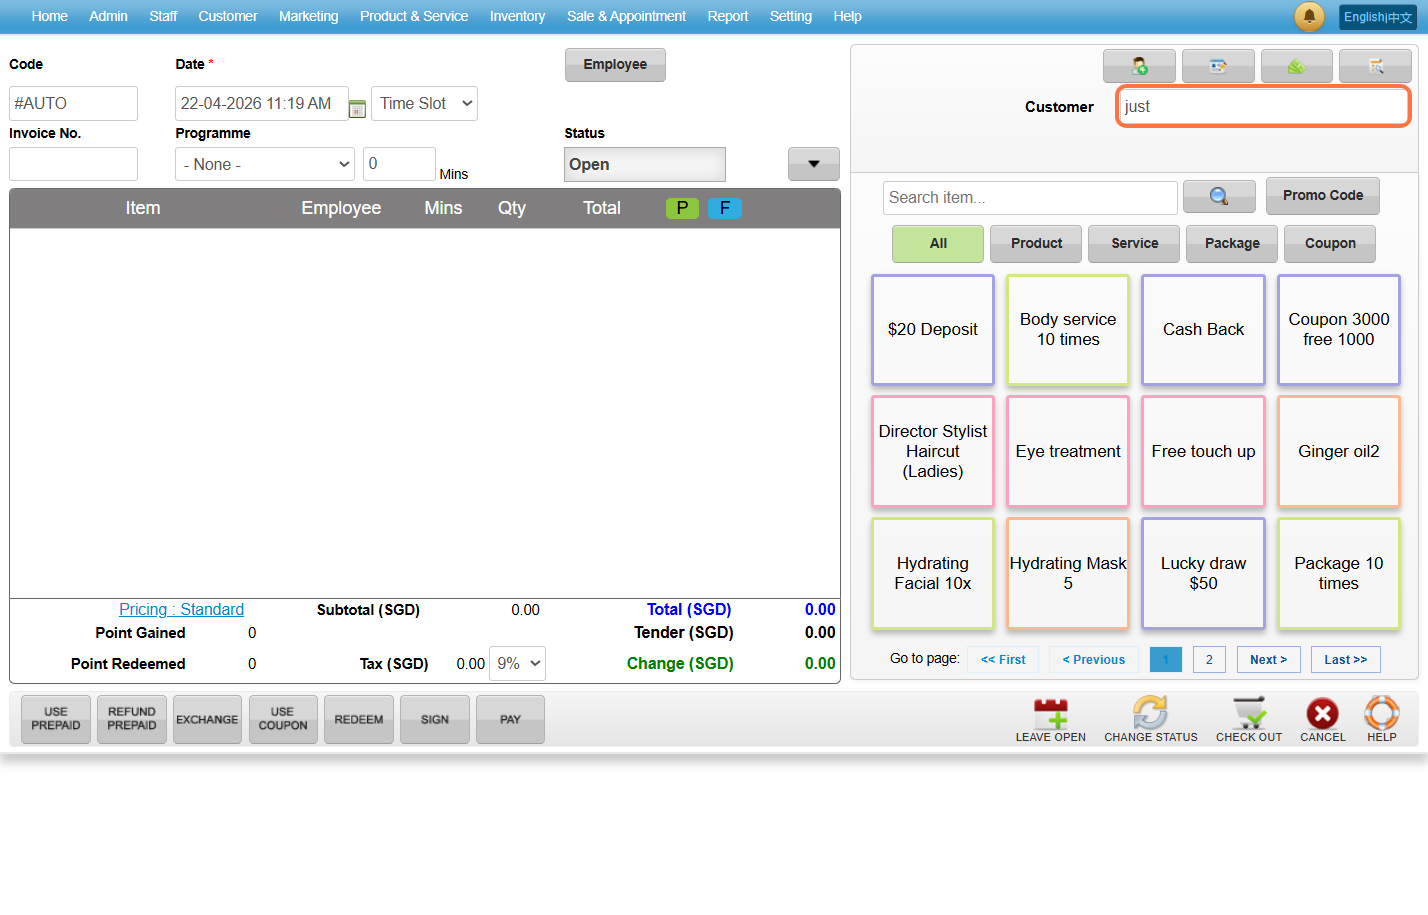
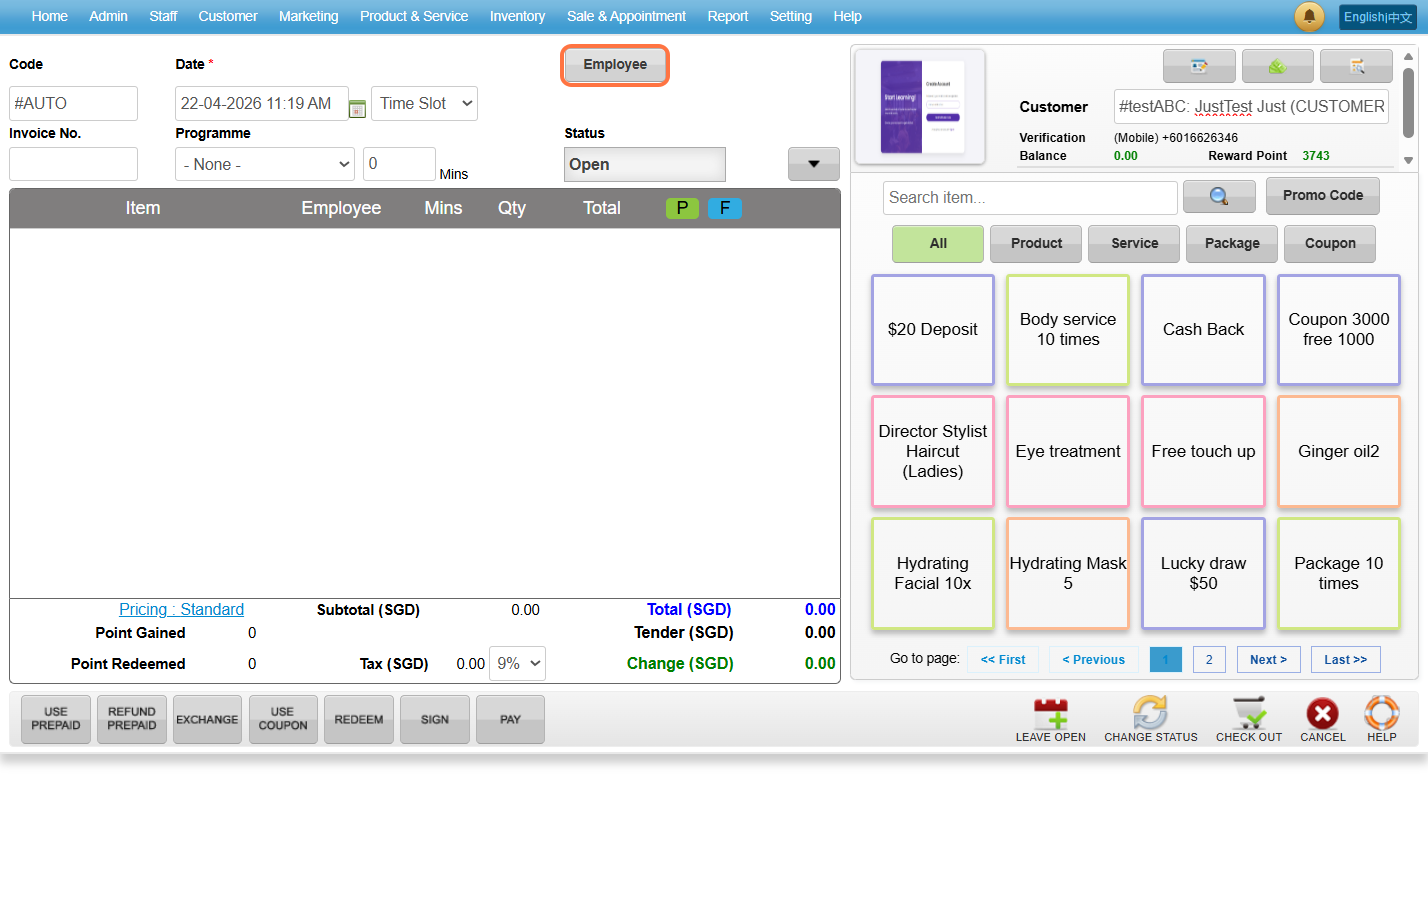
https://wesshelp.wessconnect.com/2021/06/17/how-to-add-new-sale-ticket/
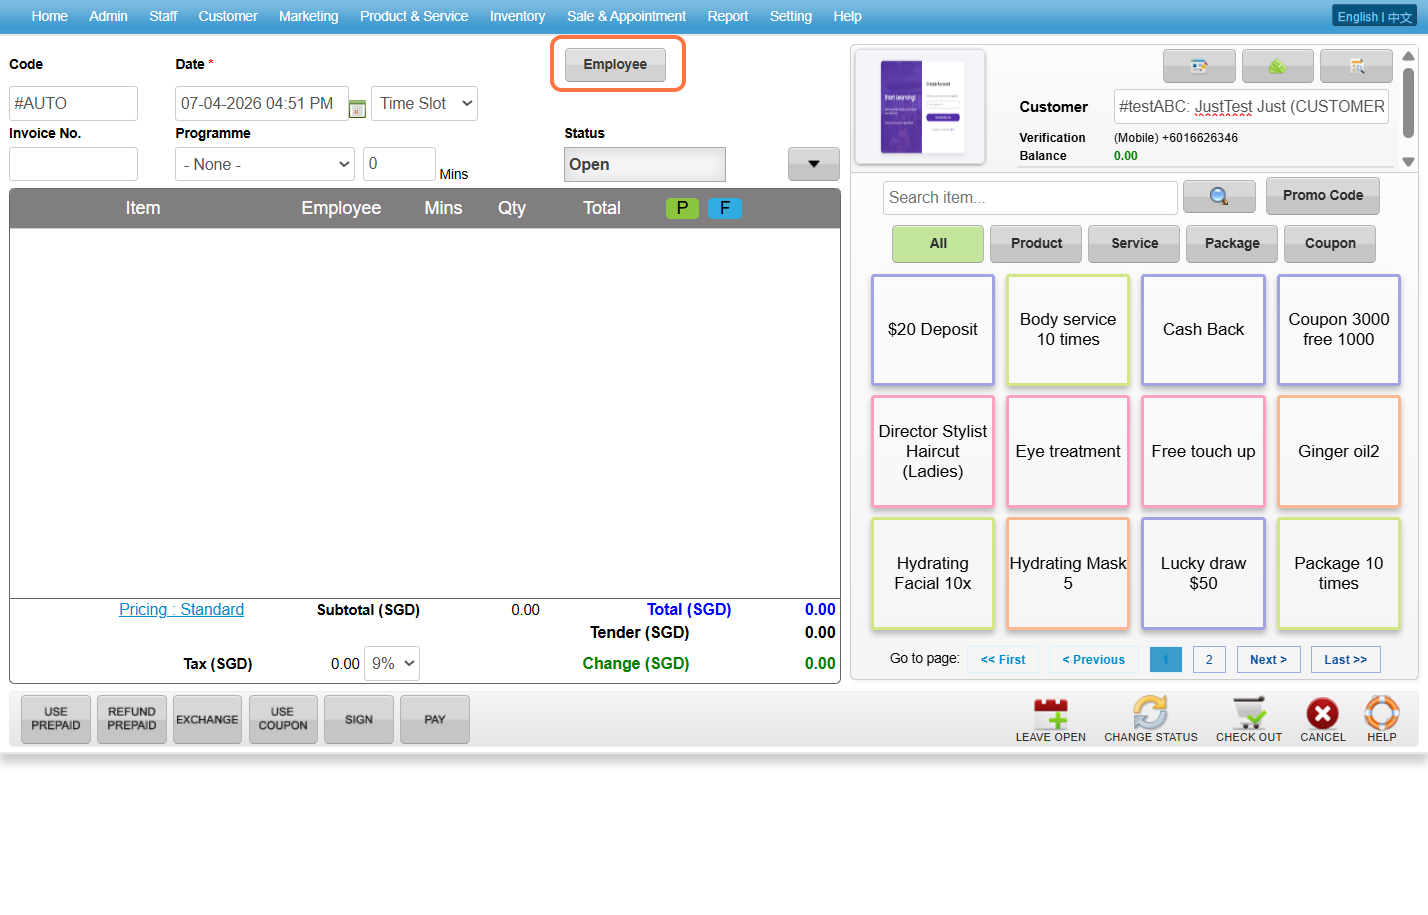
Step 1: Click “Sales & Appointment”
Step 2: Click “SALE TICKET”
Step 3: Click “NEW”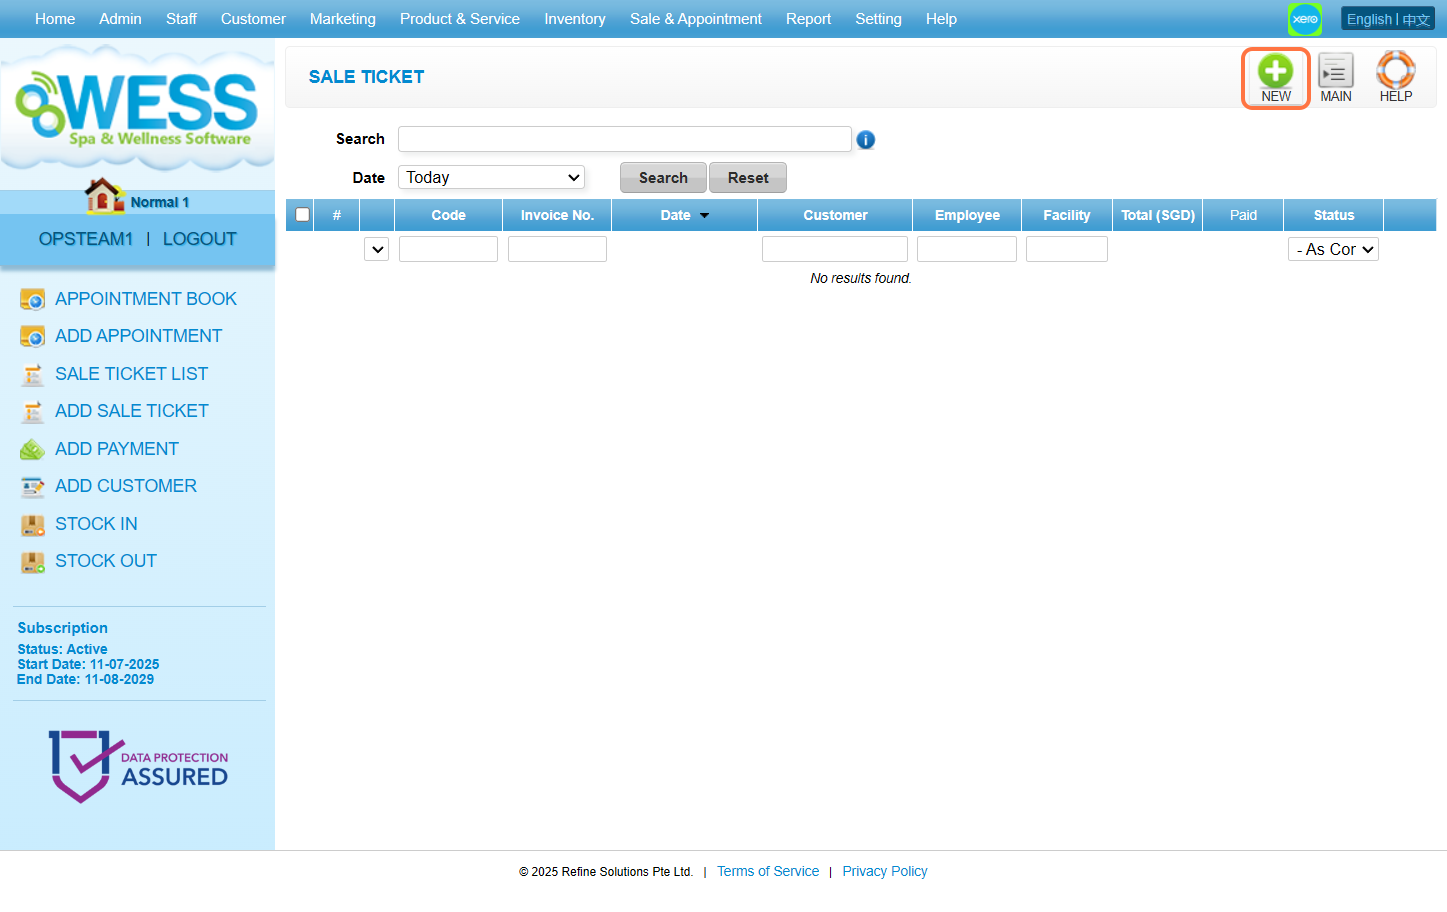
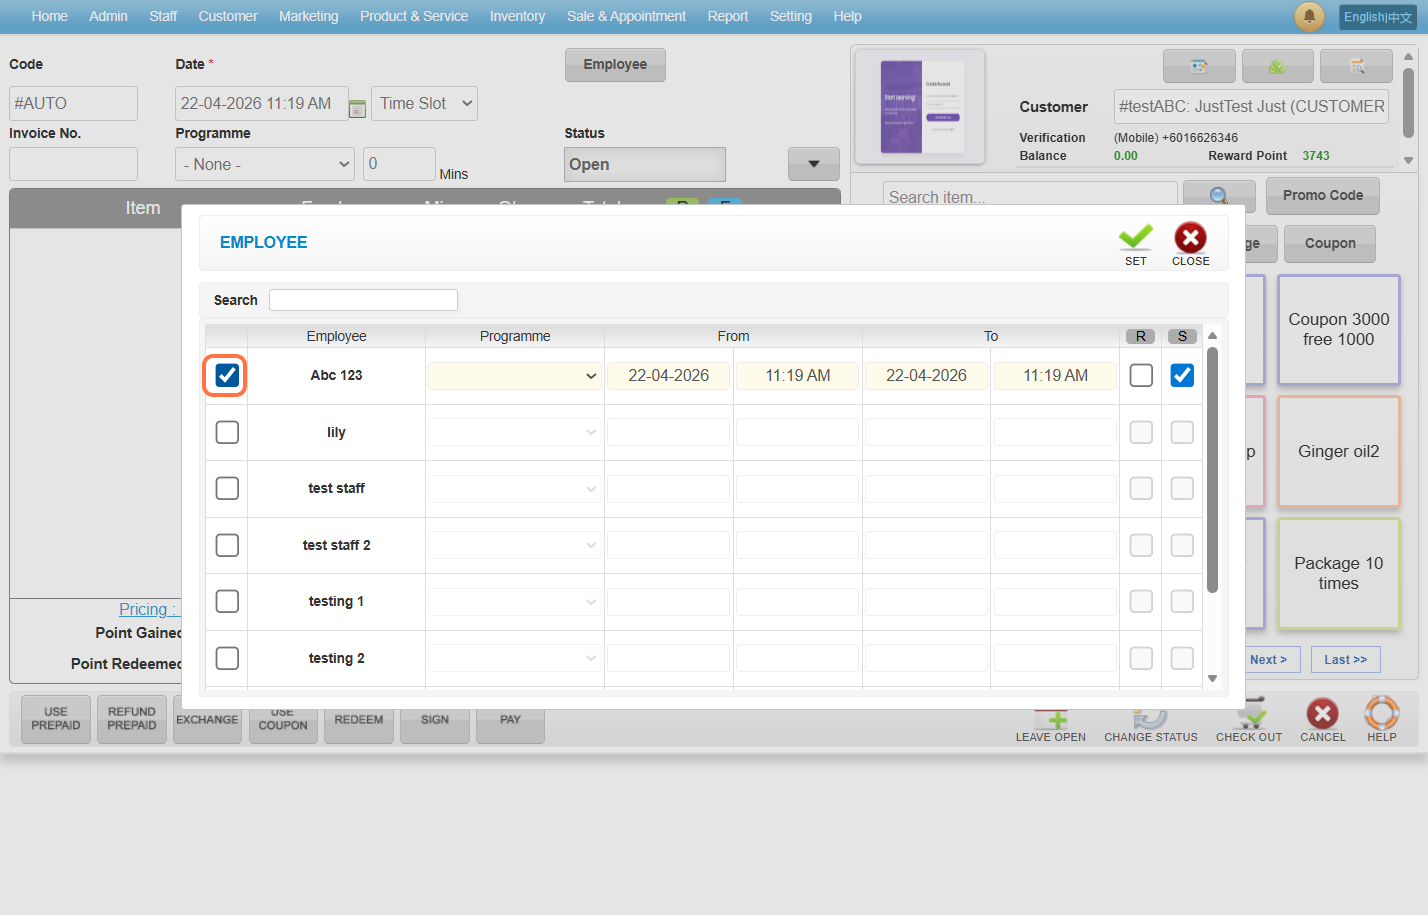
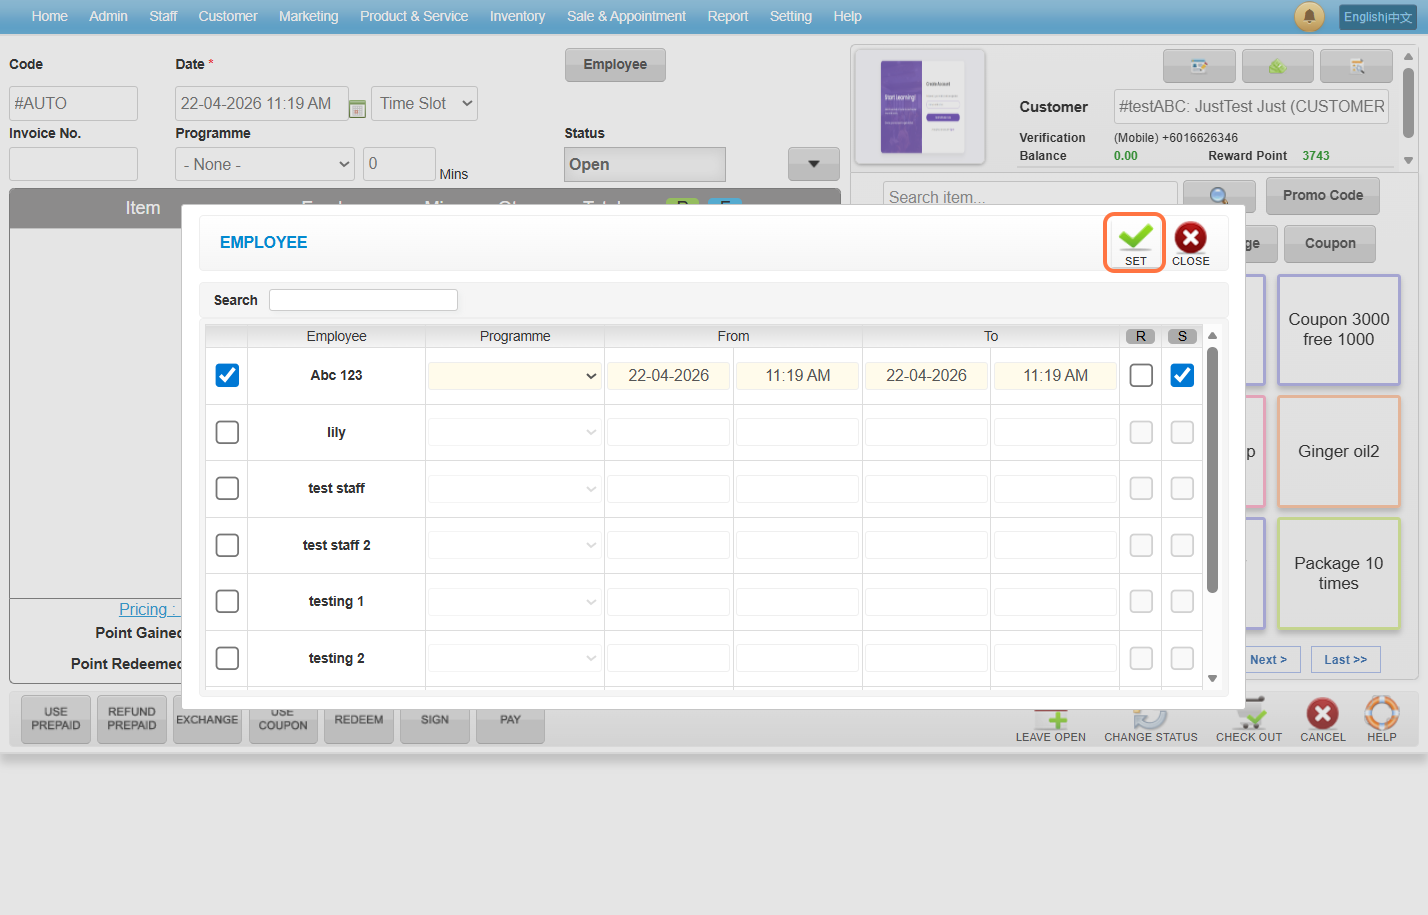
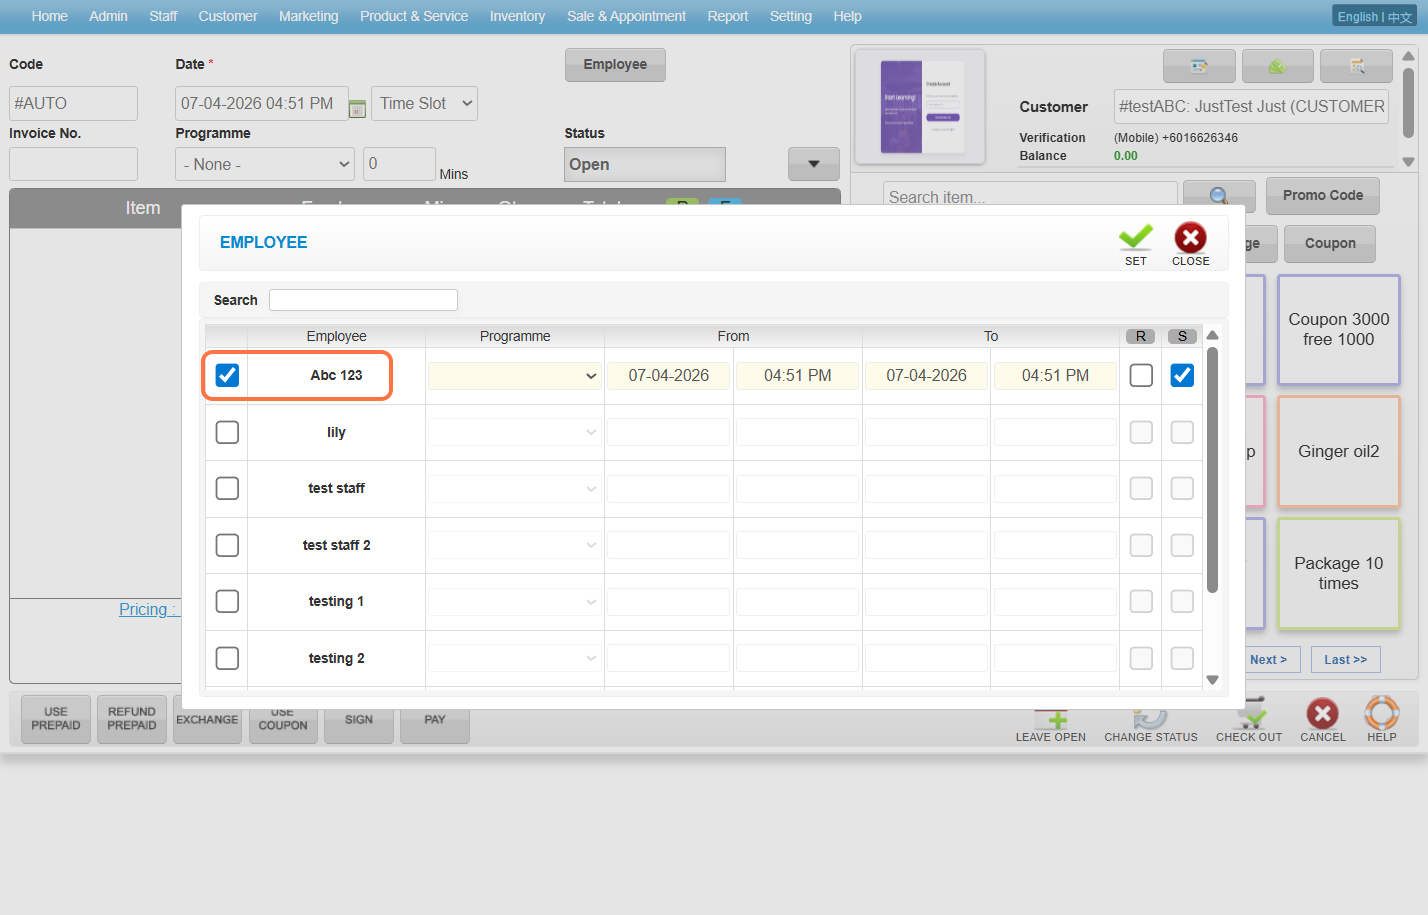
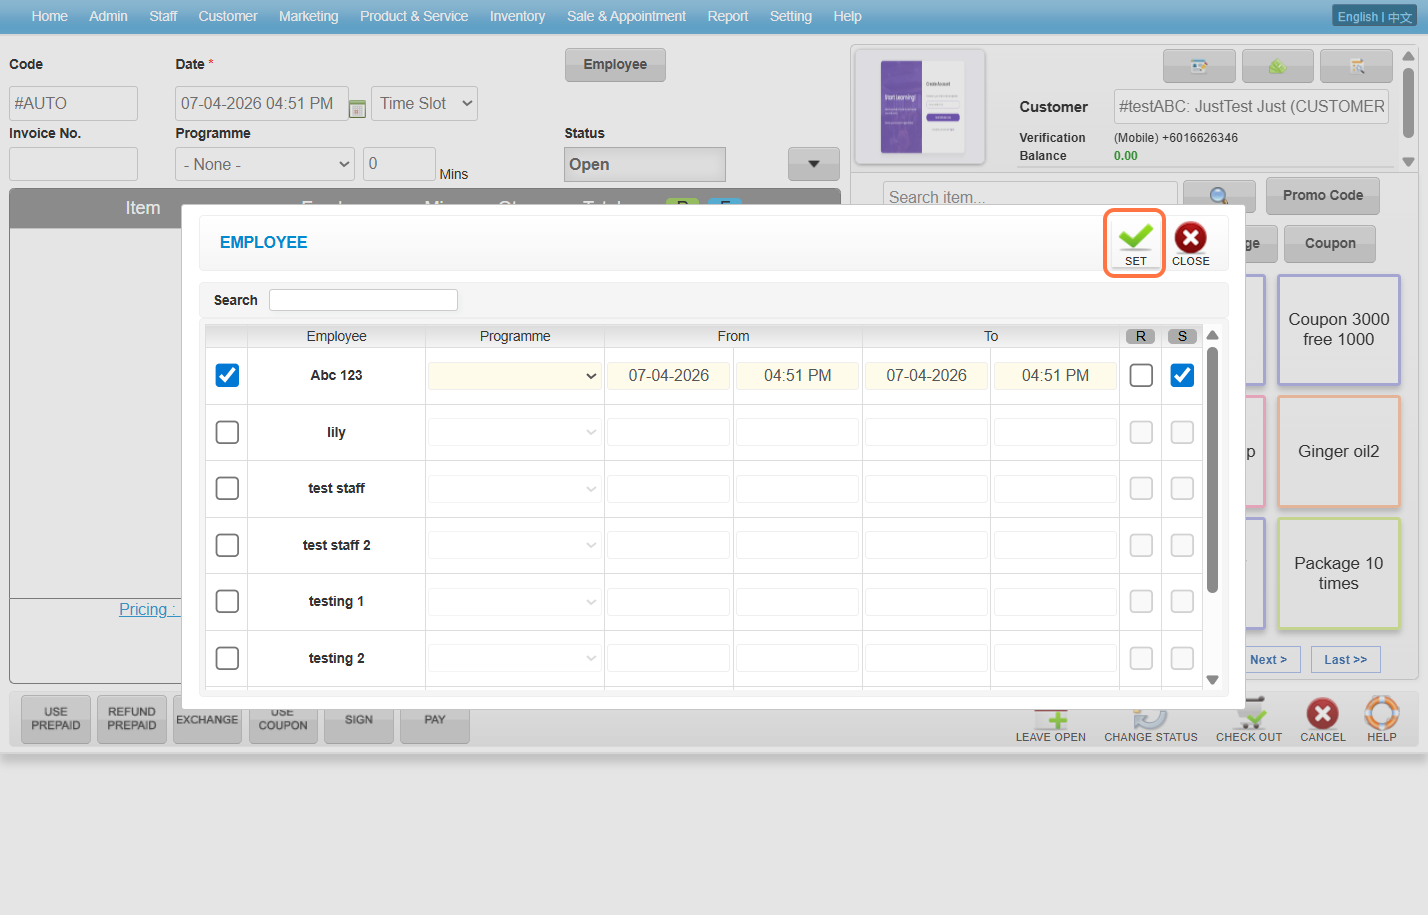
Step 4: Click “EMPLOYEE”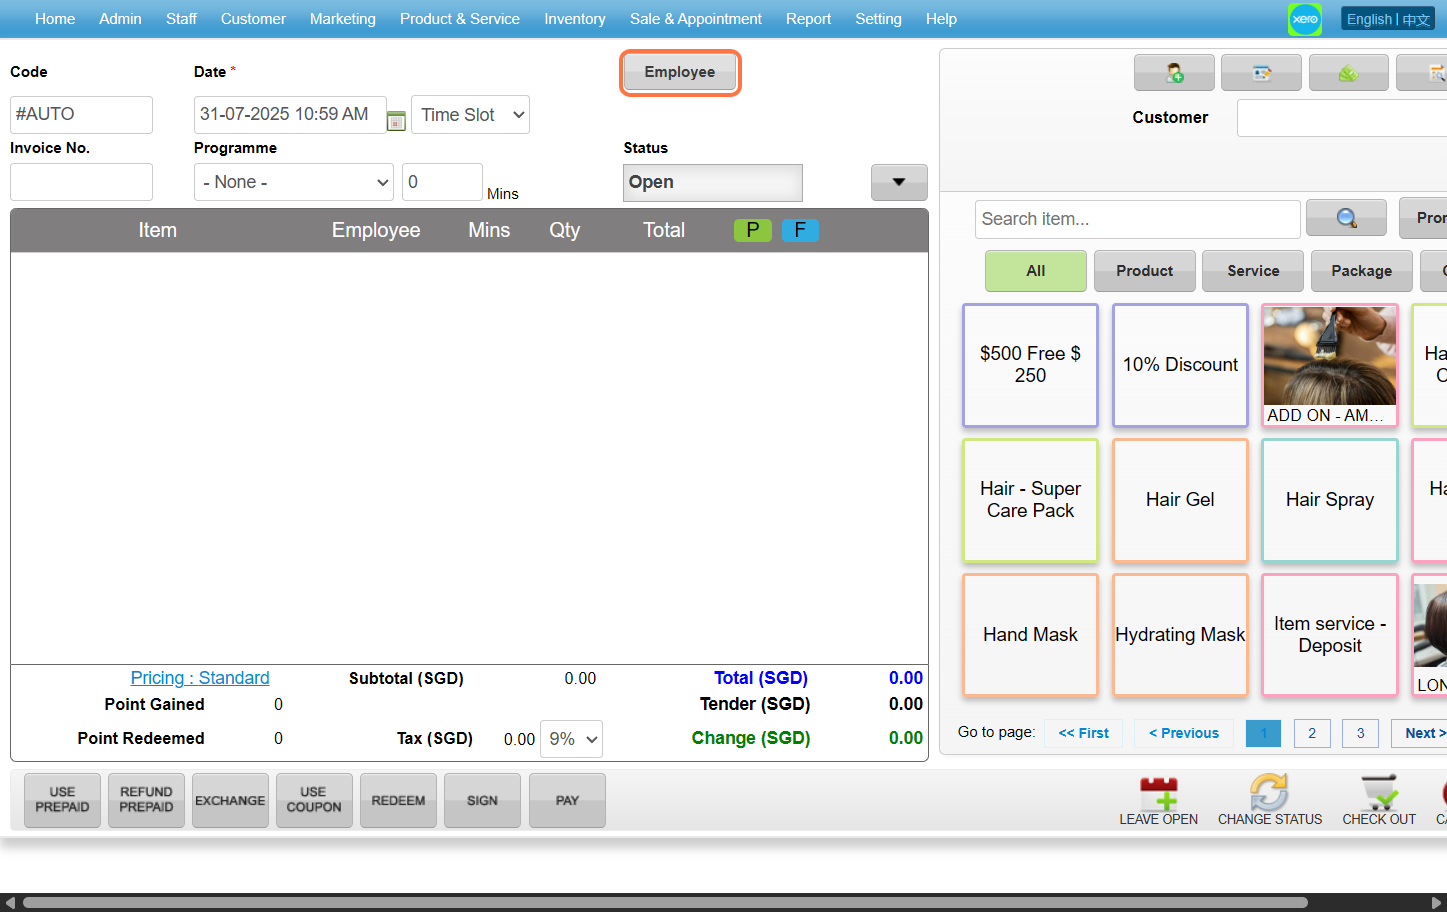
Step 5: Choose any employee you want then click “SET”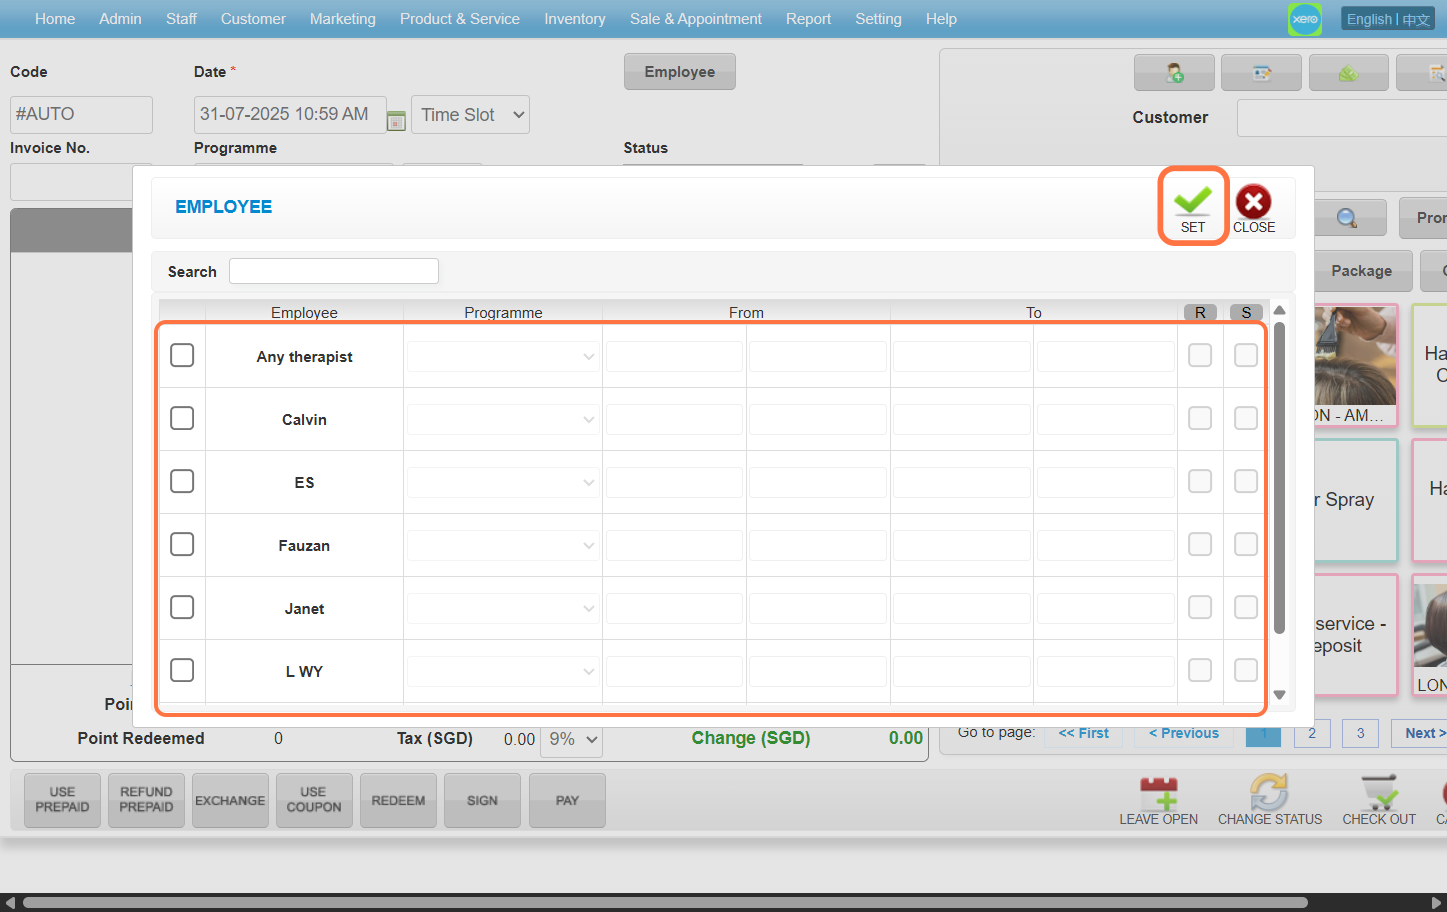
Step 6: Enter the customer name / code / phone number to search the customer you wanted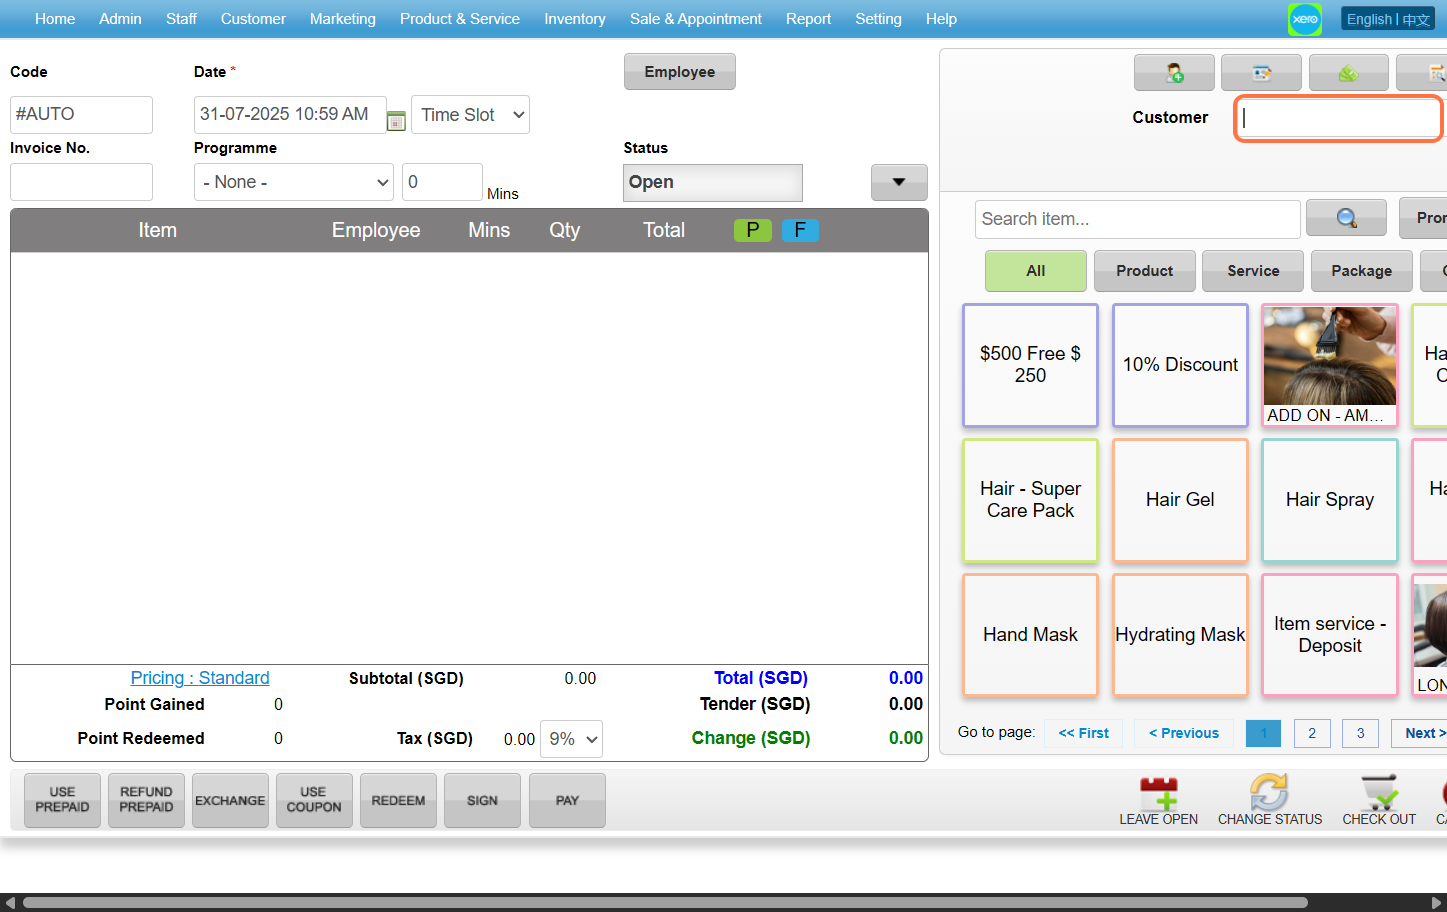
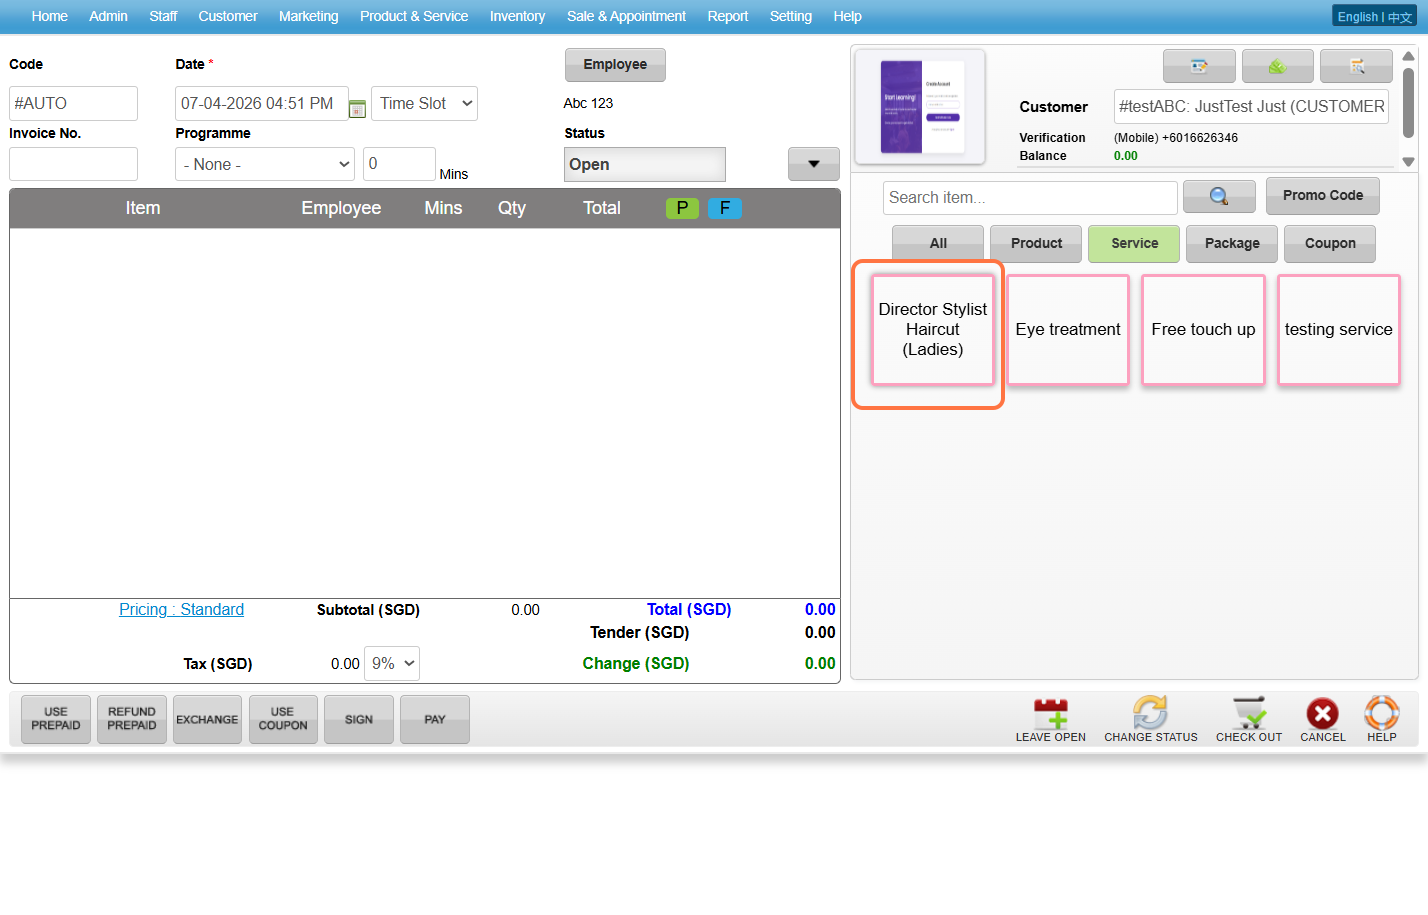
Step 7: Select the product / service / package / coupon that you wanted to choose
[!] Only favorited items, services, coupons, products etc will show up in the Sale Ticket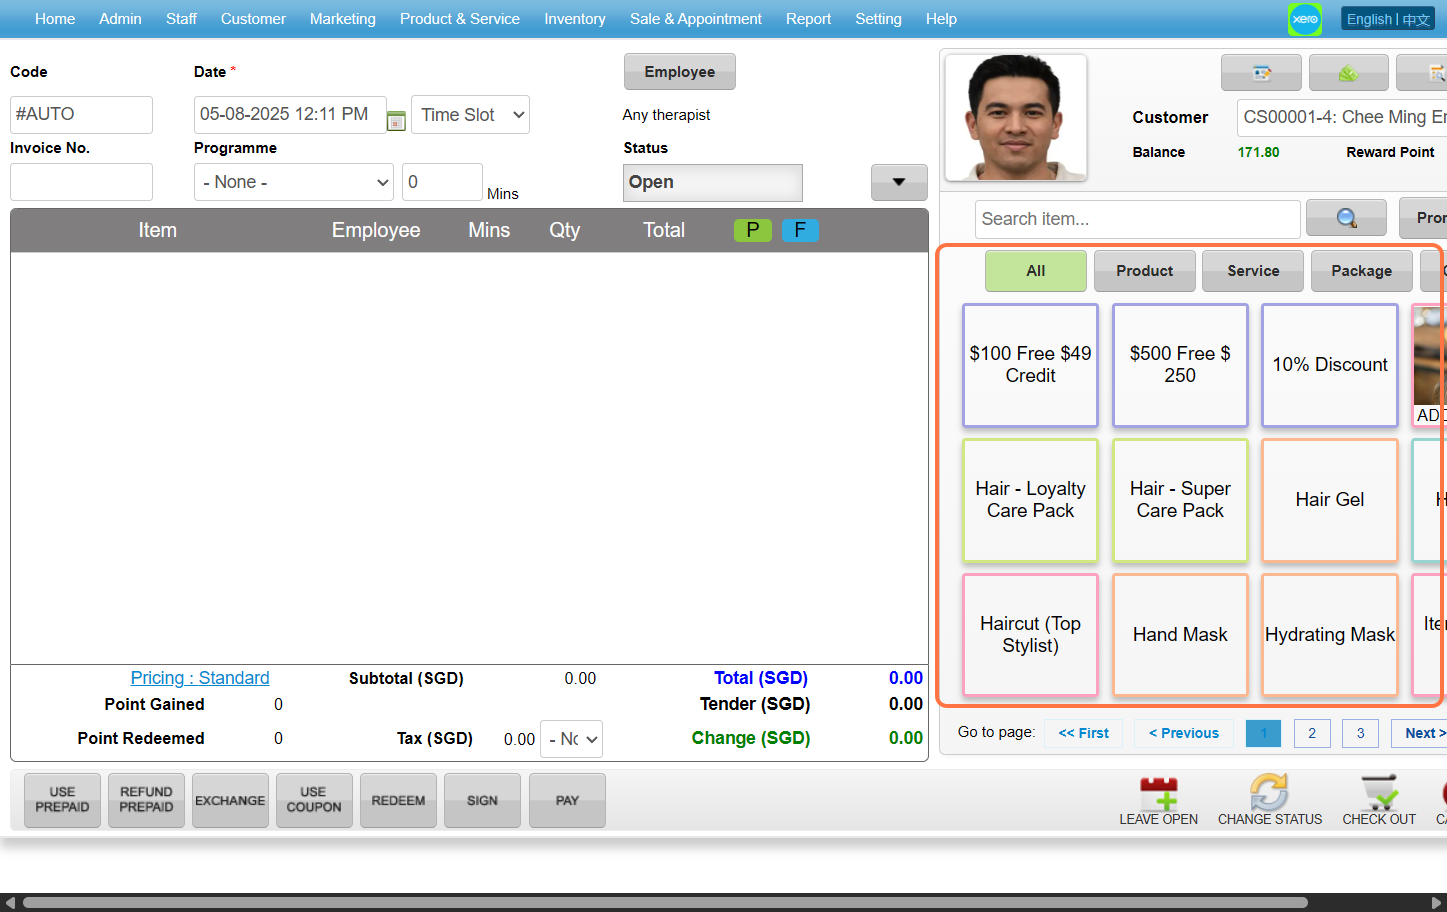
Step 8: Click “PAY”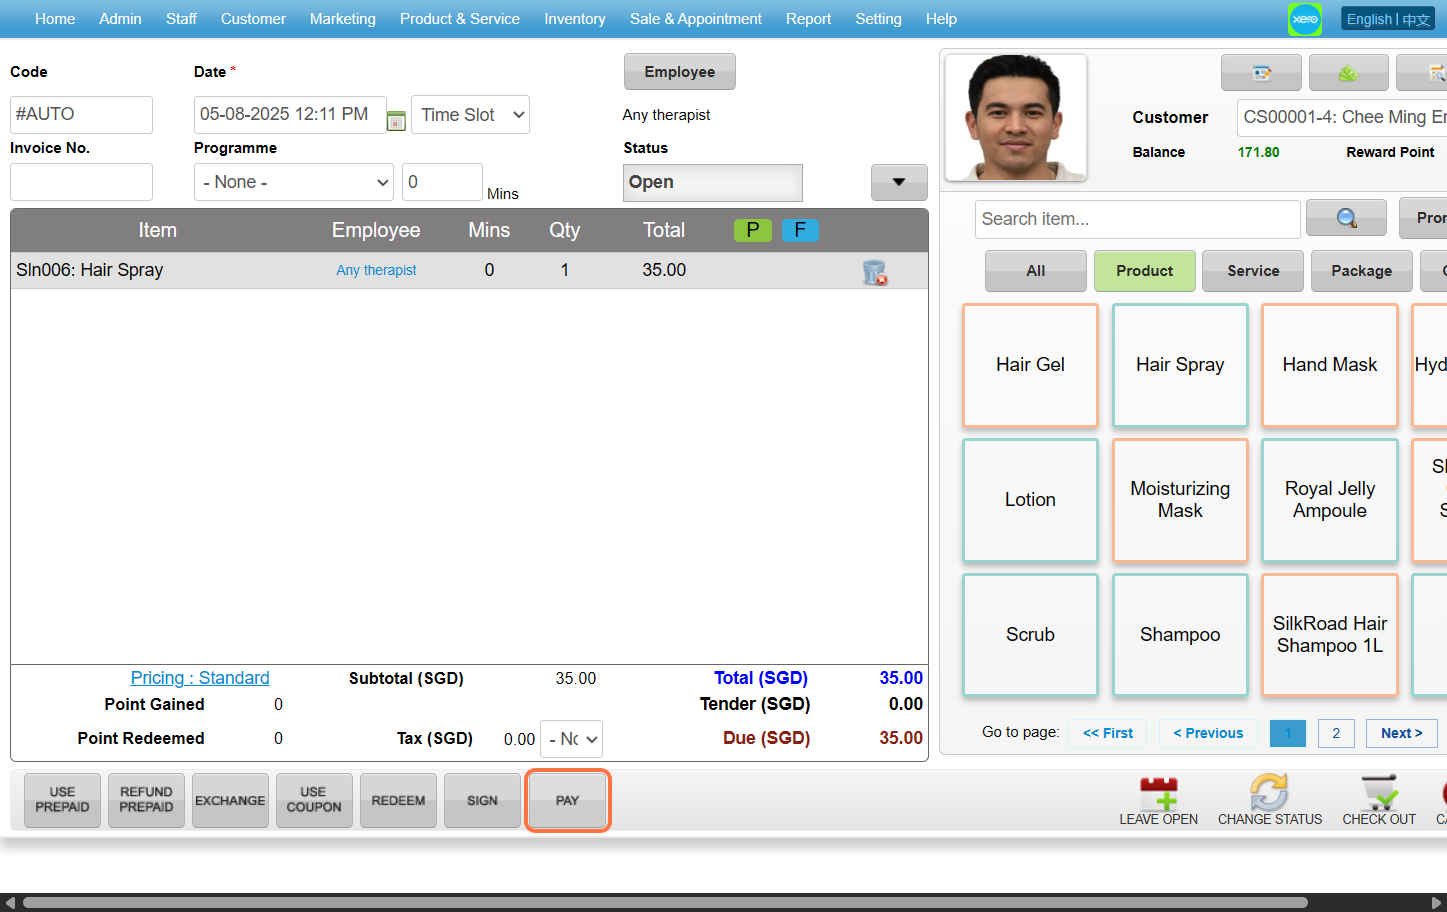
Step 9: Select the payment method and enter the amount paid by the customer.
[!] Full: Automatically sets the value to the total SGD amount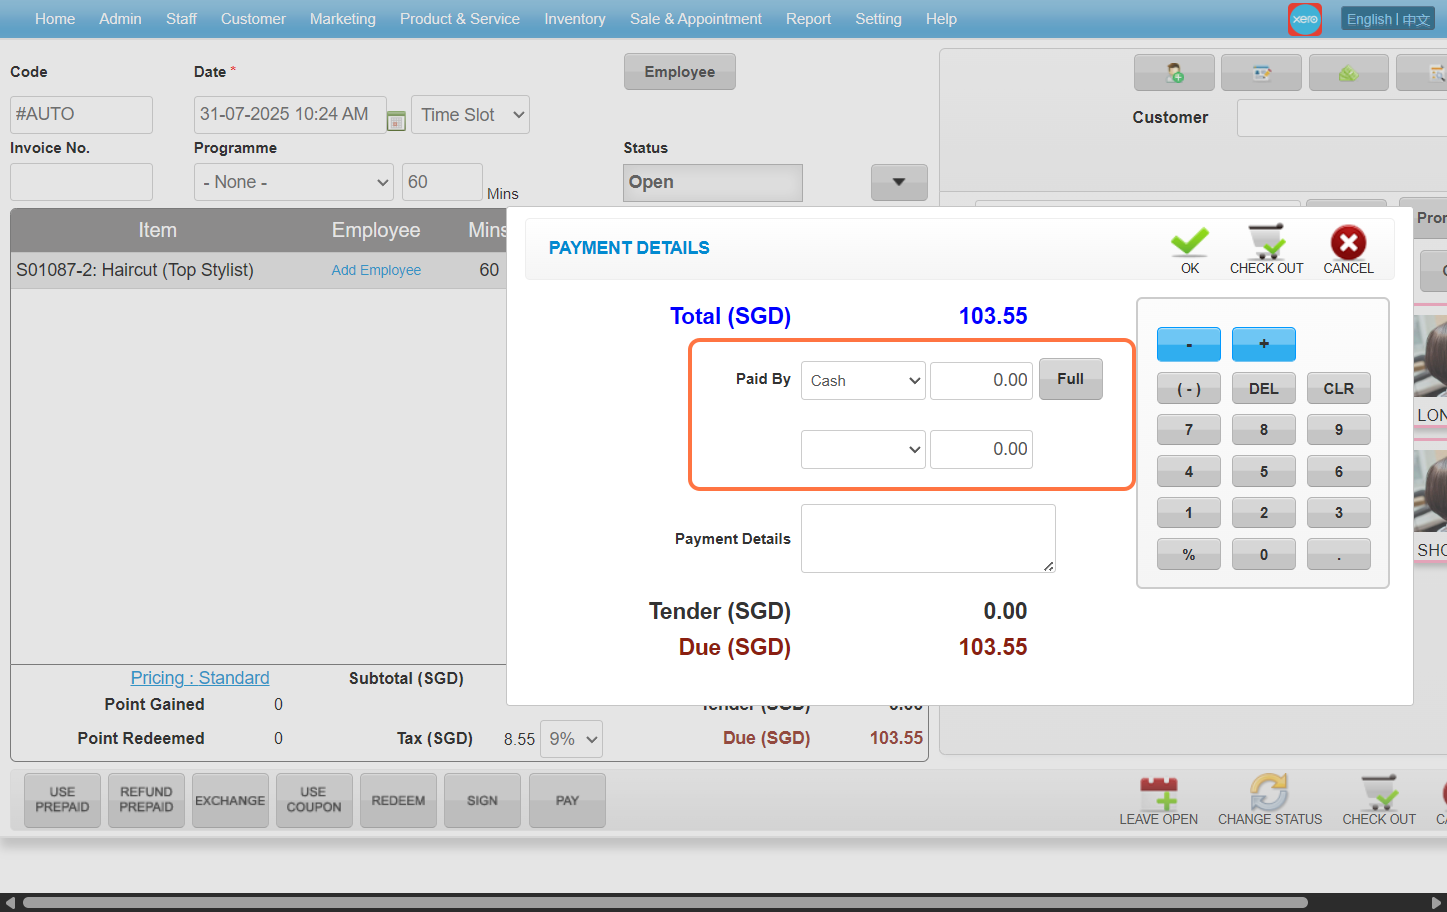
Step 10: Click “CHECK OUT” 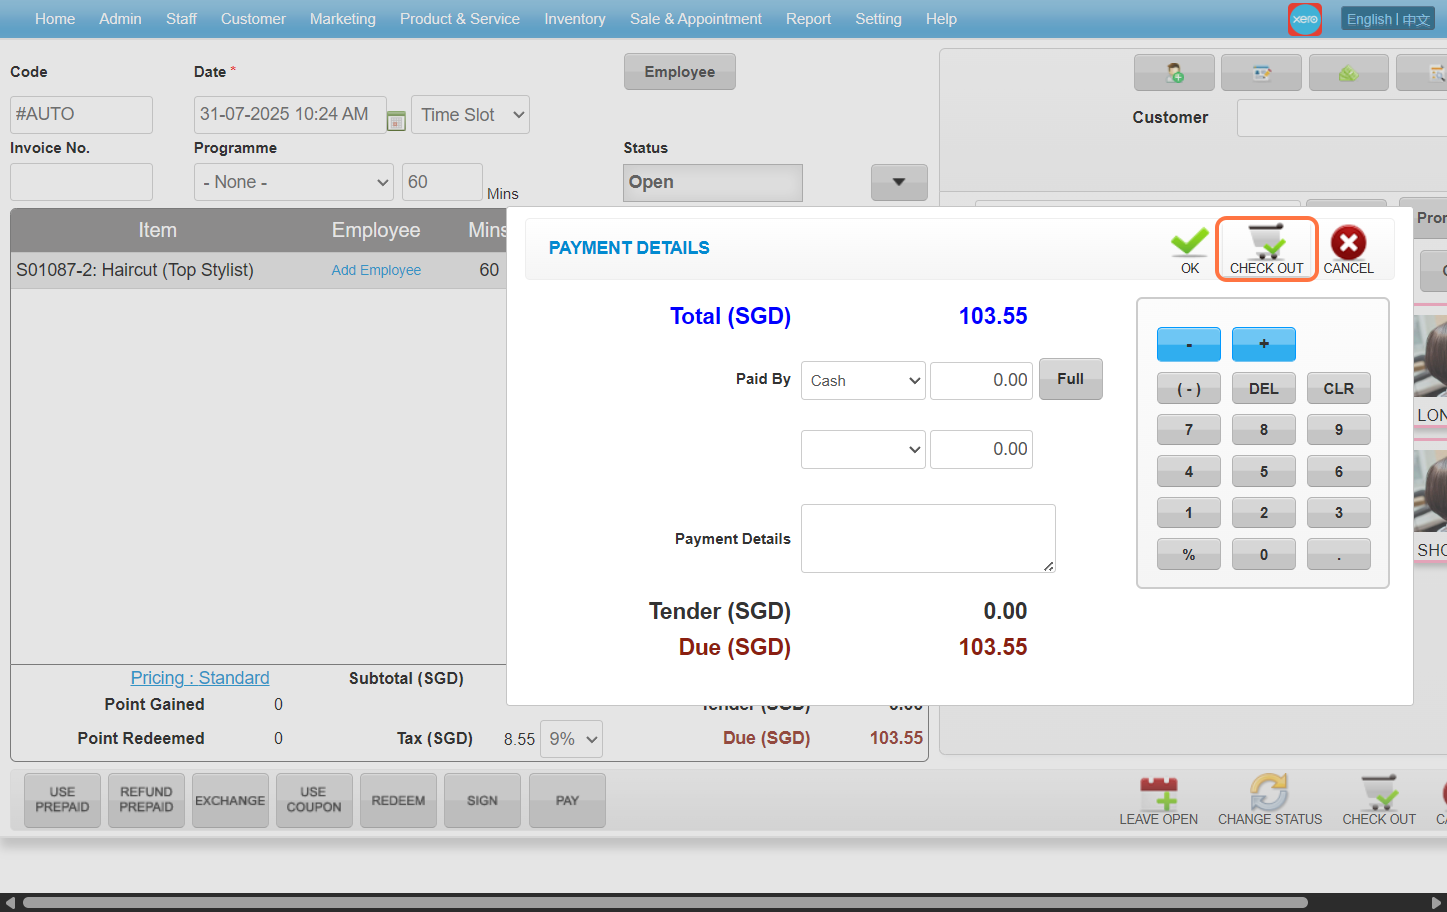
Last update: August 2025
https://wesshelp.wessconnect.com/2021/06/17/how-to-edit-item/
Step 1: Select the item.
Step 2: You can make the changes if needed.
Step 3: Click “OK”.
Note: A reminder message will appear to remind the user to tick “Prepaid” when the customer purchases more than one service items.
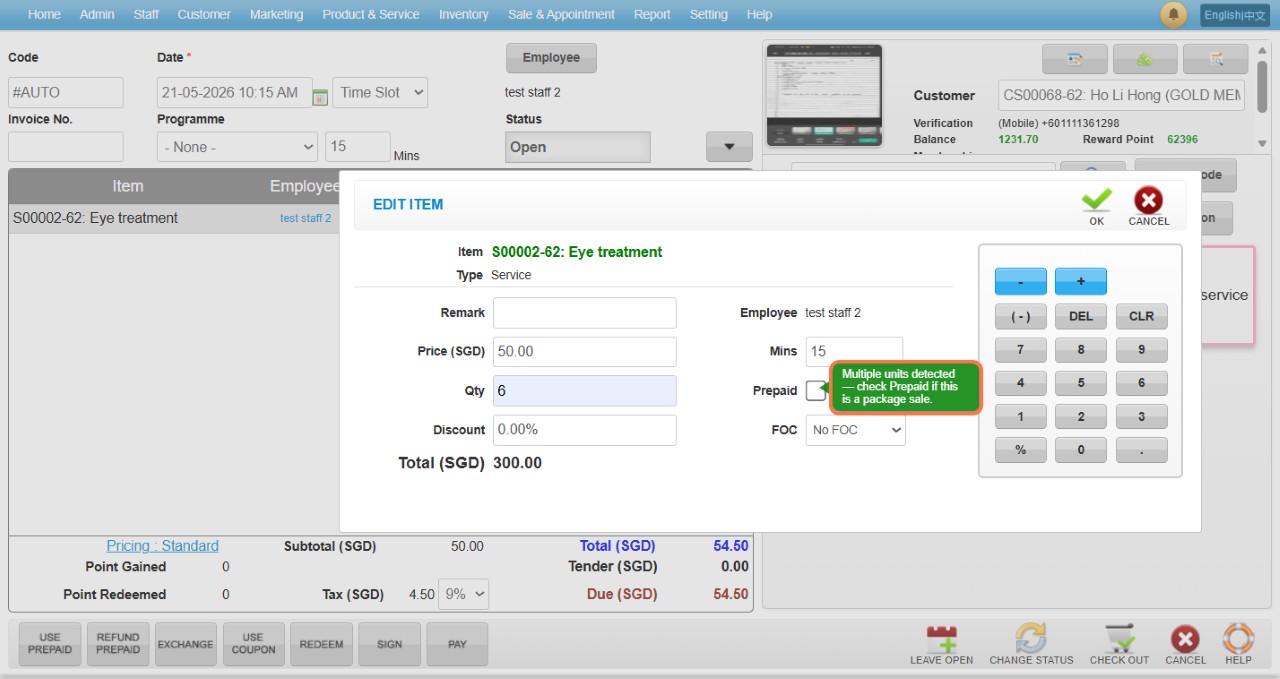
Last update: May 2026
https://wesshelp.wessconnect.com/2021/06/17/how-to-edit-sale-ticket/
Step 1: Click “SALE TICKET LIST”.
Step 2: Select any past sale ticket record you want to edit.
Step 3: Click “EDIT”.
Step 4: Make any edit changes that is needed
Step 5: Payment details can also be changed.
Step 6: Click “CHECK OUT” to check out again.
(*This will not cause the system generate two sale ticket)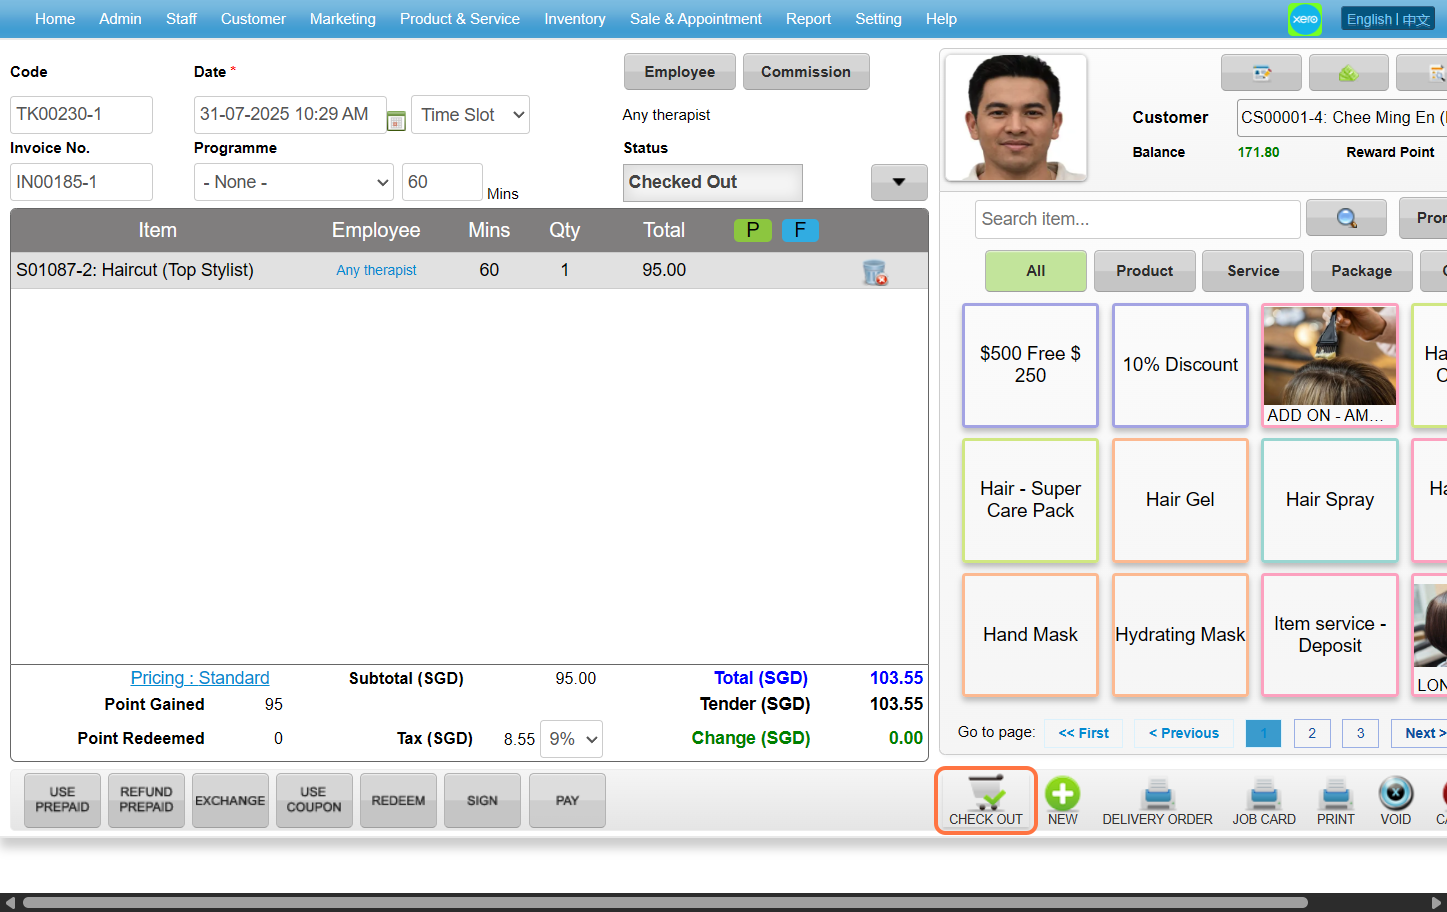
Last update: August 2025
https://wesshelp.wessconnect.com/2021/06/17/how-to-void-sale-ticket/
Step 1: Click “SALE TICKET LIST”.
Step 2: Select the sale ticket record.
Step 3: Click “EDIT”.
Step 4: Click “VOID”.
Last update: April 2021
https://wesshelp.wessconnect.com/2024/08/06/how-to-void-a-sale-ticket-record-with-remain-items/
[i] Unable to directly void an item with a remain, this error message occurs.
Step 1: Click “Edit“.
Step 2: Delete all remain item records.
Step 3: Ensure that no record of the remain is shown.
Step 4: Click “CHECKOUT“ to saved.
Step 5: Make sure the change has been saved.
Step 6: Click “VOID“.
Step 7: Make sure the record has been voided.
Last Updated: Aug 2024
https://wesshelp.wessconnect.com/2021/06/17/how-to-deduct-customer-session-package/
Step 1: Click the “EMPLOYEE”.
Step 2: Choose the employee and click “SET”.
Step 3: Enter the customer name / code / phone number to search.
Step 4: Click “USE PREPAID”.
Step 5: Select the session package and enter the quantity.
Step 6: Click “ADD & CLOSE”.
Step 7: Click “CHECKOUT”.
Last update: November 2022
https://wesshelp.wessconnect.com/2021/06/17/how-to-deduct-customer-credit-package/
Step 1: Click the “EMPLOYEE”.
Step 2: Choose the employee and click “SET”.
Step 3: Enter the customer name / code / phone number to search.
Step 4: Click “USE PREPAID”.
Step 5: Select the credit package and enter the use quantity.
Step 6: Click “ADD & CLOSE”.
Step 7: Search the item by item name / type / section / category and select the item.
Step 8: Click “ADD & CLOSE”.
Step 9: Click “CHECKOUT”.
Last update: November 2022
https://wesshelp.wessconnect.com/2021/06/17/how-to-use-2-credit-coupon-to-redeem-the-item/
Step 1: Click dollar icon “💲”.
Step 2: Select the credit package and enter the amount that want to use.
(*Credit Payable: Amount of the credit need to pay)
Step 3: Click “SET”.
Step 4: Click “CHECKOUT”.
Last update: November 2022
https://wesshelp.wessconnect.com/2021/06/17/how-to-use-transferable-coupon/
Step 1: Click “USE COUPON”.
Step 2: Search the item by item name / shortname / section / category and select the coupon.
Step 3: Click “ADD & CLOSE”.
Step 4: The coupon is applied already.
Last update: April 2021
https://wesshelp.wessconnect.com/2021/06/17/how-to-redeem-item-with-loyalty-point/
Step 1: Click “Sales & Appointment”
Step 2: Click “SALE TICKET”
Step 3: Click “NEW”
Step 4: Click “EMPLOYEE”
Step 5: Select any of the employee you want to choose before clicking “SET”
Step 6: Enter the customer name / code / phone number to search the customer you wanted
Step 7: Click “REDEEM”.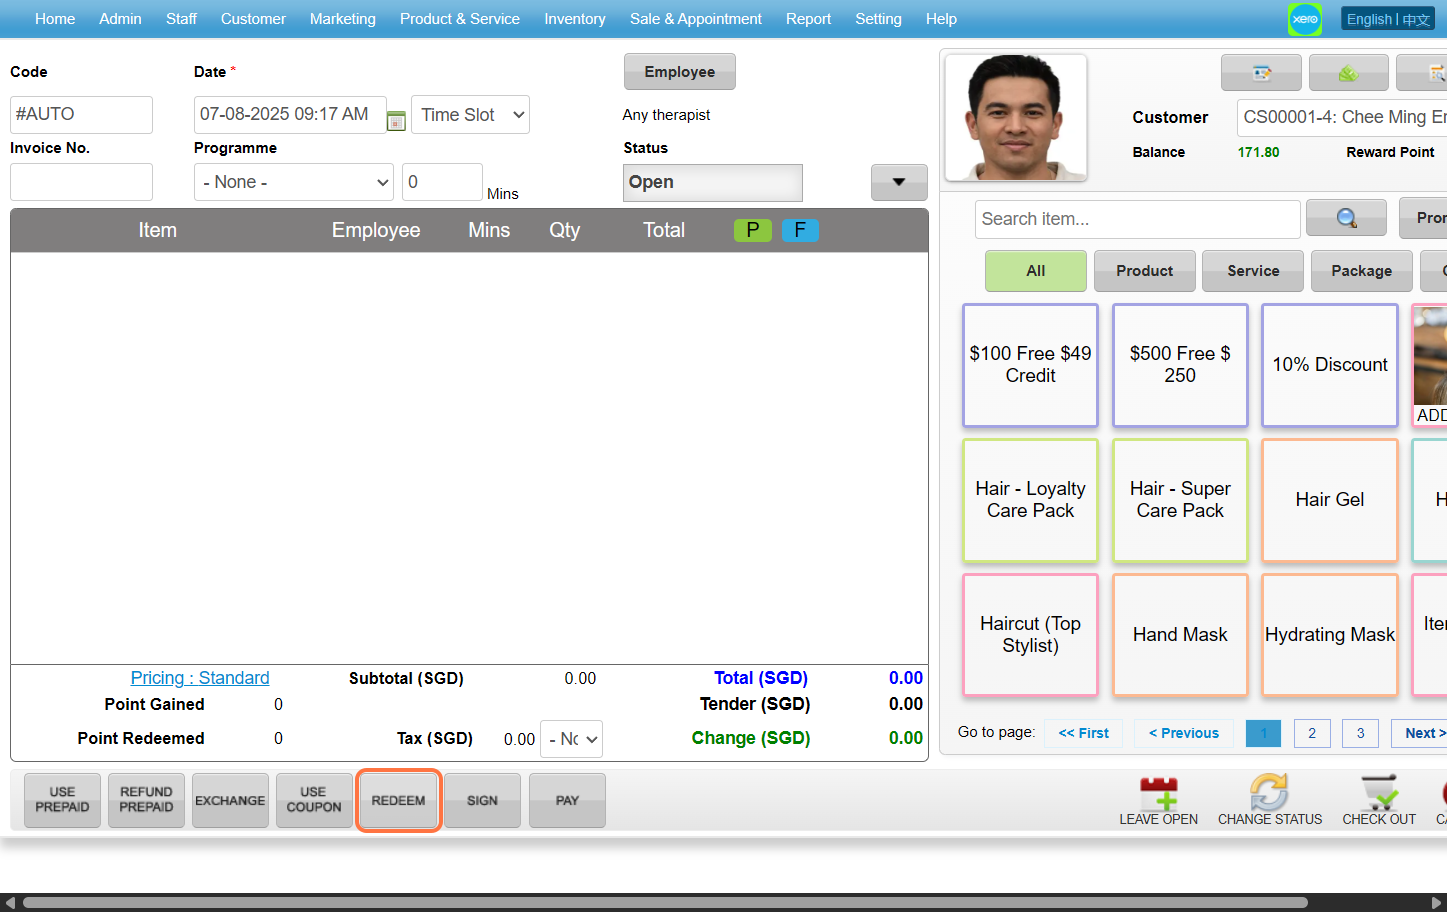
Step 8: Search the redeem item by item name / type / section / category and select the redeem item. Click “ADD & CLOSE” after done setting up.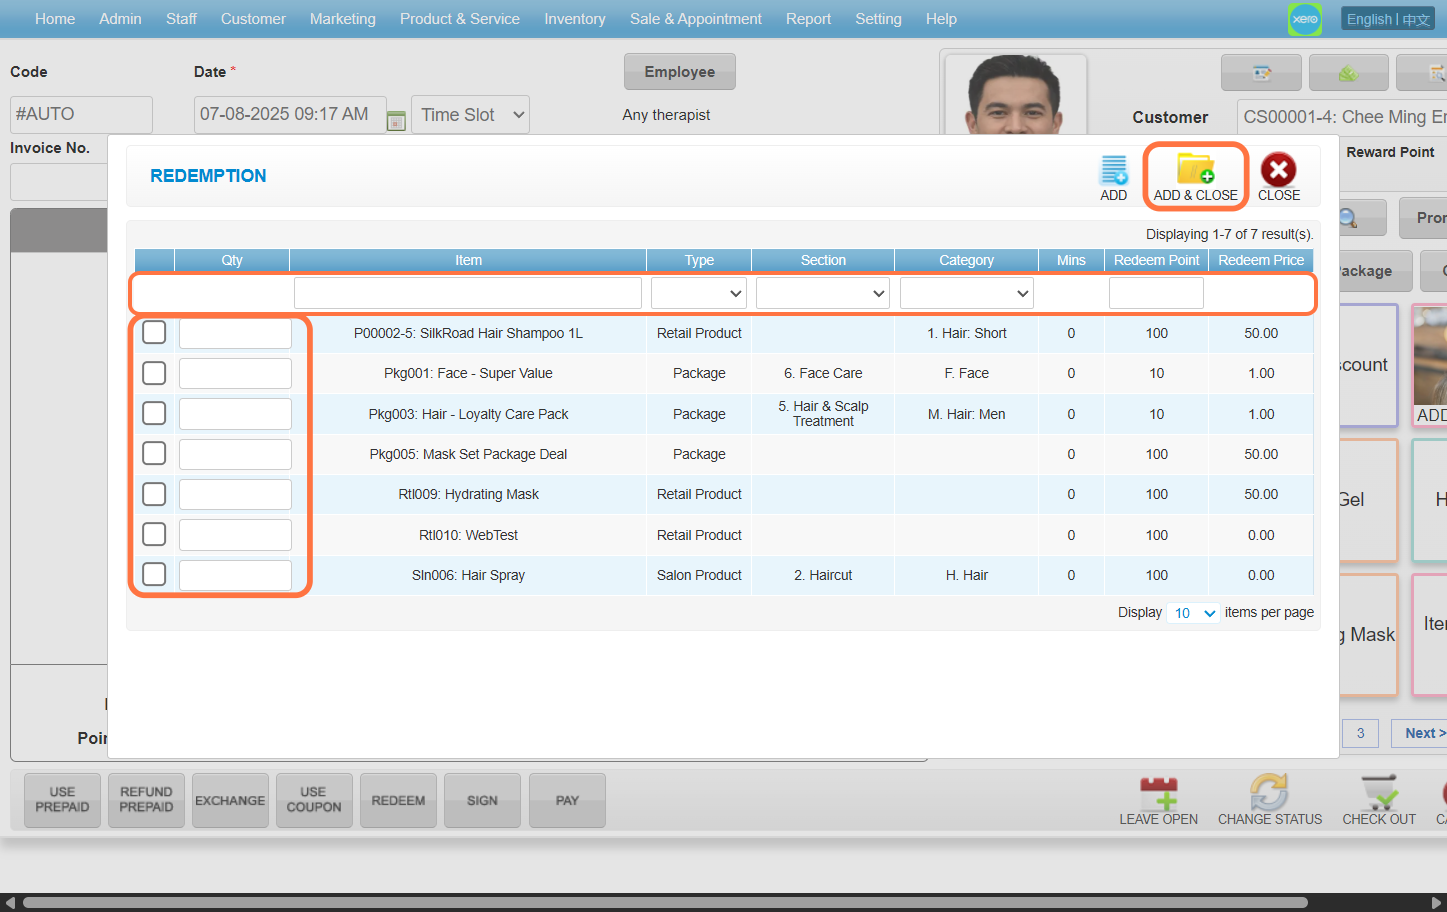
Step 9: Ensure the redeem item is added.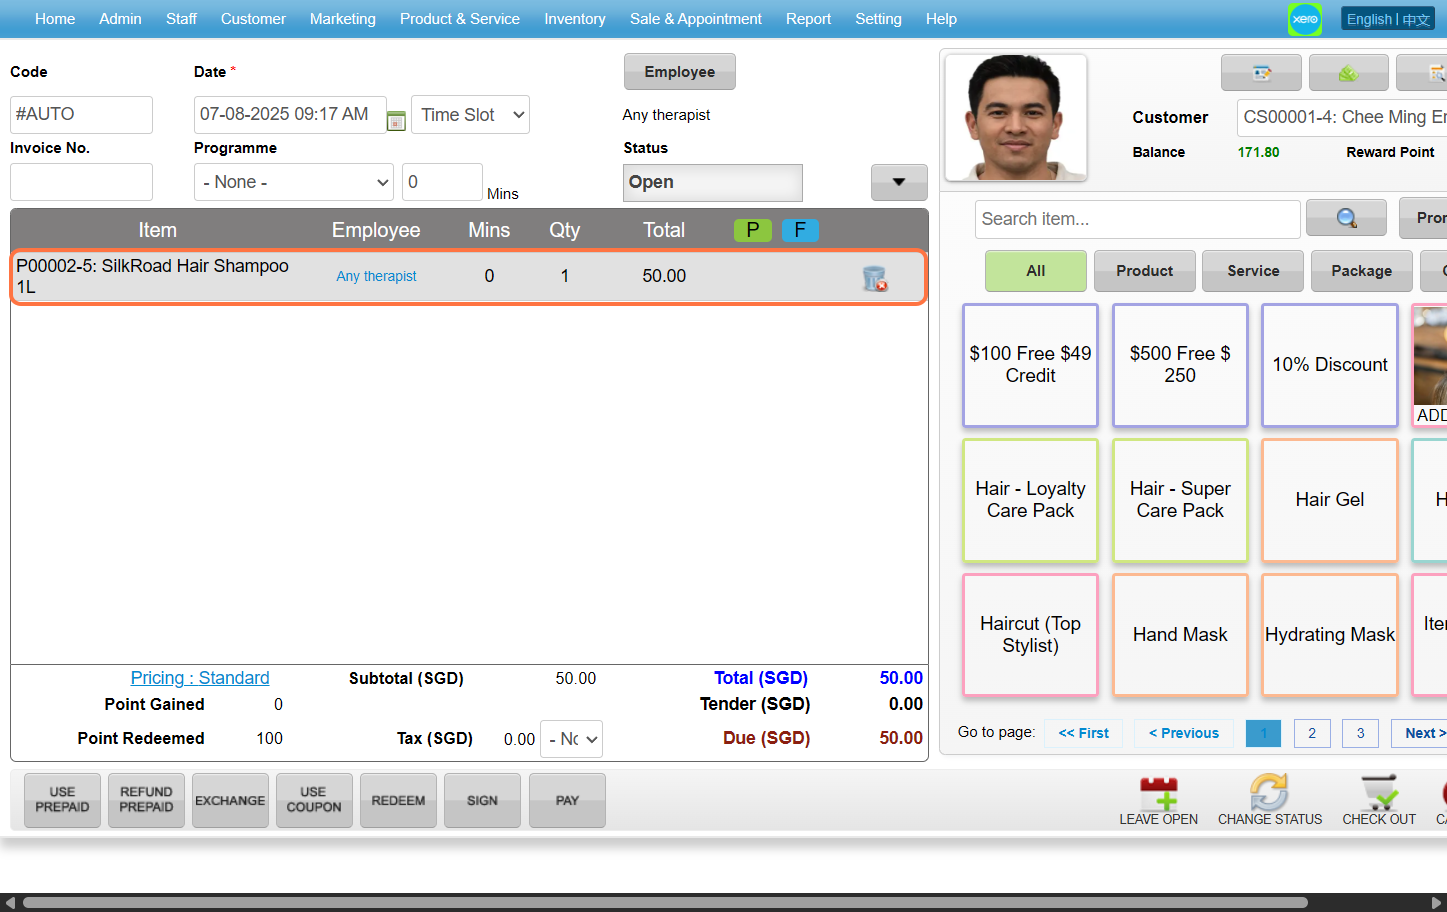
Last update: August 2025
https://wesshelp.wessconnect.com/2021/06/17/how-to-use-promo-code-to-redeem/
[!] Click this guide if you haven’t created any Promo Code.
Step 1: Click “PROMO CODE”.
Step 2: Enter the promo code.
Step 3: Click “APPLY CODE”.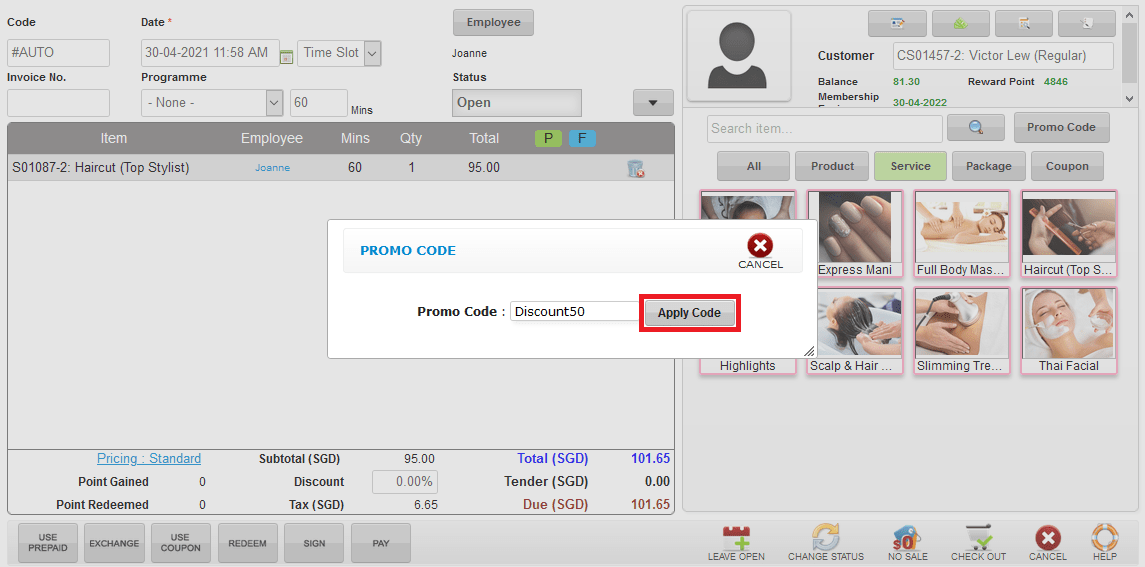
Step 4: The promo code is applied already.
Last update: August 2025
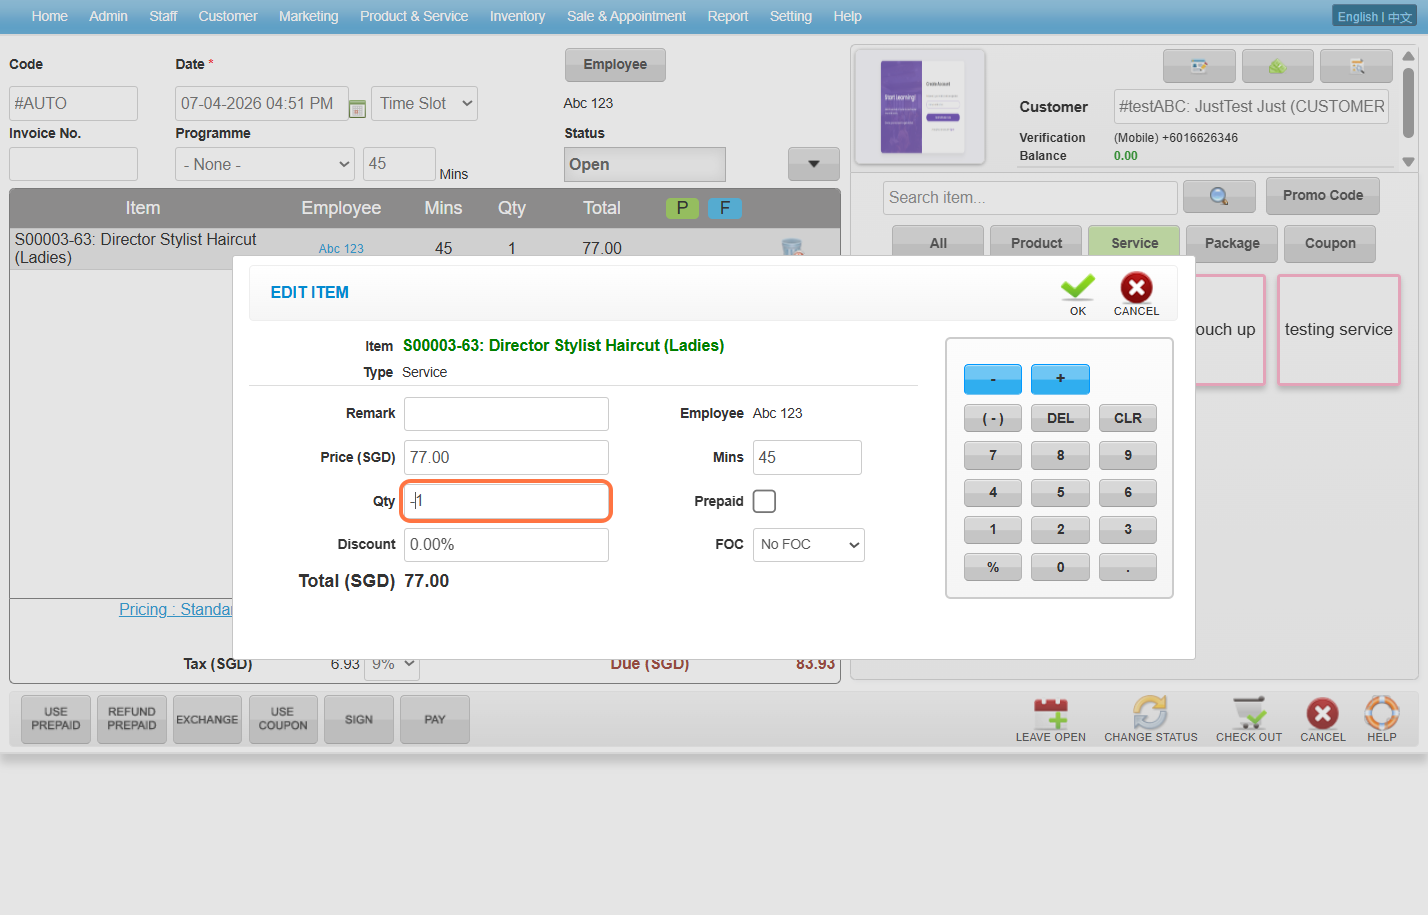
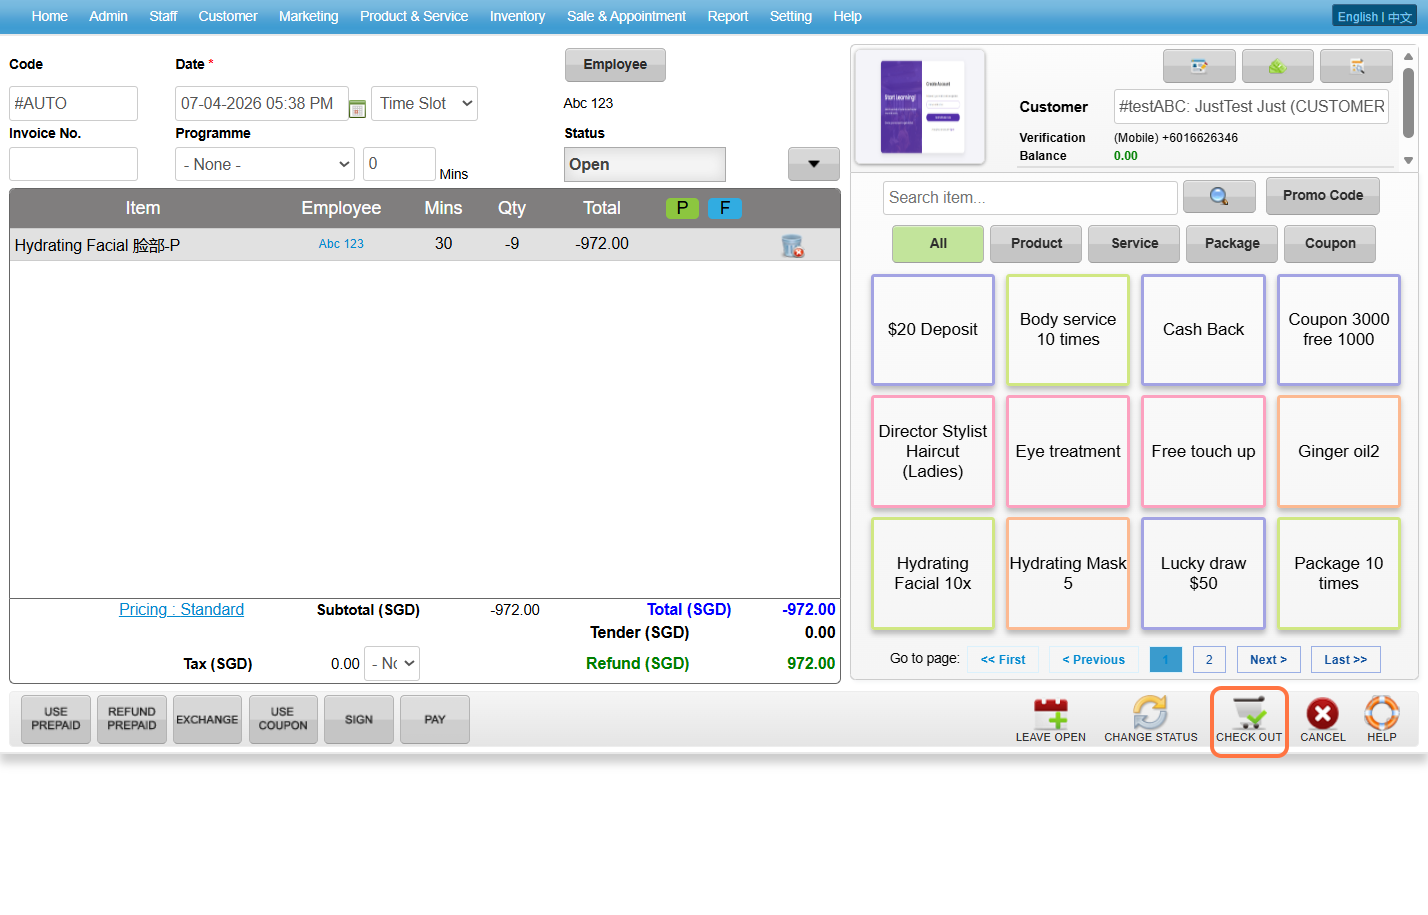
https://wesshelp.wessconnect.com/2021/06/17/how-to-refund-non-prepaid-item/
Step 1: Click “Sale & Appointment”
Step 2: Click “SALE TICKET” 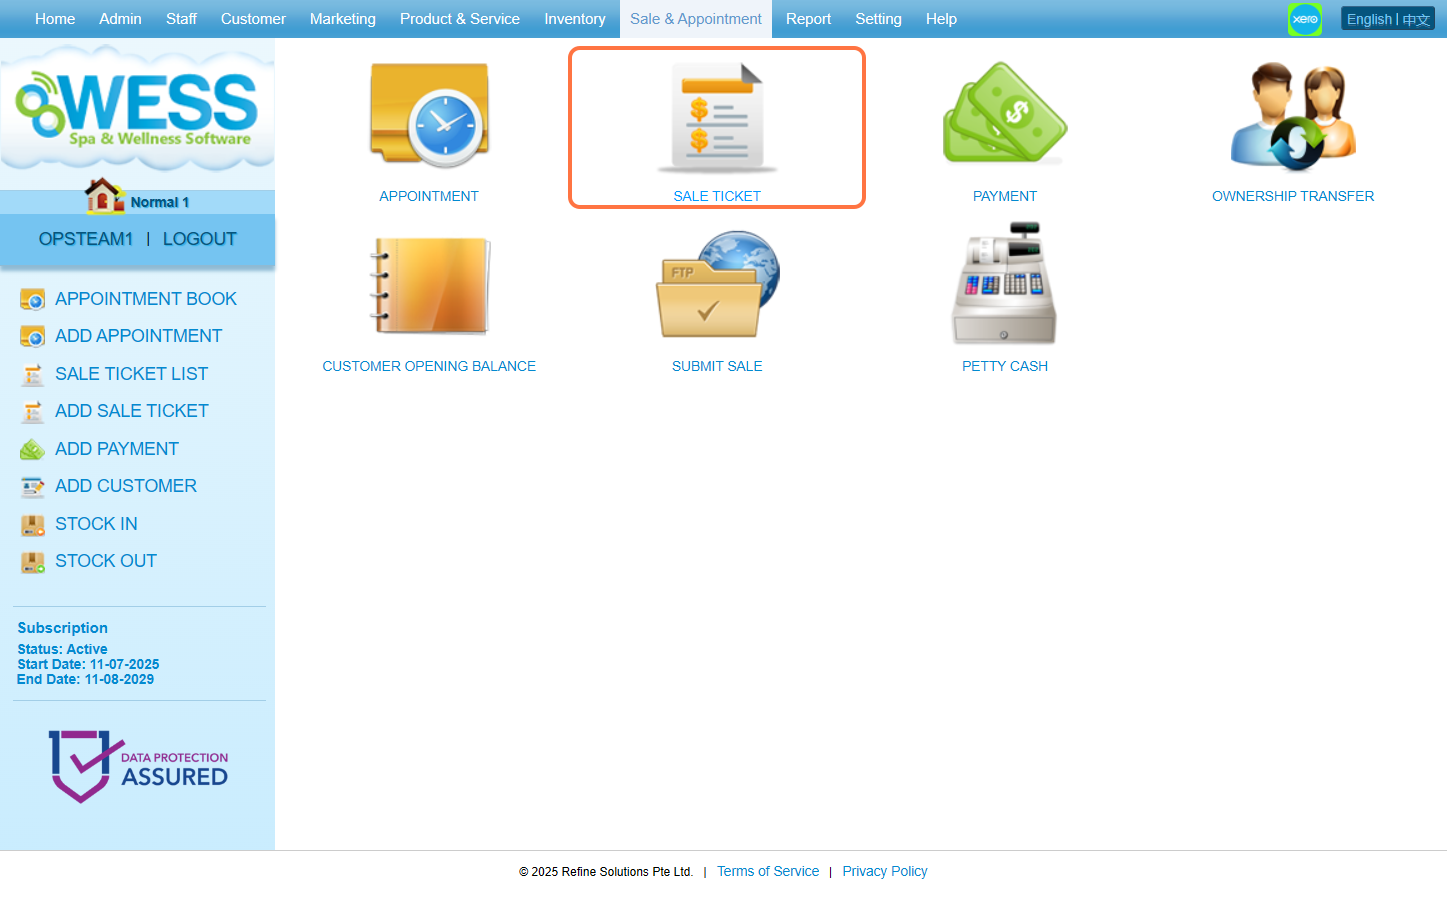
Step 3: Click “NEW”
Step 4: Enter the customer name / code / phone number to search the customer you wanted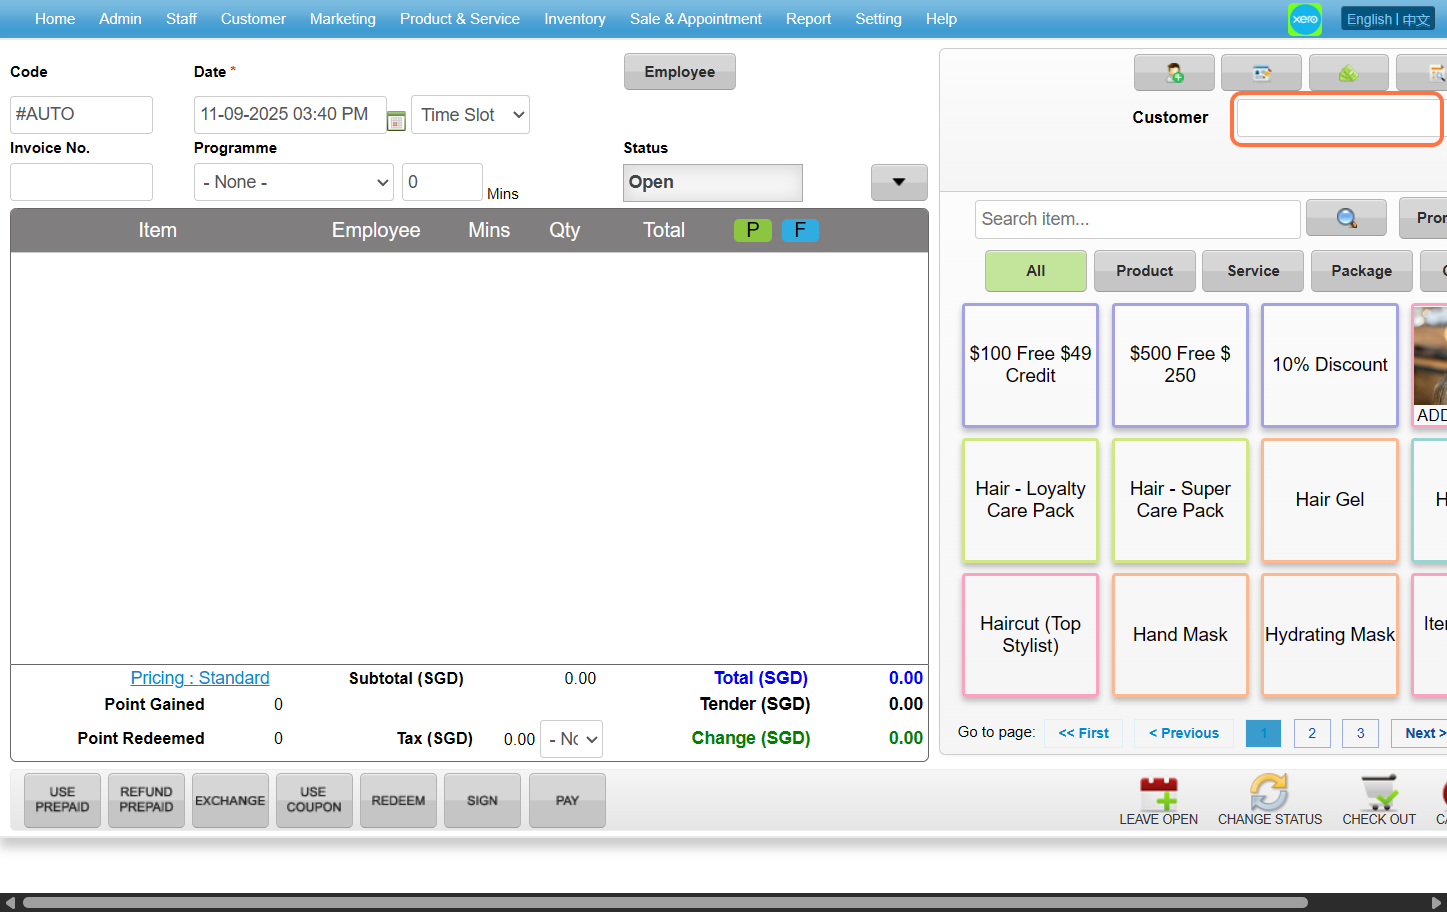
Step 5: Click “Employee”
Step 6: Choose any employee you want then click “SET”
Step 7: Select the product / service / package / coupon that you wanted to refund
Step 8: Click on the item that you have chosen
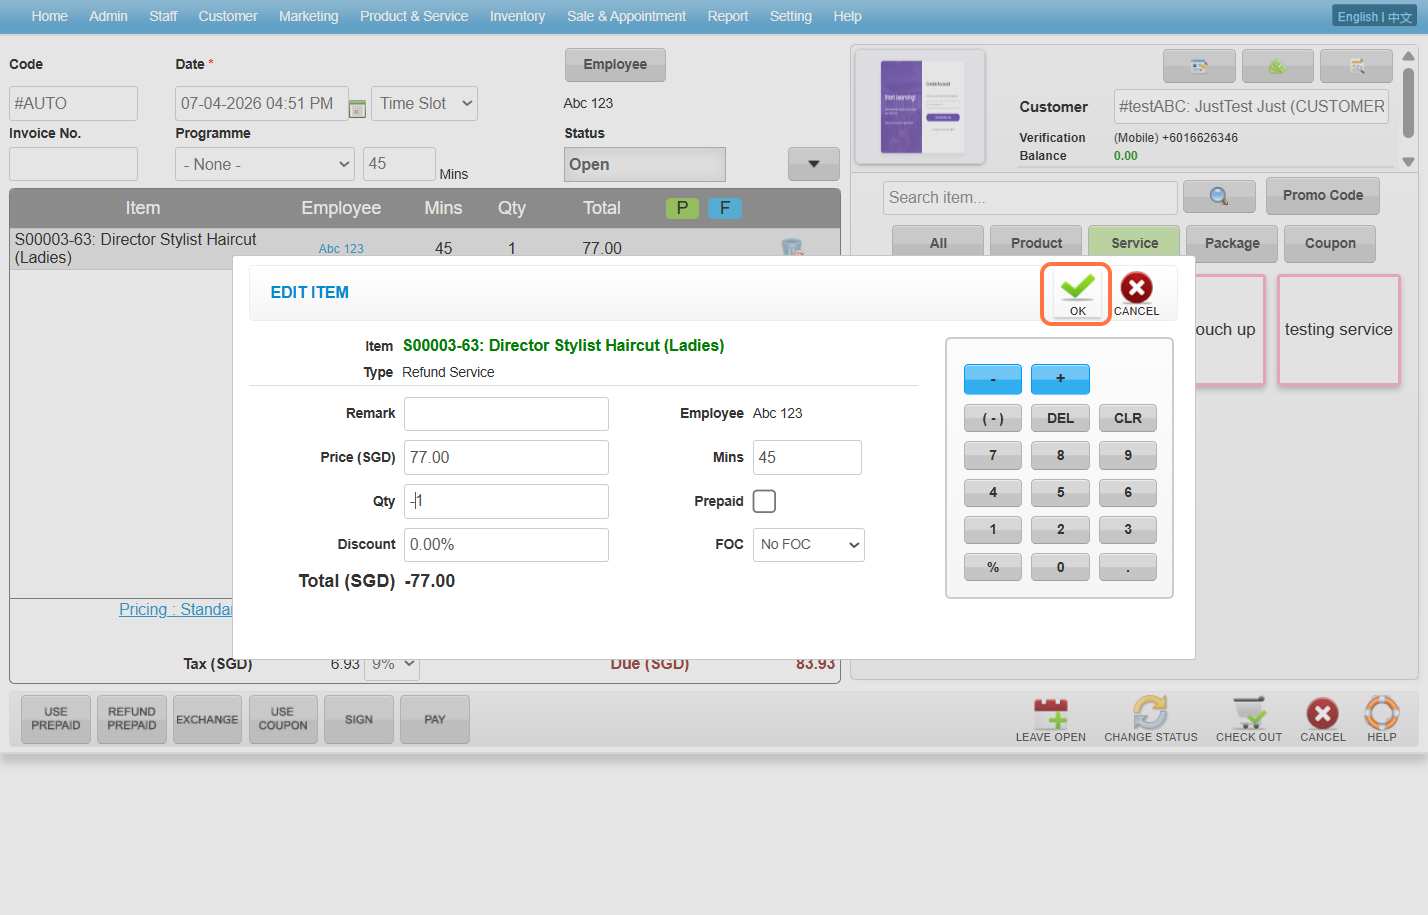
Step 9: Enter the “-N” at Qty (N mean the number of amount)
(*For example: “-2” refund 2 quantity, “-3” refund 3 quantity and so on…)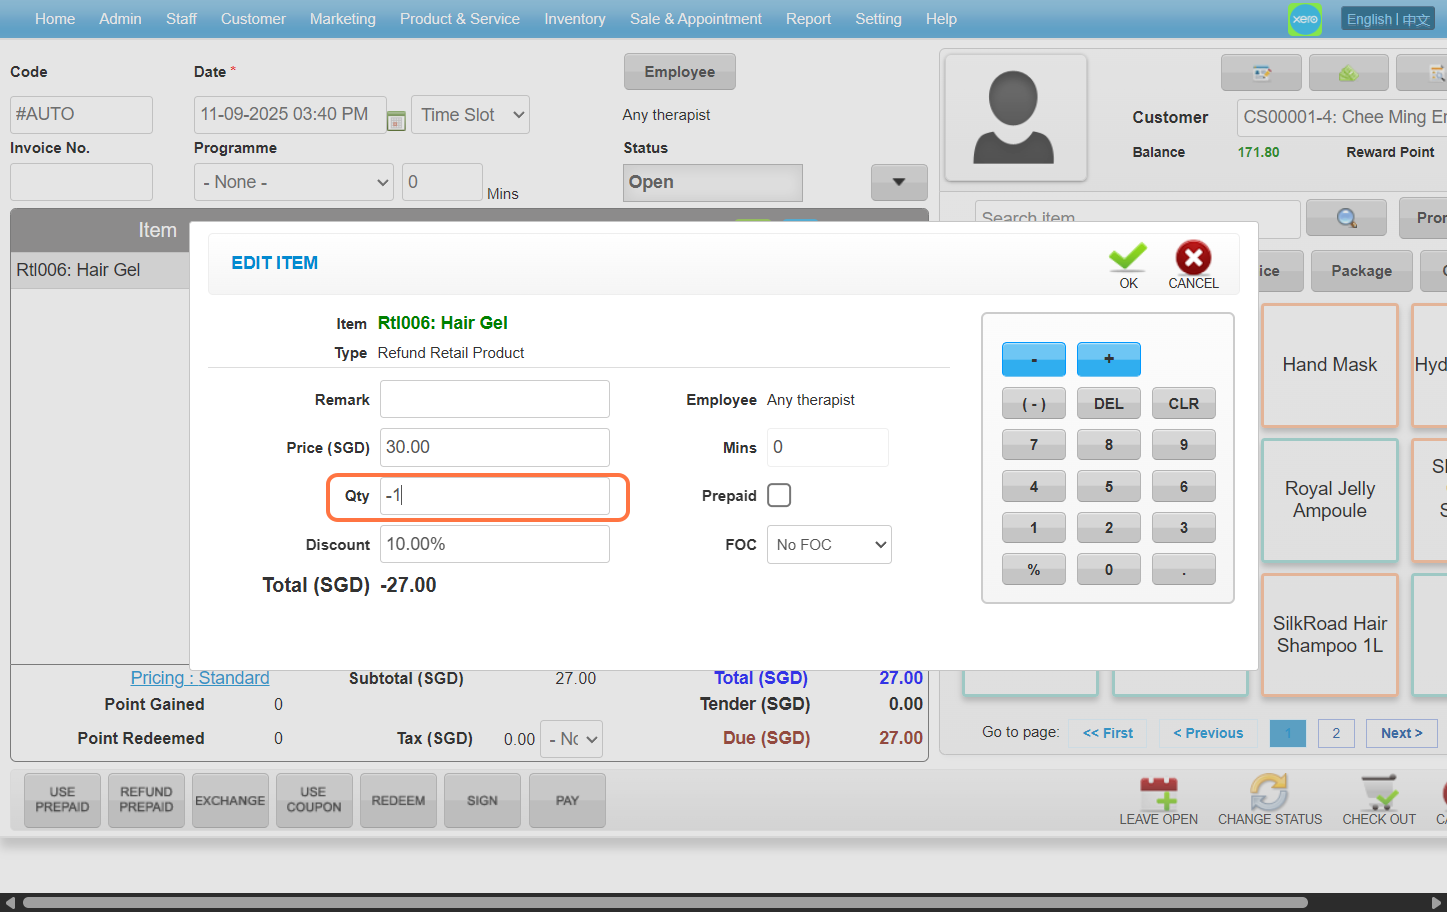
Step 10: Click “OK”.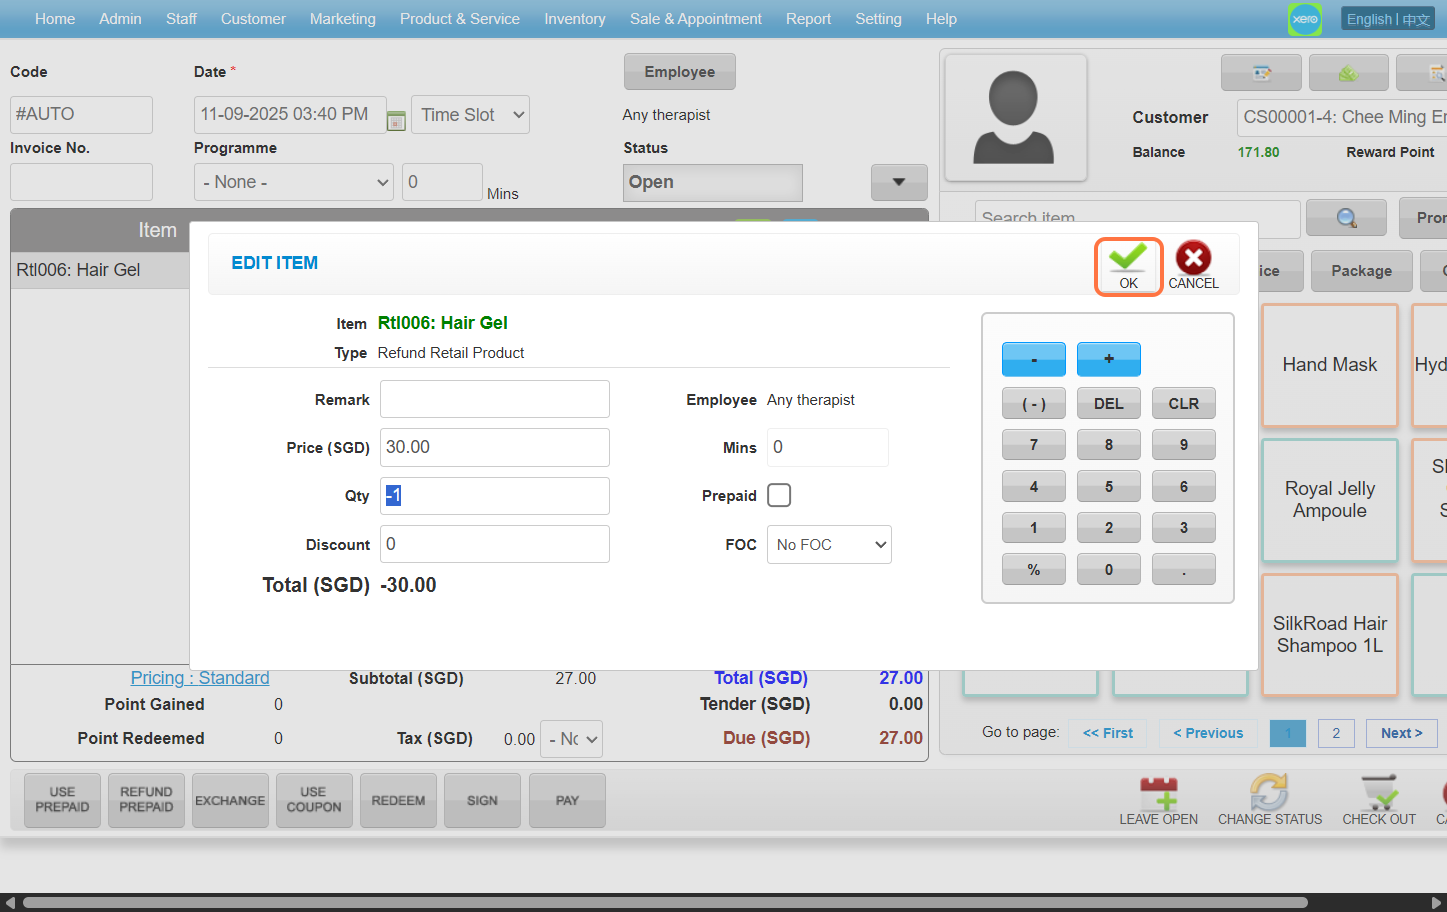
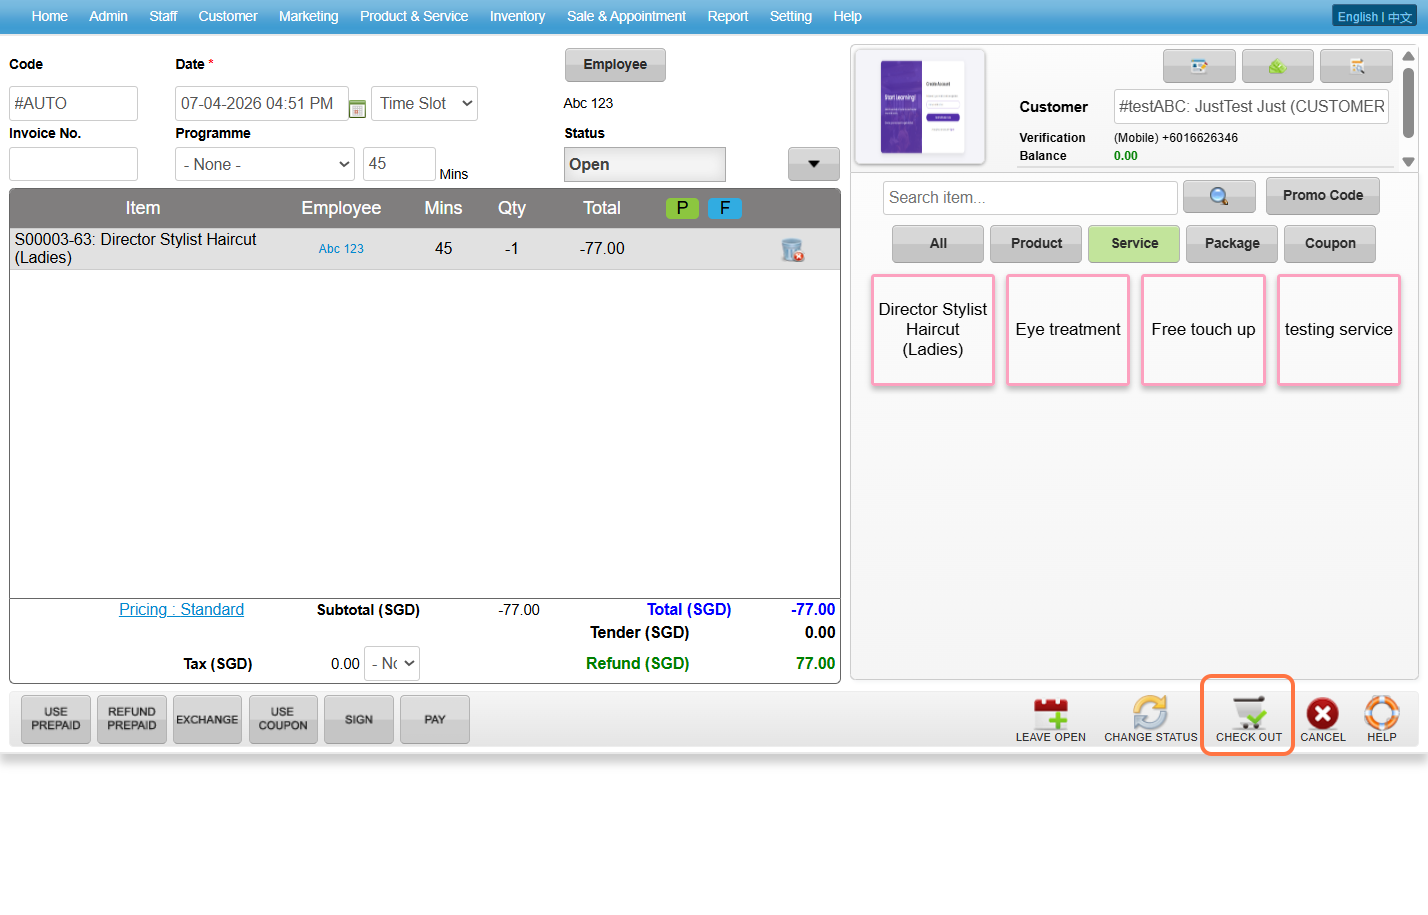
Step 11: Click “CHECK OUT”.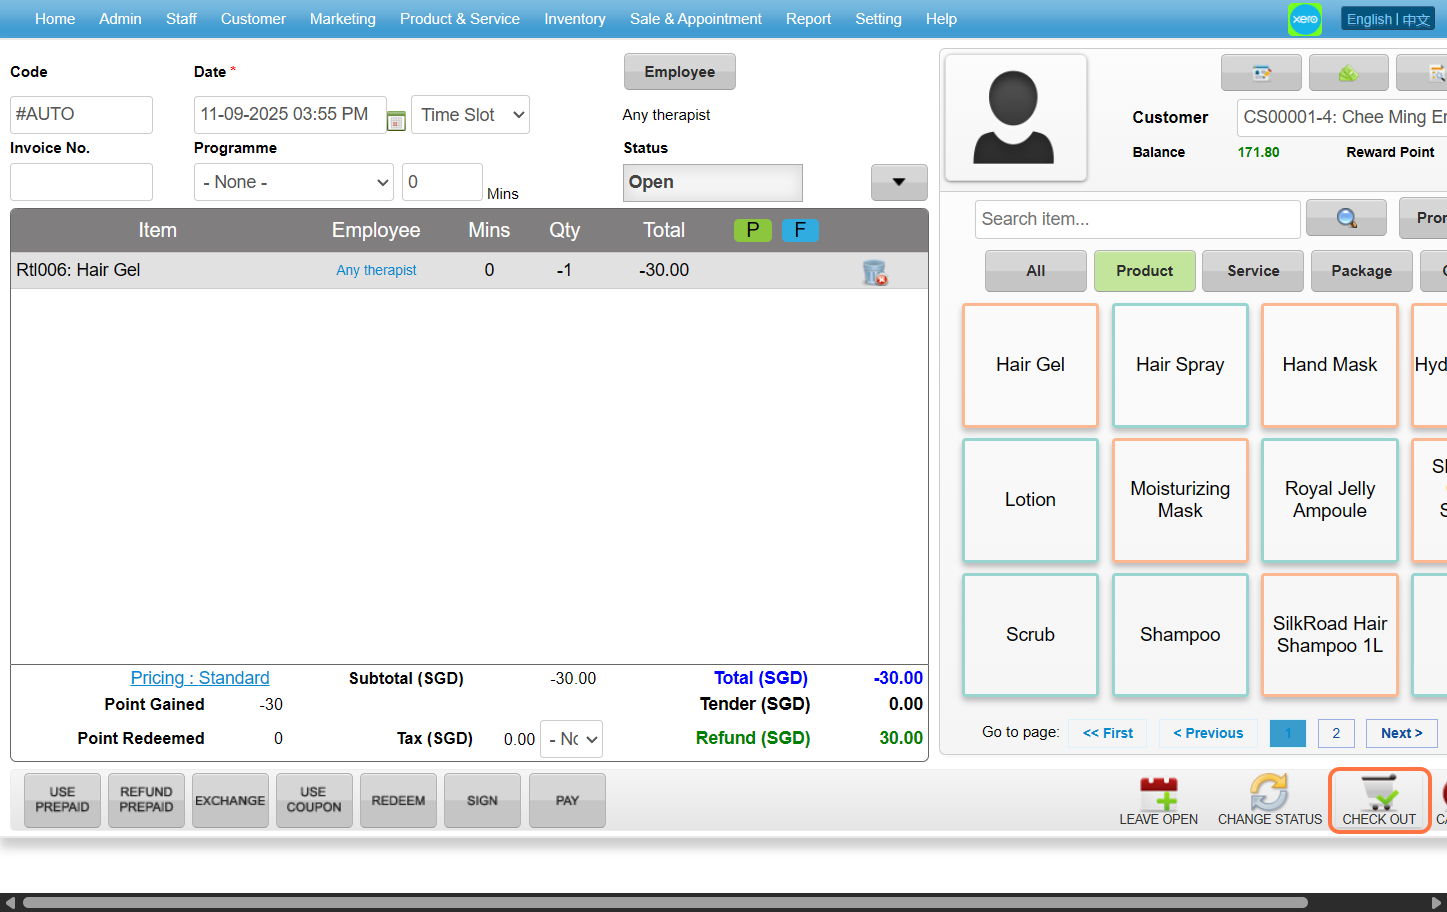
Last update: September 2025
https://wesshelp.wessconnect.com/2024/01/10/how-to-refund-prepaid-items/
Step 1: Click “Setting” .
Step 2: Click “SALE SETTING” .
Step 3: Set the “Refund Prepaid” button to “On” .
Step 4: Click “SAVE” .
Step 5: Make sure the change has been saved.
Step 6: Click “Sale & Appointment” .
Step 7: Click “SALE TICKET” .
Step 8: Click “NEW” .
Step 9: Enter a customer name and select a customer.
Step 10: Click “Employee” .
Step 11: Tick the checkbox “☑️” to select an employee. Then check the employee’s responsibilities R (Service), S (Sale). Tick the checkbox “☑️” either one or both.
Step 12: Click SET icon “✔️” to confirm.
Step 13: Click “Refund Prepaid” .
Step 14: Tick the checkbox “☑️“ to select a prepaid item to refund.
Step 15: Click ADD & CLOSE icon “📁“ .
Step 16: Click “Pay” .
Step 17: Click “CHECK OUT” .
[!] Ensure the value in Paid By textbox is 0 before checking out

Step 18: Make sure the ticket has been checked out.
Last Updated: August 2025
https://wesshelp.wessconnect.com/2024/01/10/how-to-perform-exchange-2/
Step 1: Click “Setting” .
Step 2: Click “SALE SETTING” .
Step 3: Set “Exchange Button” as “On” .
Step 4: Click “SAVE” .
Step 5: Make sure the change has been saved.
Step 6: Then click “Sale & Appointment” .
Step 7: Click “SALE TICKET” .
step 8: Click on “NEW” .
Step 9: Enter a customer name and select a customer.
Step 10: Click “Employee” .
Step 11: Tick the checkbox “☑️” to select an employee. Then check the employee’s responsibilities R (Service), S (Sale). Tick the checkbox “☑️” either one or both.
Step 12: Click “SET” .
Step 13: Click “Exchange” .
Step 14: Tick the checkbox “☑️” to select a prepaid item.
Step 15: Enter the amount of the item to be exchanged.
Step 16: [Optional] Enter the amount to overwrite its actual value.
[!] This amount is auto-generated after entering the “Exchange” amount.
[!] This action is not suggested as it can affect the commission calculation.
Step 17: Click ADD & CLOSE icon “📁” .
Step 18: Select the items to exchange.
Step 19: Click ADD & CLOSE icon “📁” .
Step 20: Click “Pay” .
Step 21: Click “CHECK OUT” to saved.
Step 22: Make sure the ticket has been checked out.
Last Updated: Aug 2024
https://wesshelp.wessconnect.com/2025/08/21/how-to-email-sale-invoice-to-customer/
Step 1: Click “Sale & Appointment”
Step 2: Click “SALE TICKET”.
Step 3: Click on any of the past sale ticket that you want to send the sale invoice to the customer.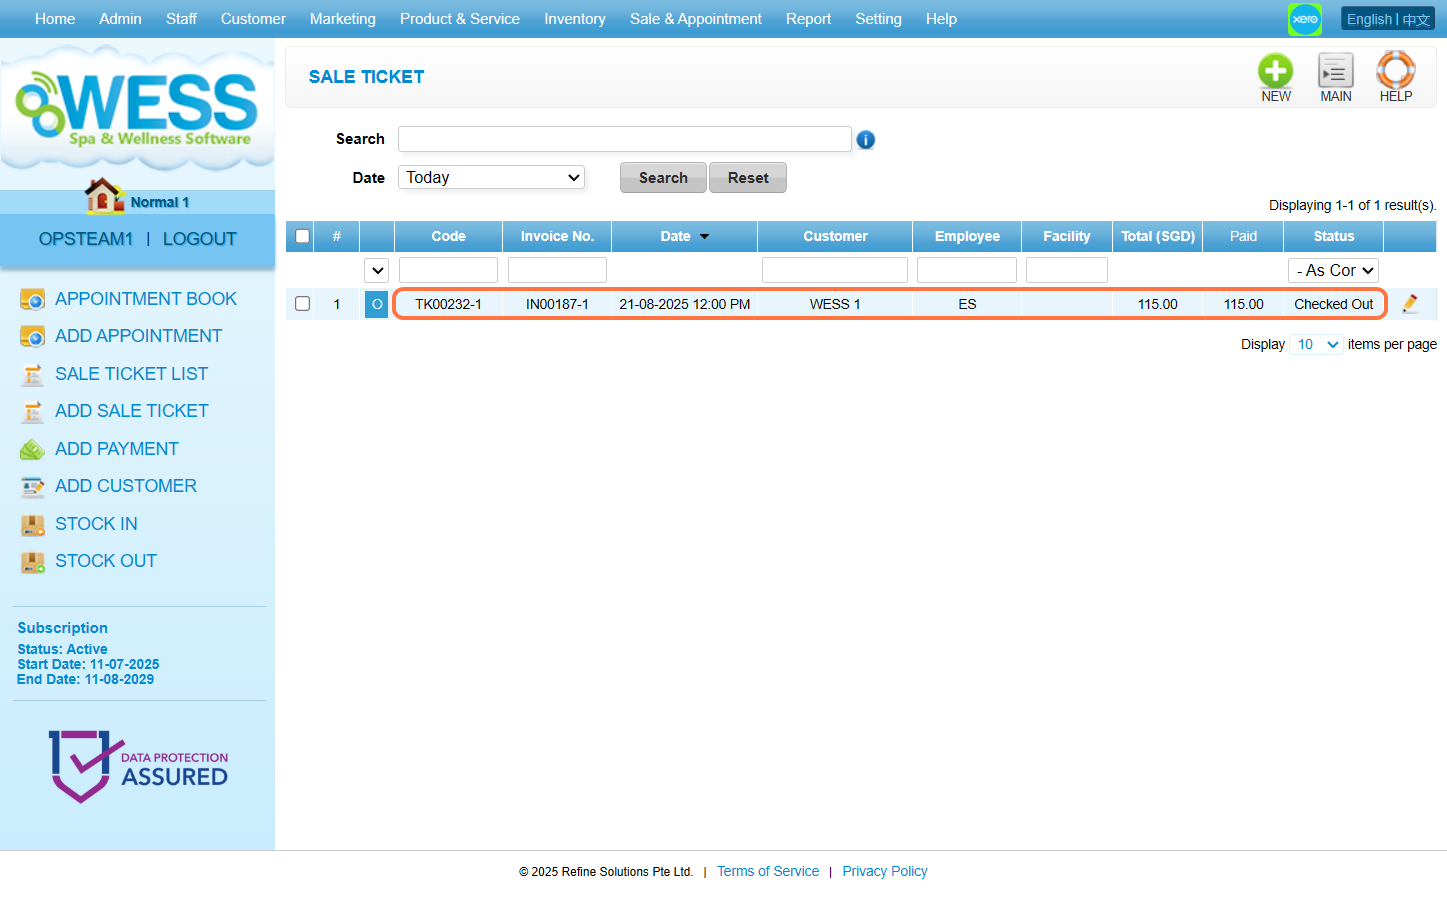
Step 4: Click “PRINT”.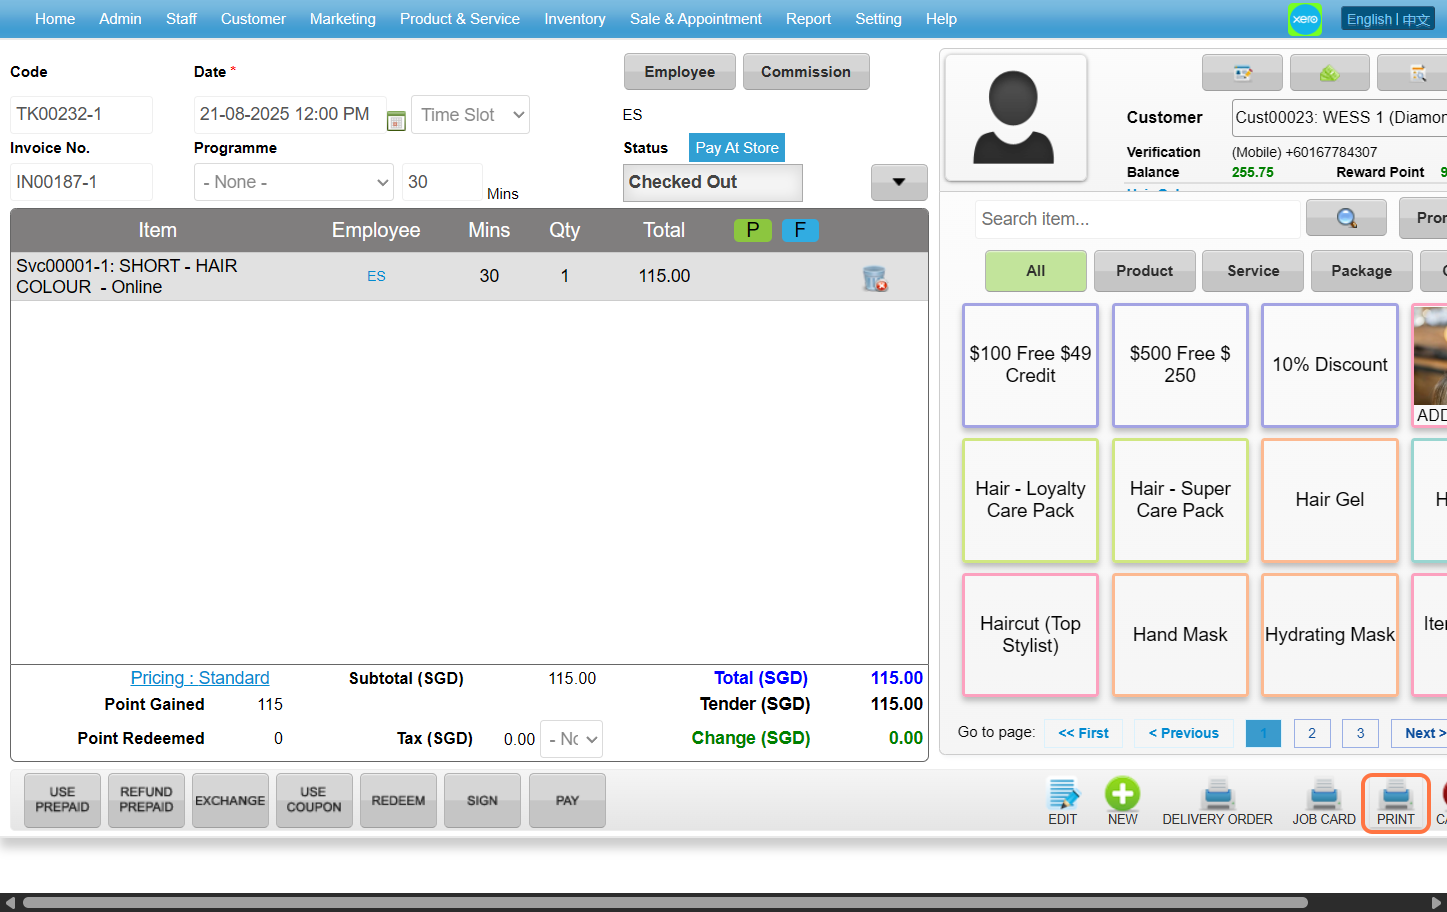
Step 5: Click “EMAIL”.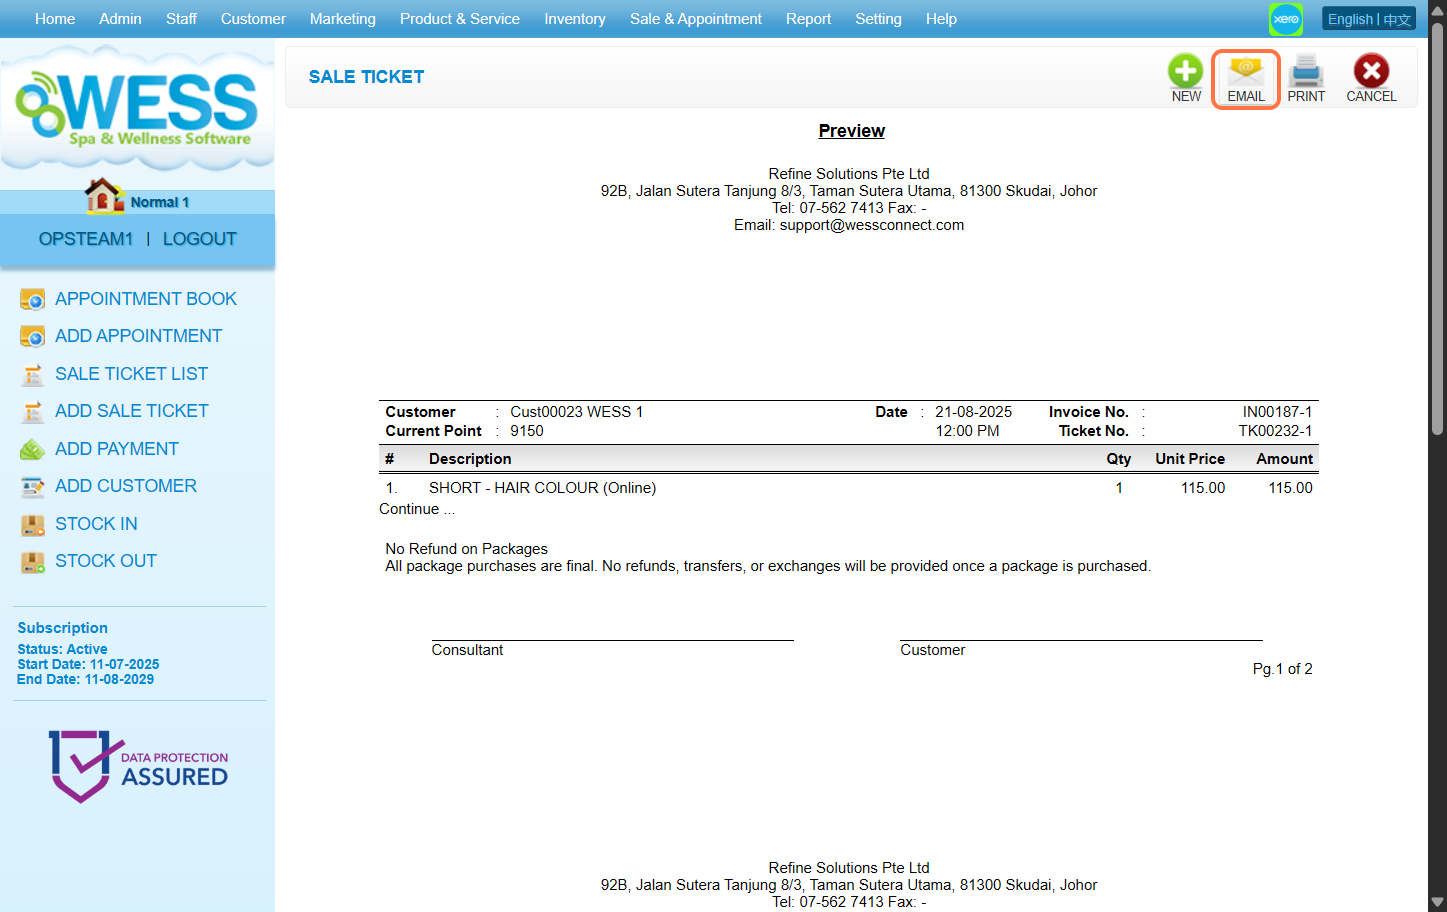
Step 6: Fill the textbox with the respective information accordingly.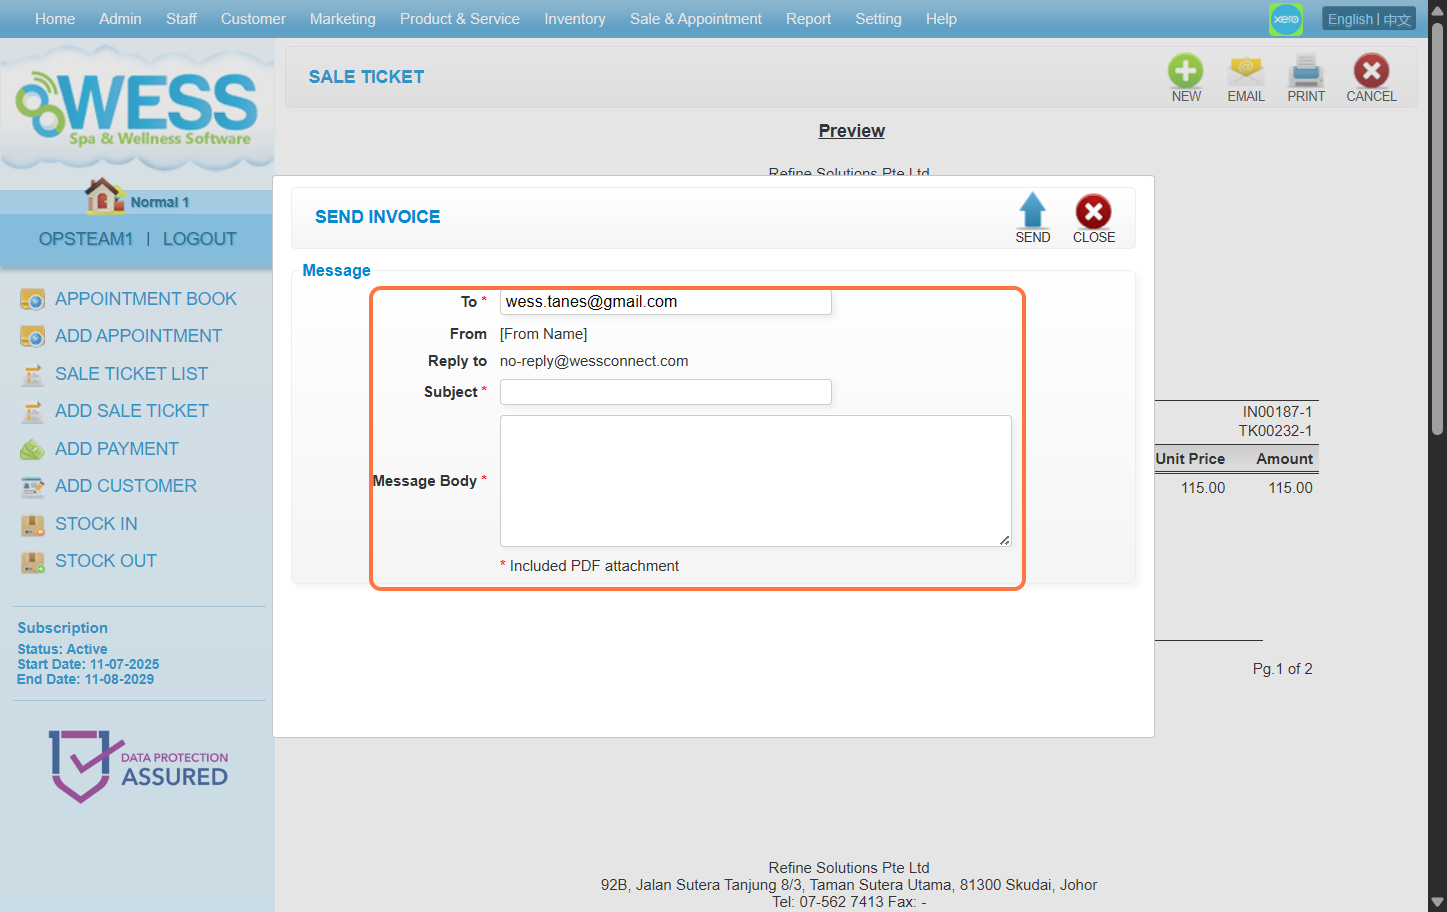
Step 7: Click “SEND”.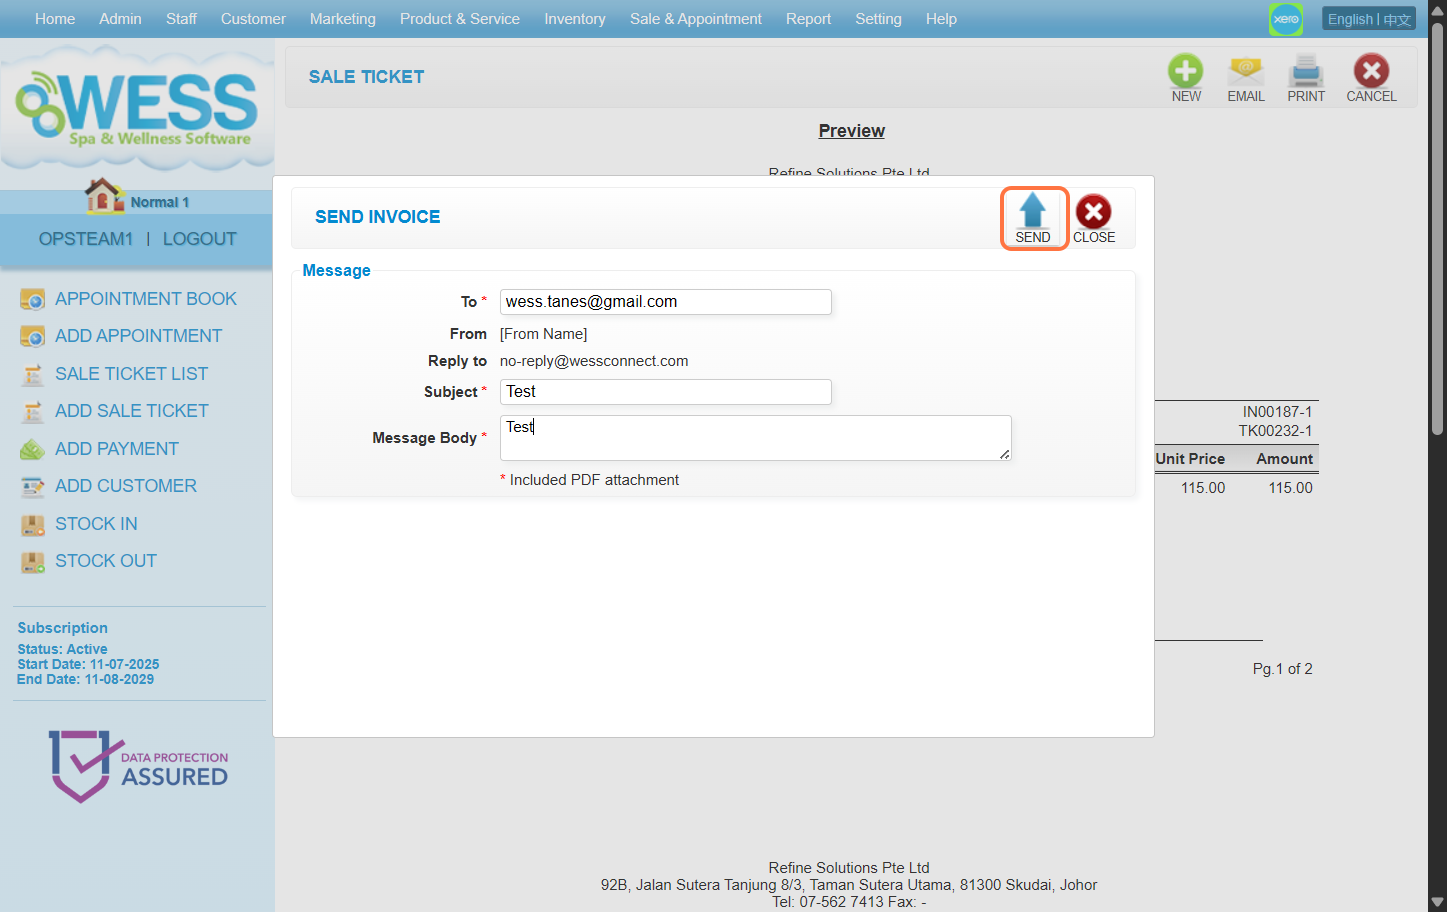
Last update: August 2025
https://wesshelp.wessconnect.com/2021/06/17/how-to-add-payment-method/
Step 1: Click “SETTING”.
Step 2: Click “PAYMENT METHOD”.
Step 3: Click “NEW”.
Step 4: Fill in payment method details.
Step 5: Click “SAVE”.
Last update: April 2021
https://wesshelp.wessconnect.com/2022/11/25/how-to-add-a-new-tax-selection-option/
Step 1: Click “Setting”.
Step 2: Click “TAX”.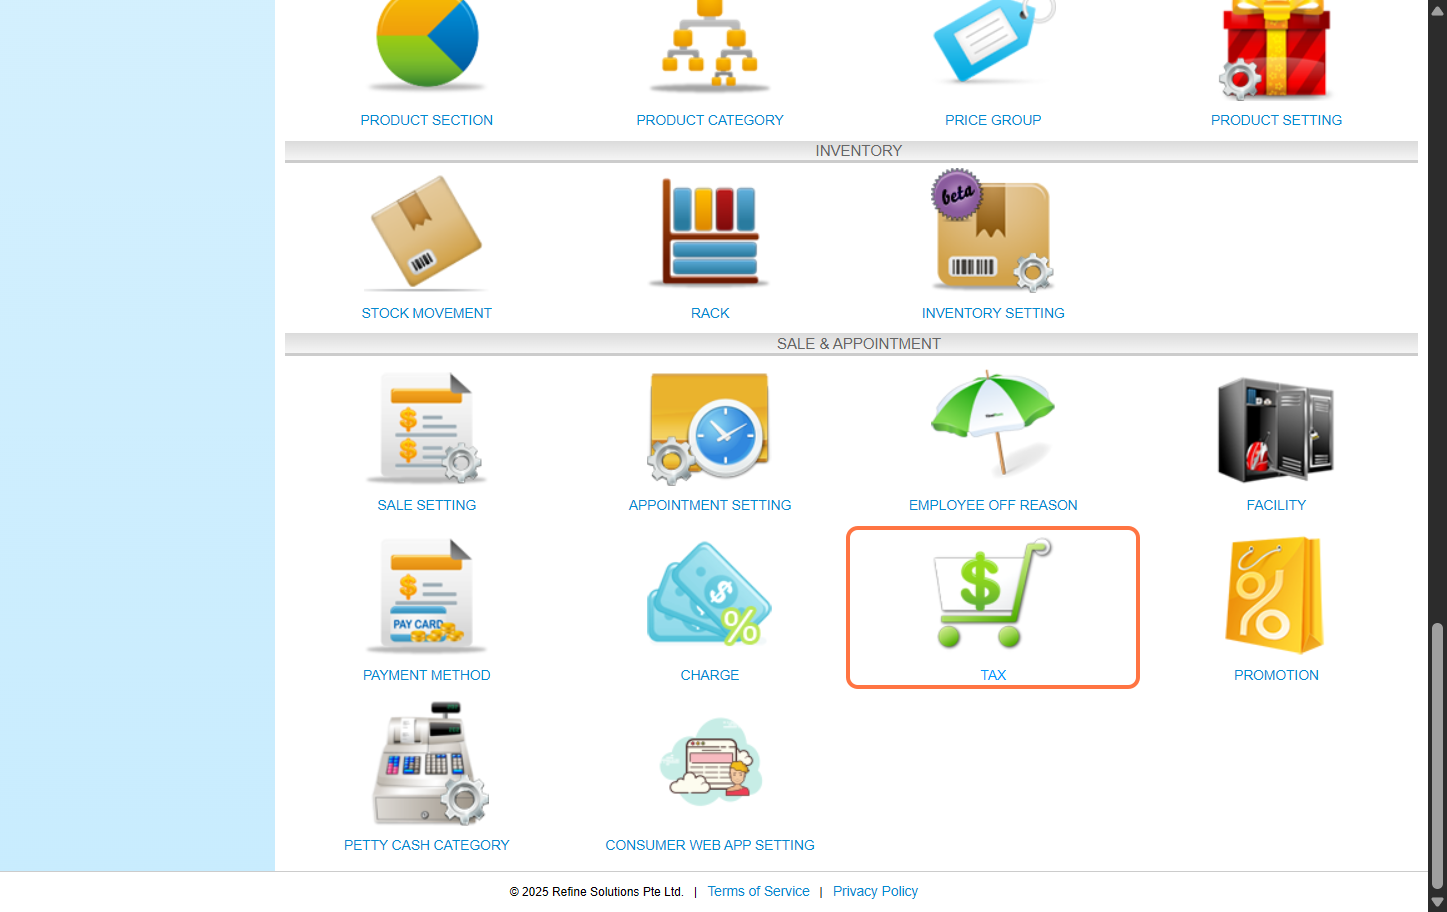
Step 3: Click “NEW”.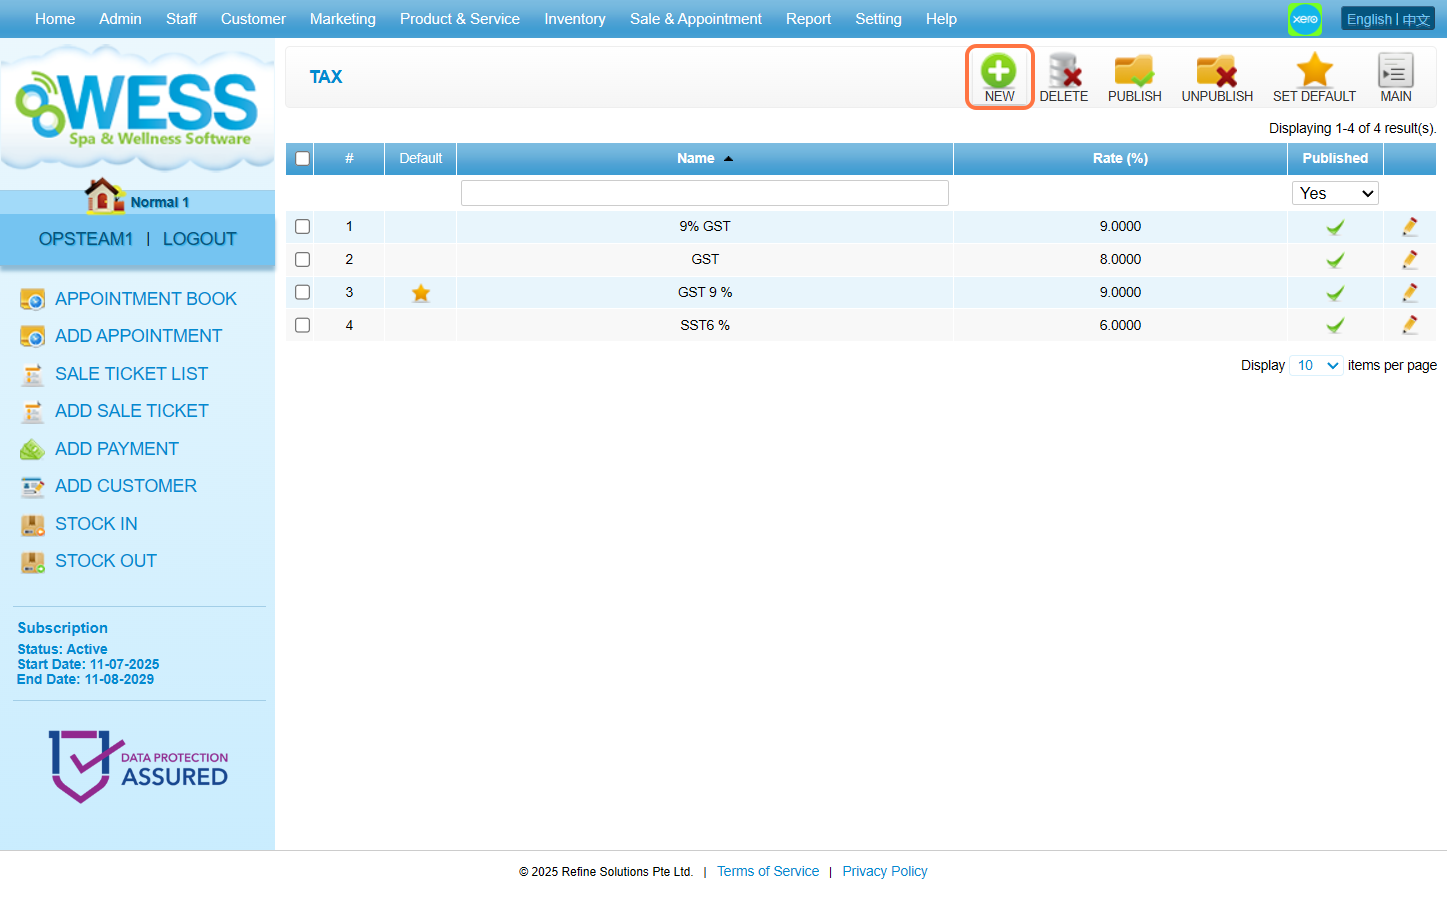
Step 4: Fill the textbox with relevant information accordingly.
Step 5: Click “SAVE”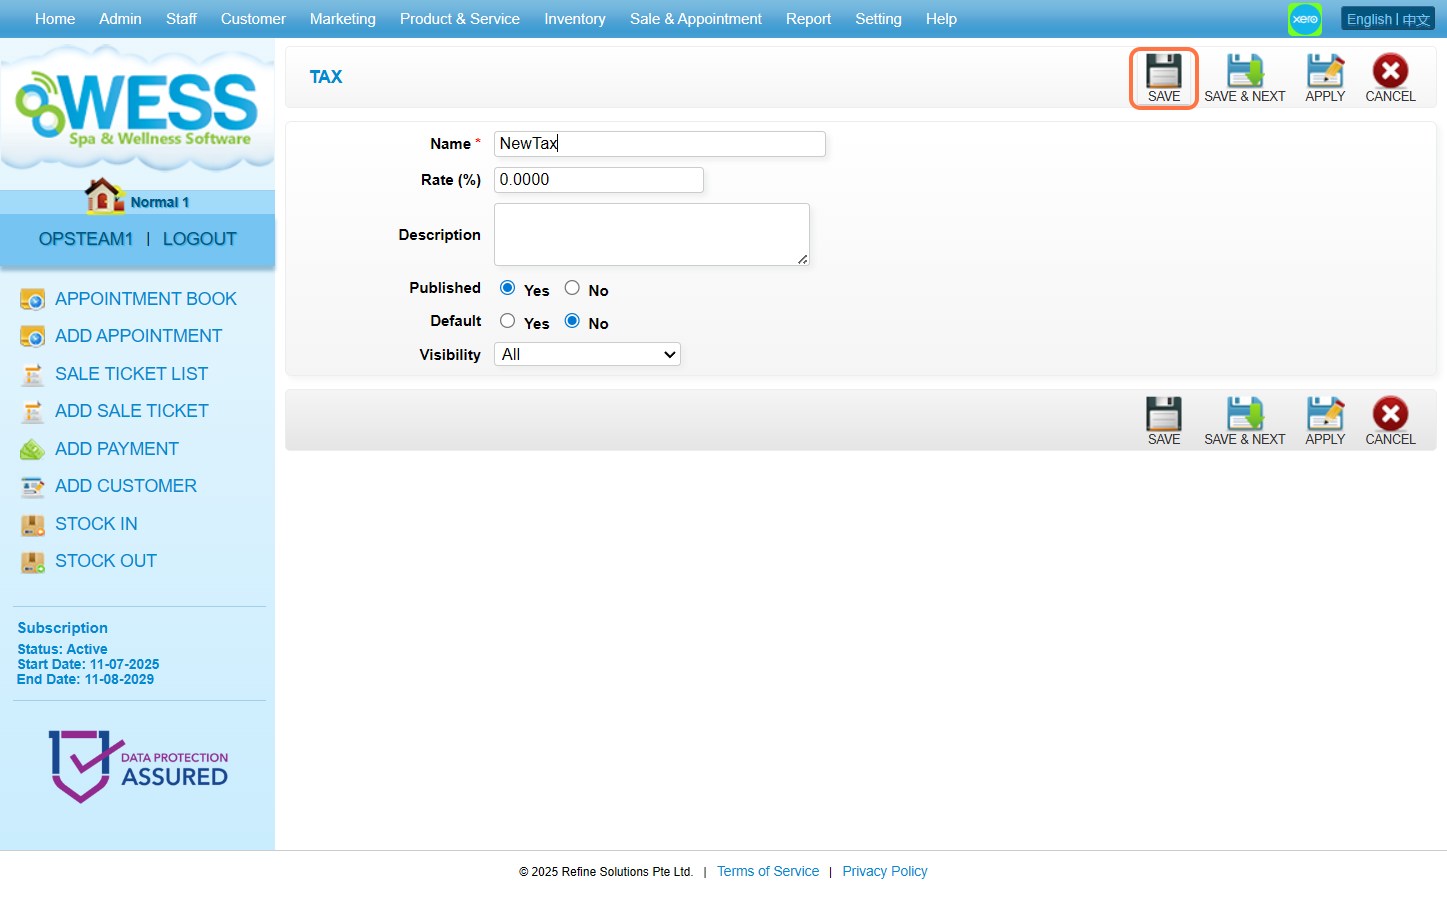
Last Update: August 2025
https://wesshelp.wessconnect.com/2025/08/12/how-to-edit-taxes/
Step 1: Click “Setting”.
Step 2: Click “TAX”.
Step 3: Select the tax option you want to edit.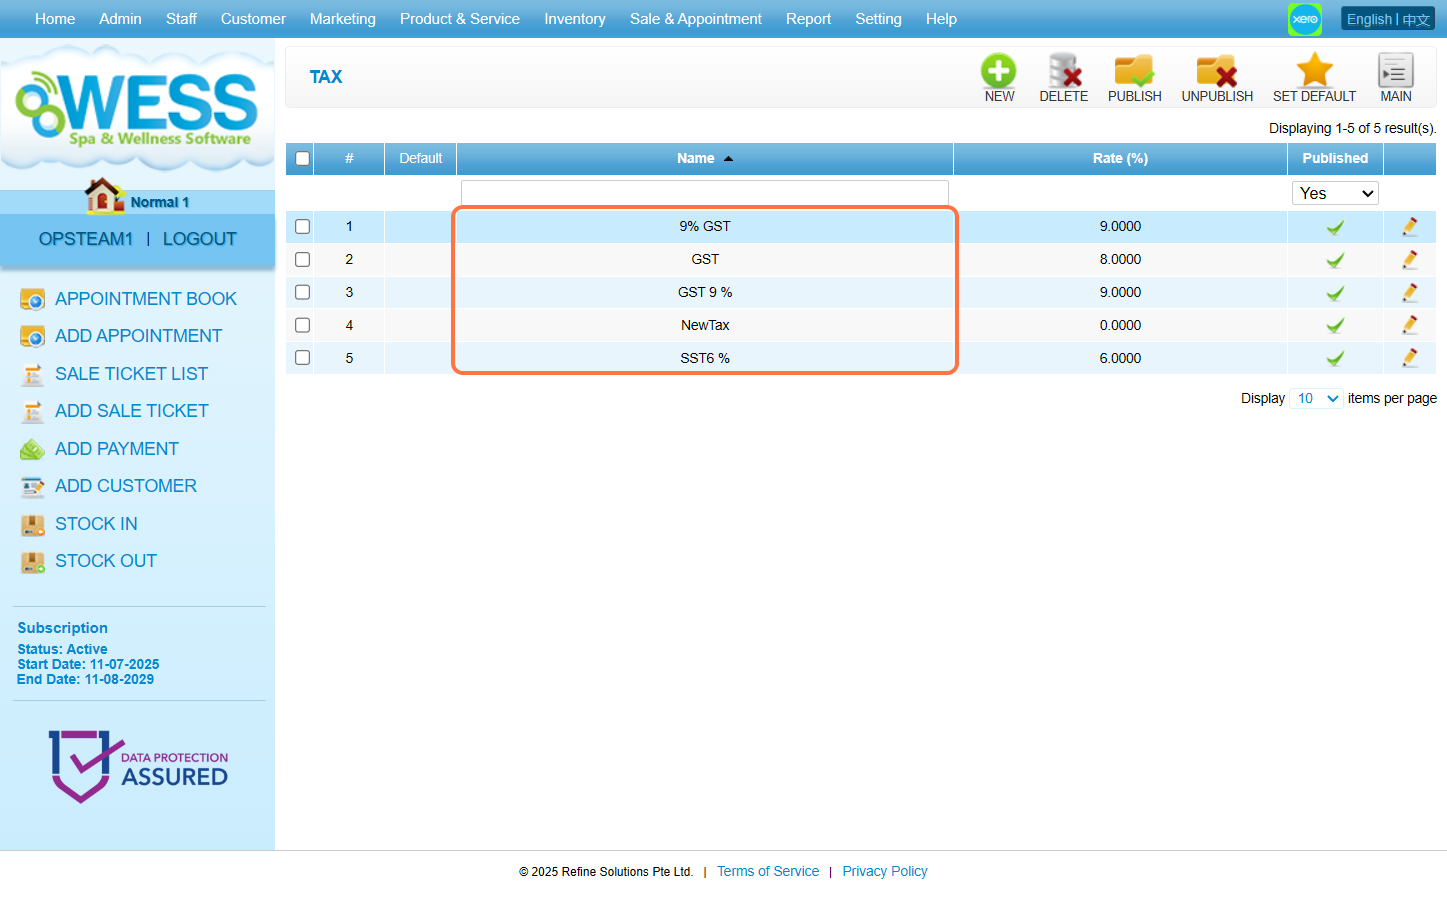
Step 4: Click “EDIT”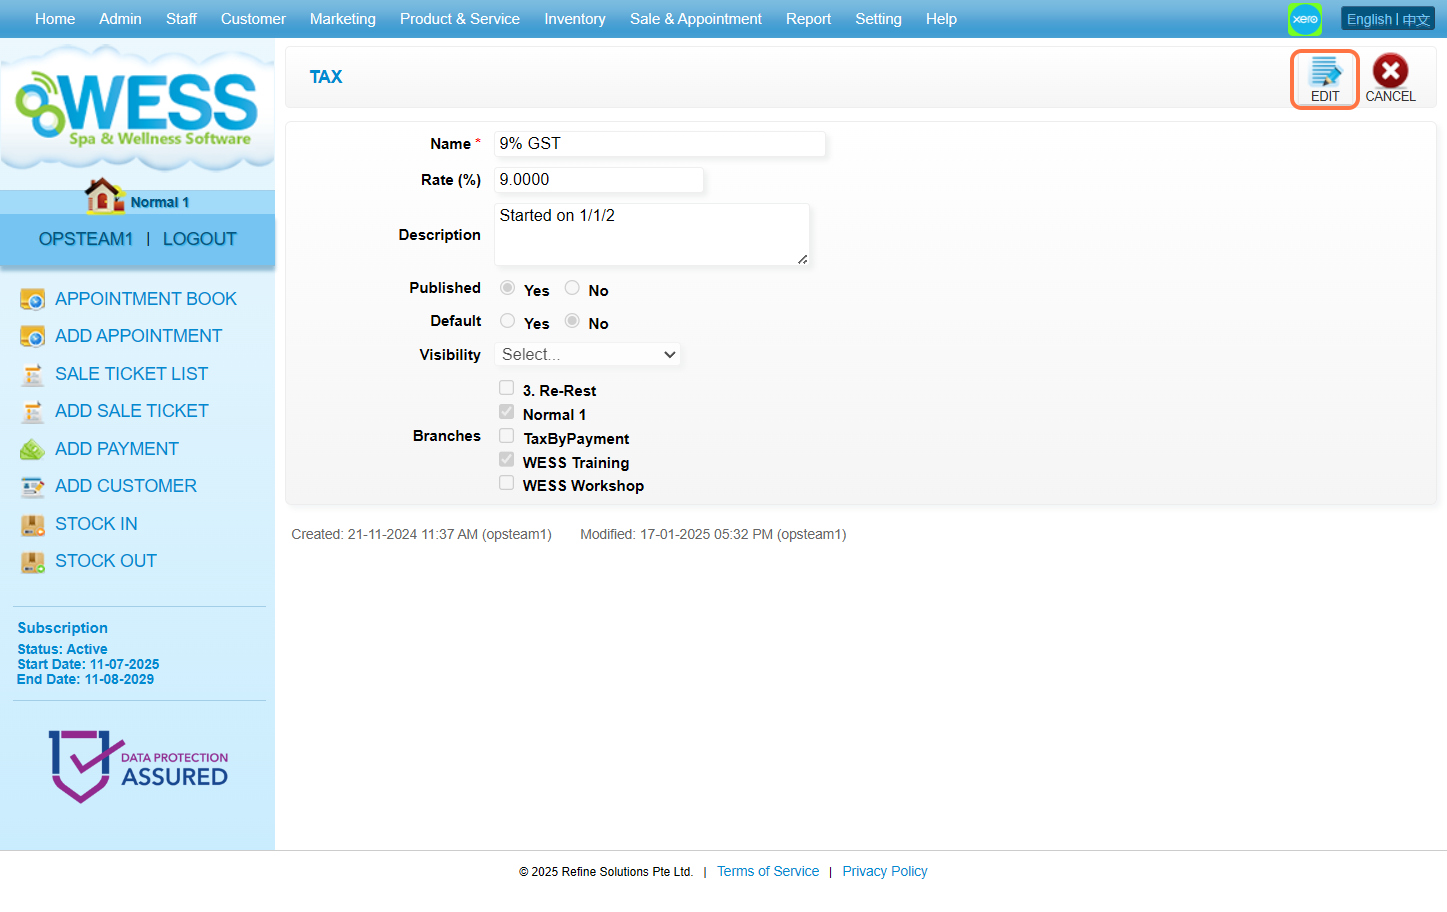
Step 5: Make any edit changes that is needed.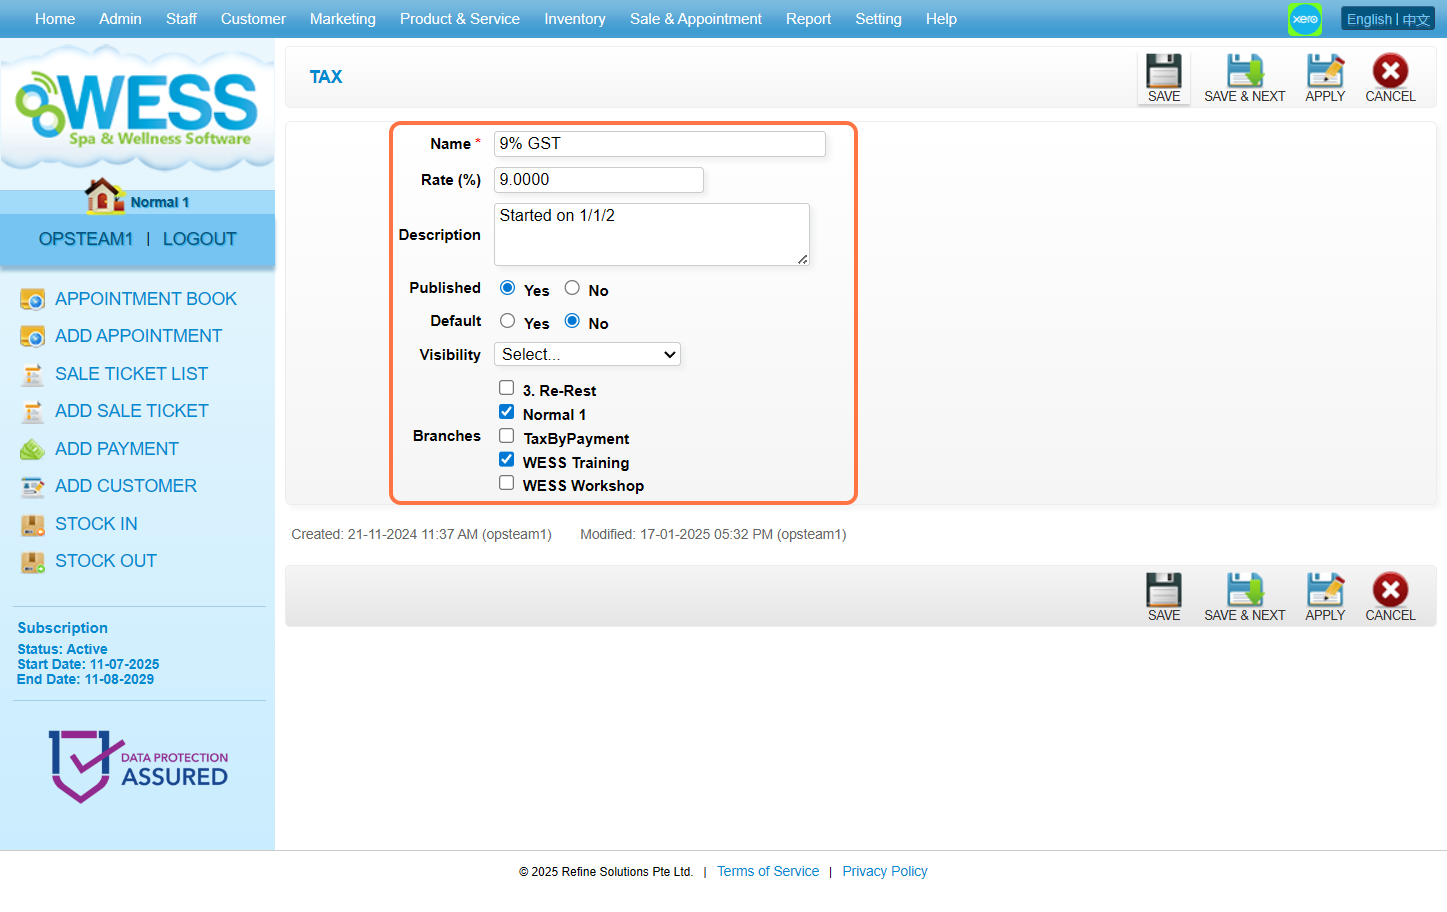
Step 6: Click “SAVE”.
Last Update: August 2025
https://wesshelp.wessconnect.com/2025/08/13/how-to-set-remove-a-default-option-for-taxes/
Step 1: Click “Setting”.
Step 2: Click “TAX”.
Step 3: Tick on the box for the tax you want to set as the default.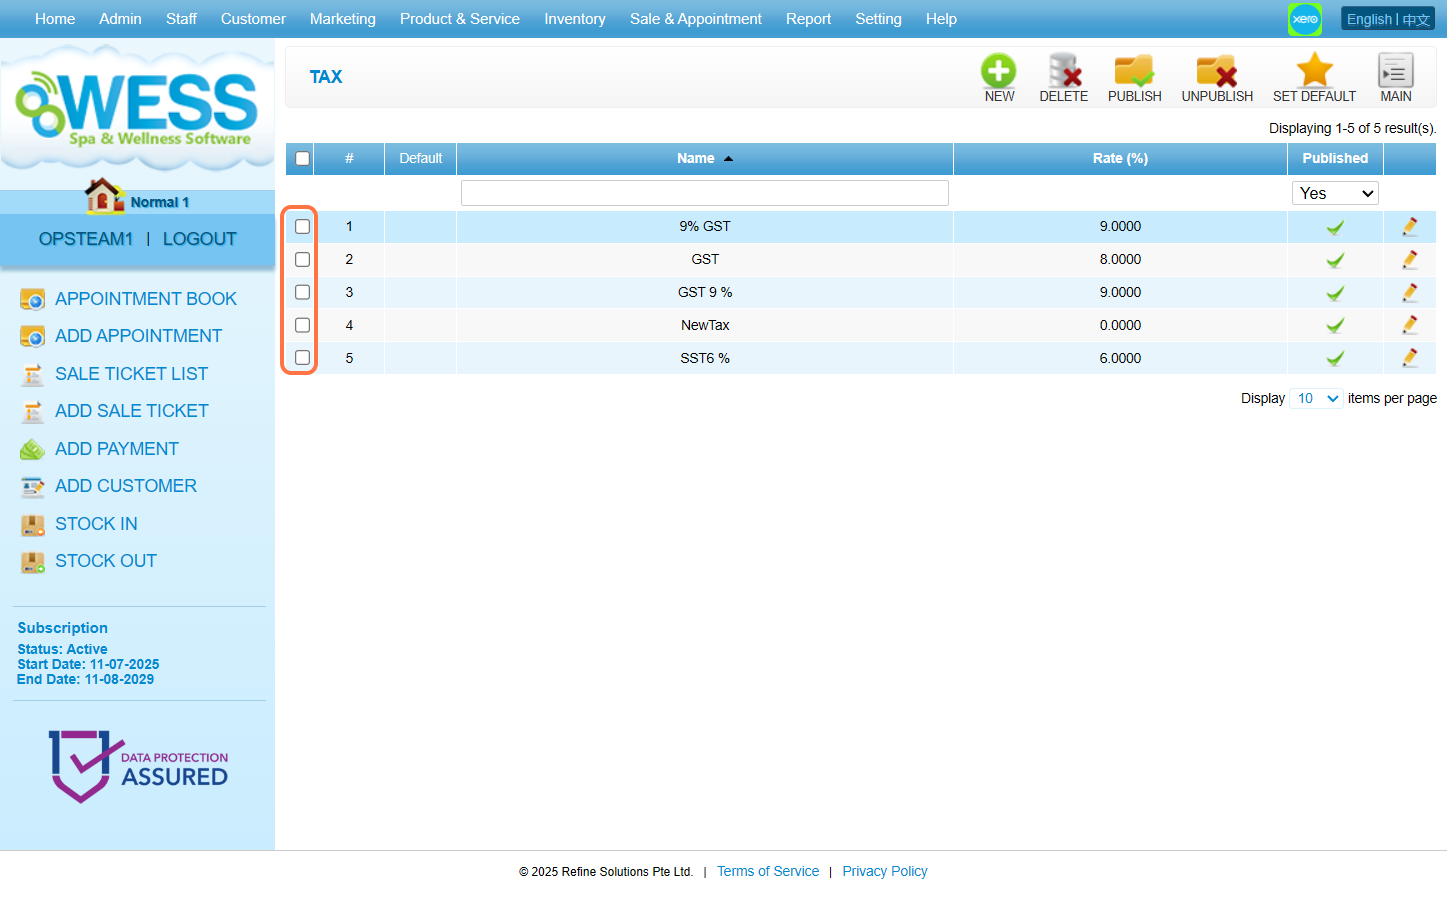
Step 4: Click “SET DEFAULT”.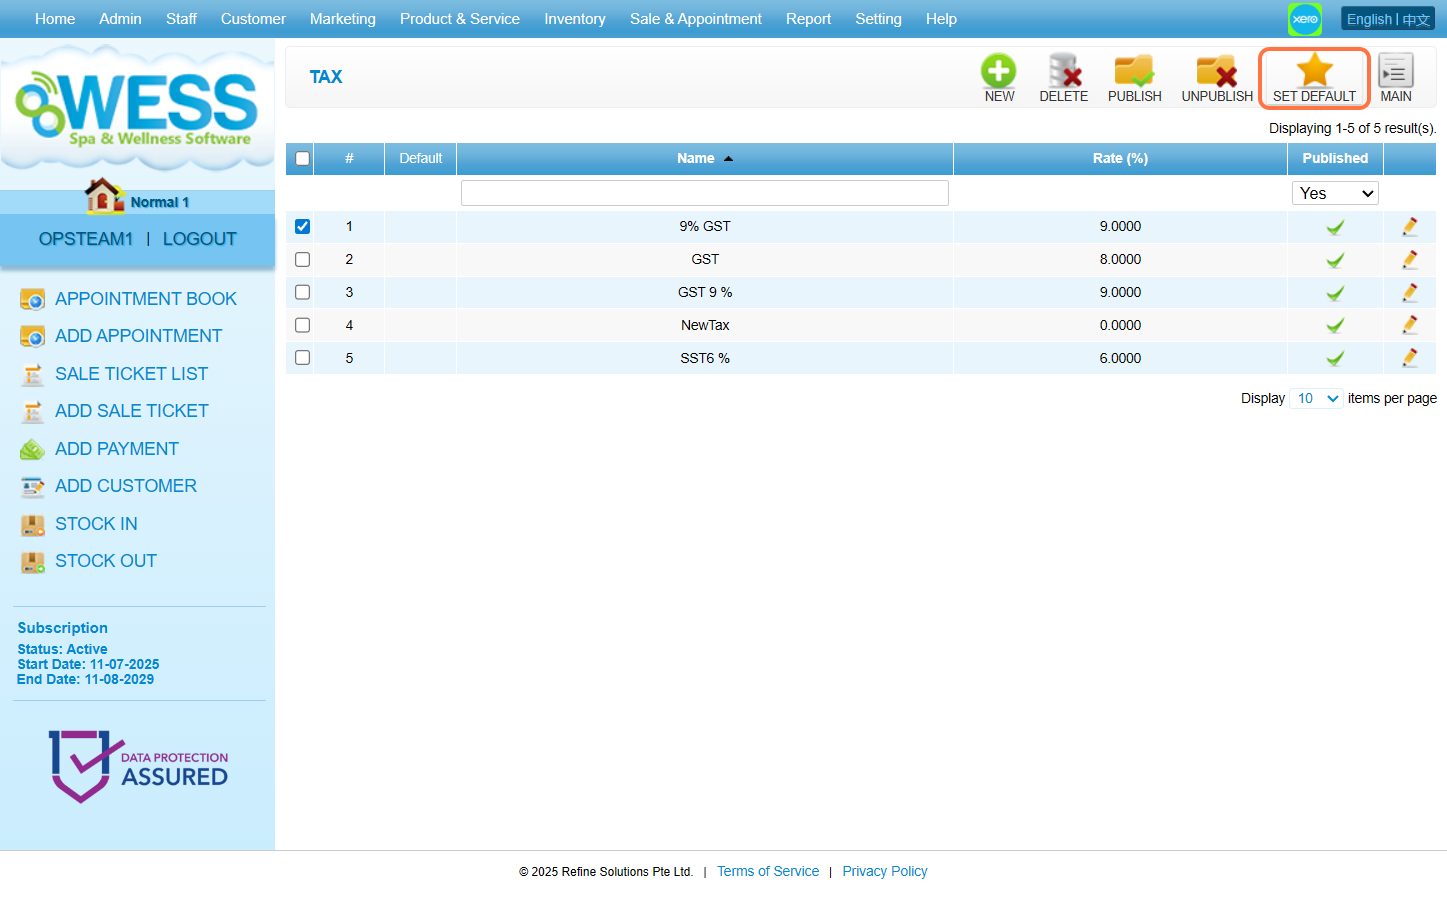
Step 5: To remove a tax being default option, click on the tax that you want to remove the default setting from.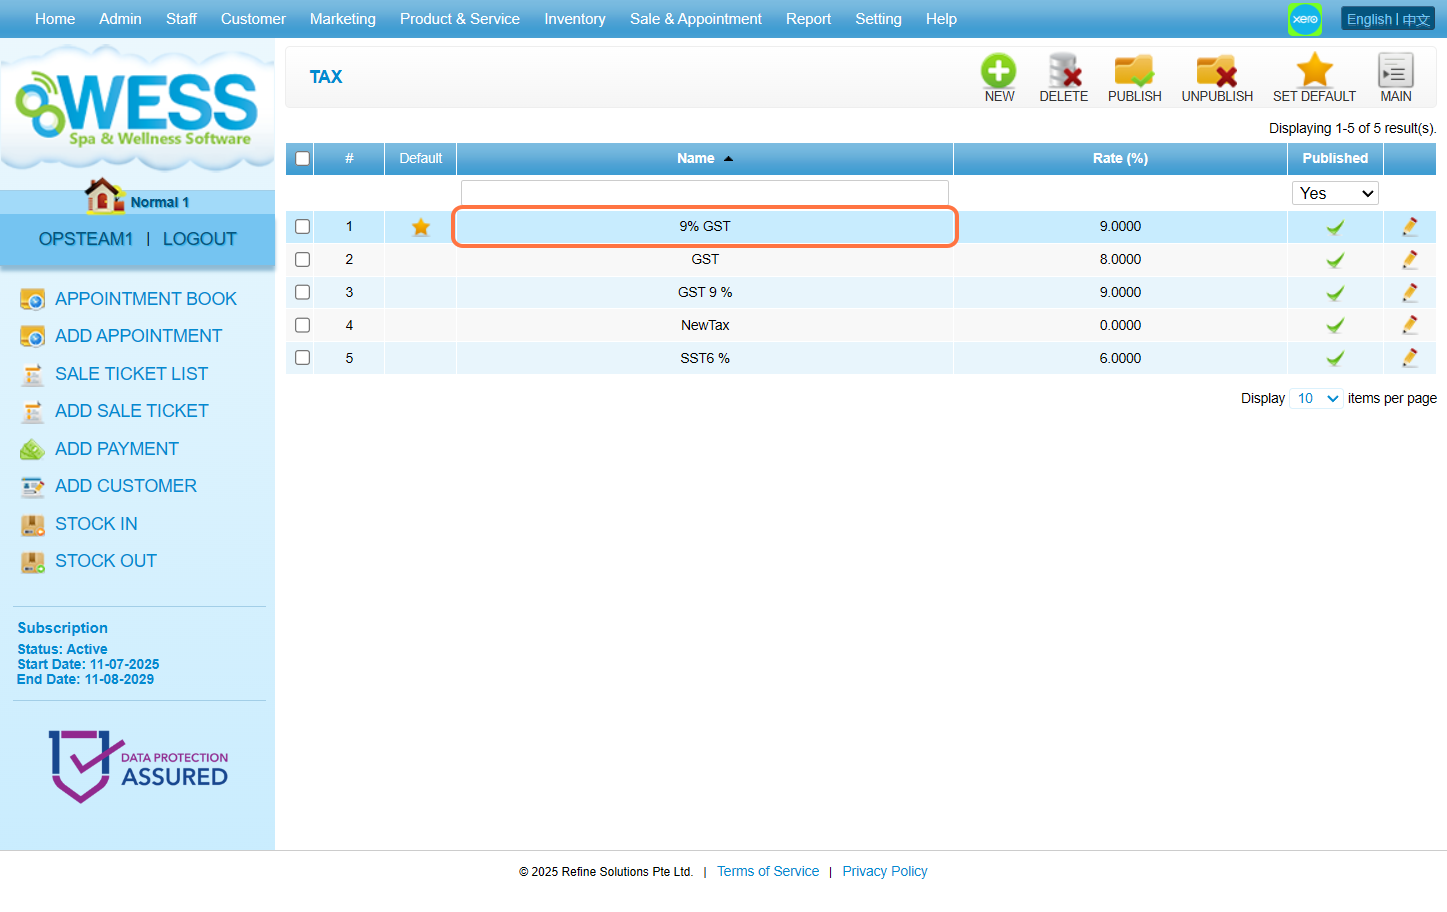
Step 6: Click “EDIT”.
Step 7: Set the Default option to “No”.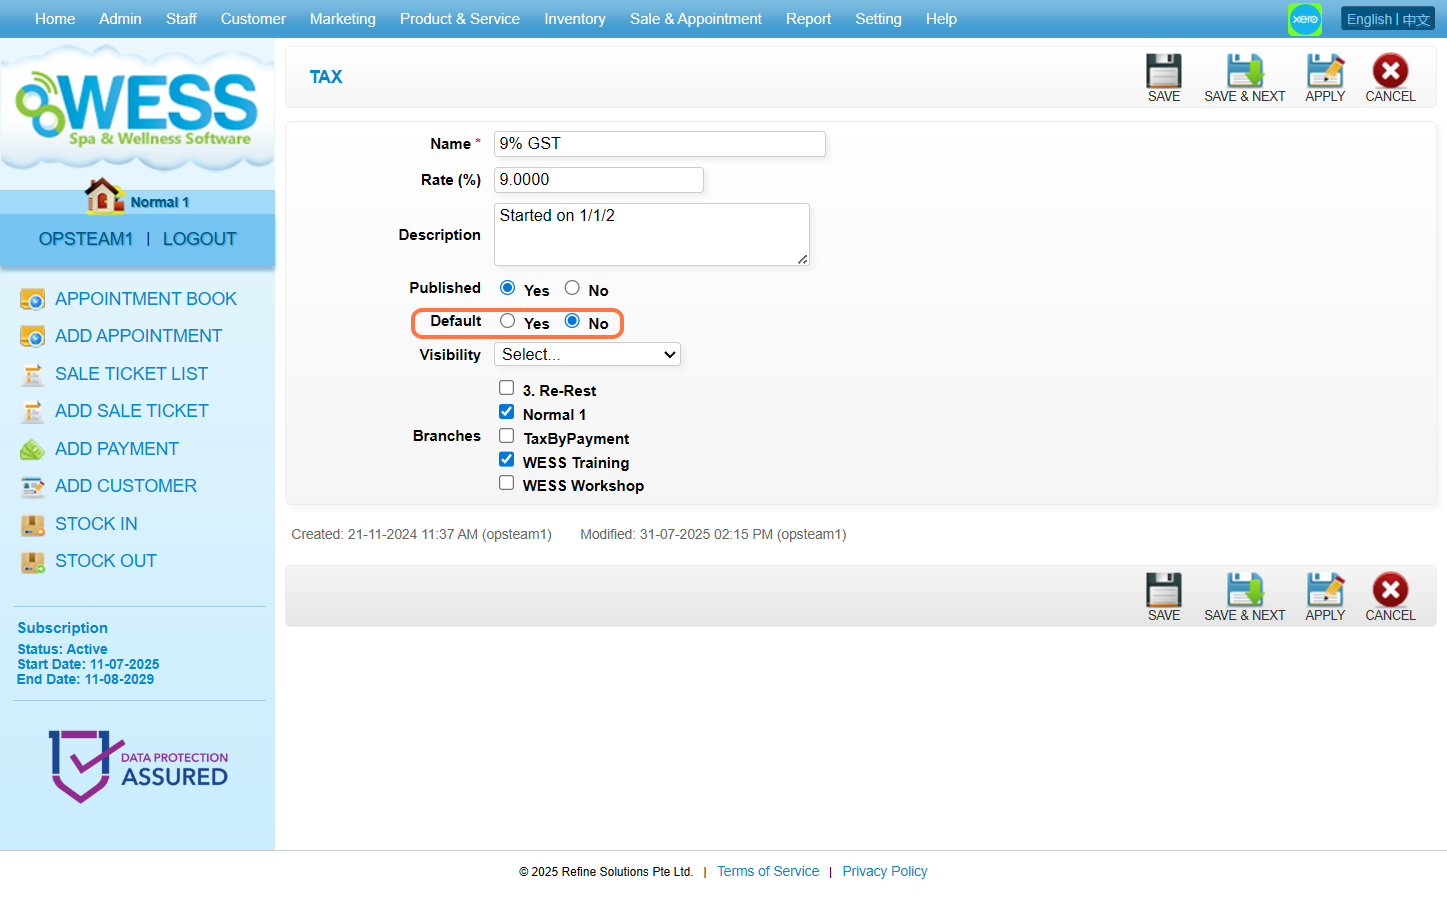
Step 8: Click “SAVE”.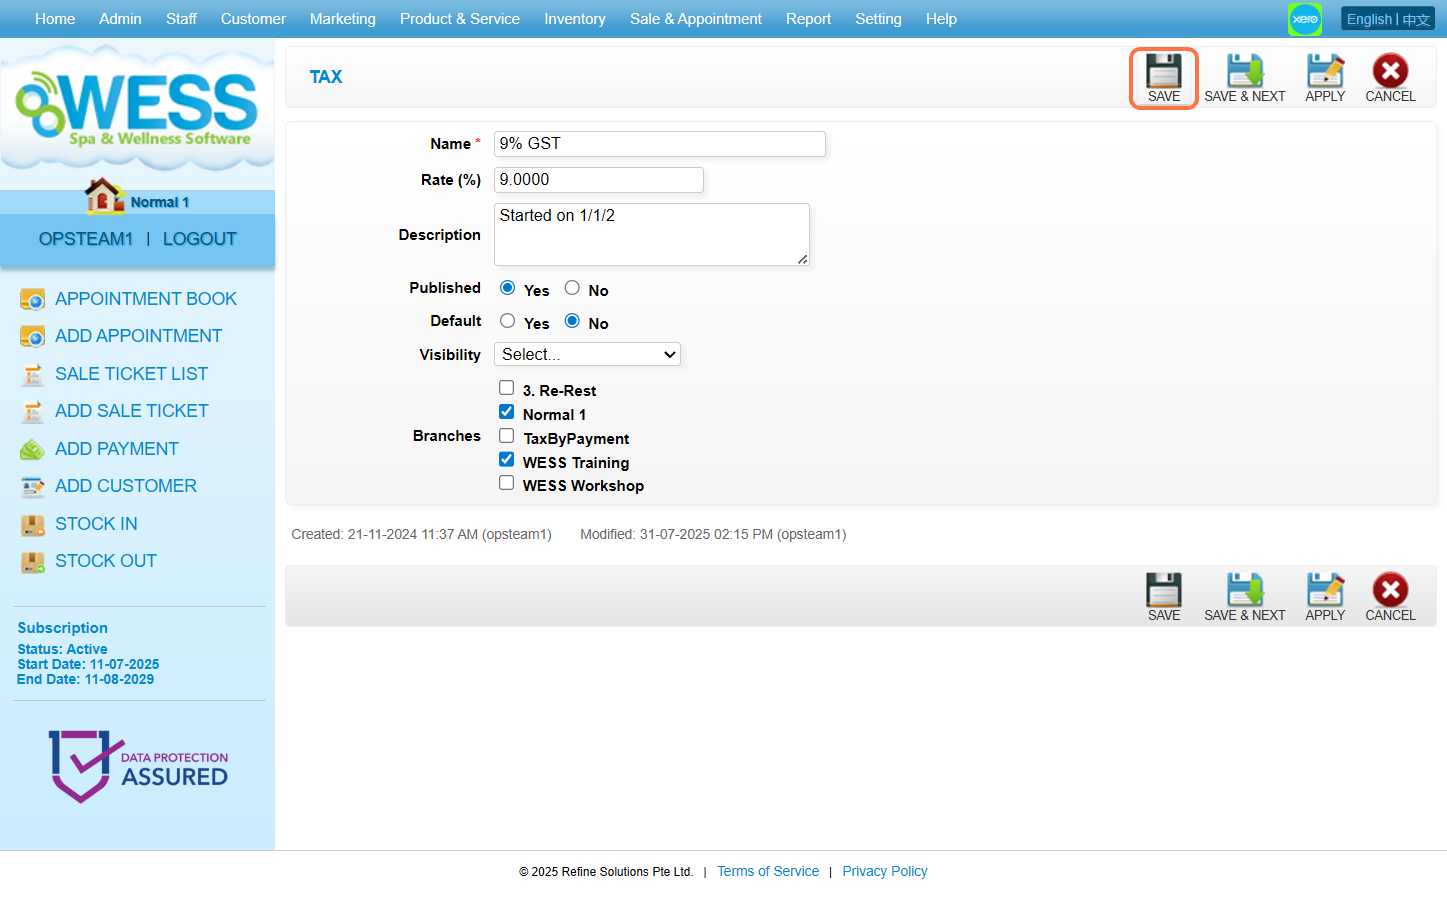
Last Update: August 2025
https://wesshelp.wessconnect.com/2023/03/03/how-to-use-the-expired-item/
Step 1: Click “Setting” .
Step 2: Click “SALE SETTING” .
Step 3: Click “OTHERS” .
Step 4: Select “Yes” for “Use expired item” .
Step 5: Click any Save icon “💾” .
Step 6: Now the branch/outlet allows users to use expired item.
[!] Note that some users are still not able to use this feature as it is also an access right which admin can limit users to use.
Step 7: To check the access right(shortcut), click on current username.
Step 8: Click “MY ROLE” .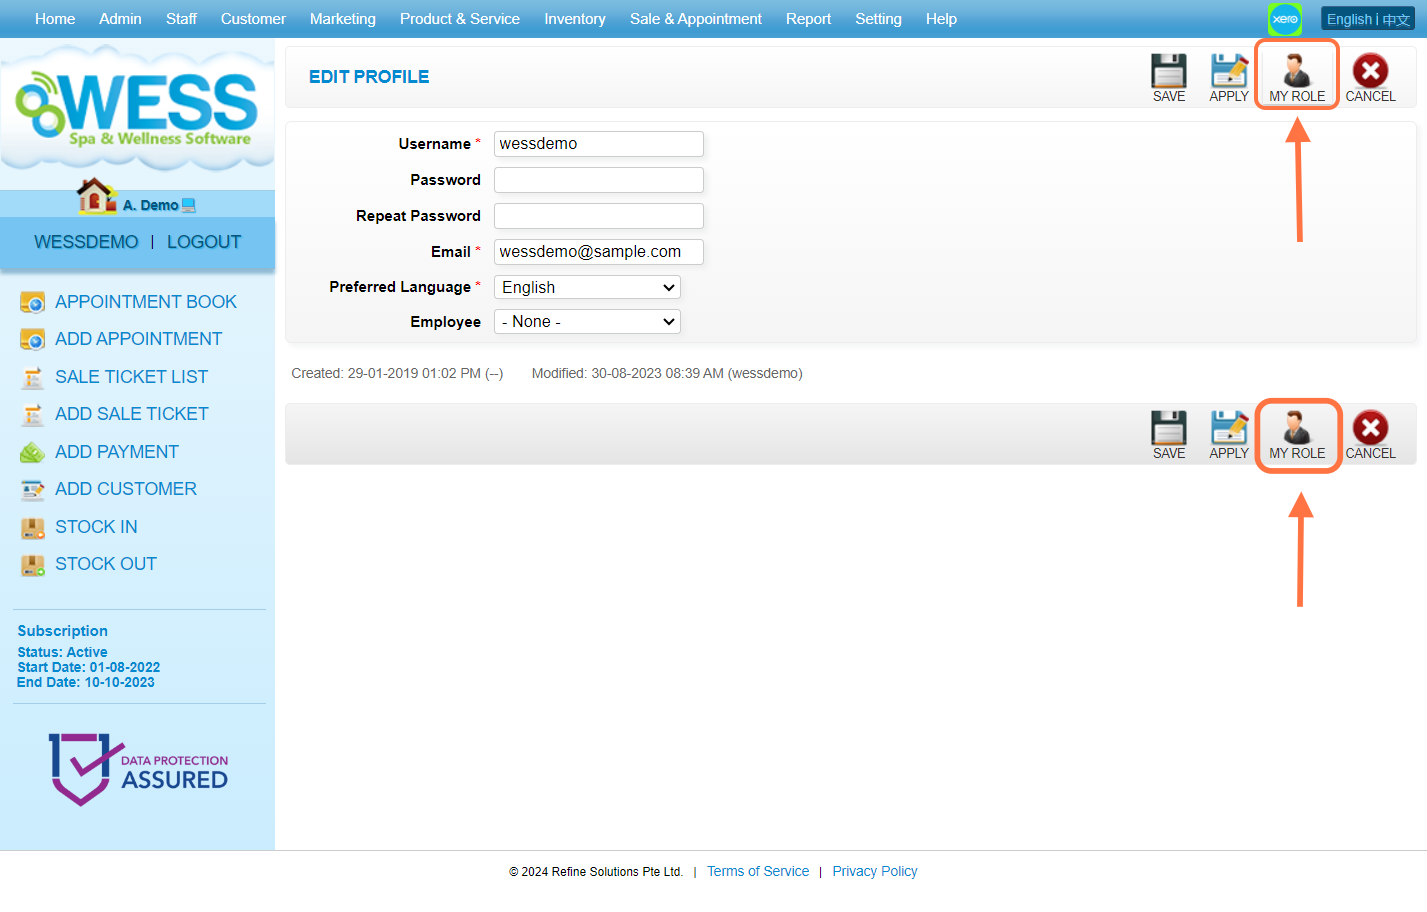
Step 9: Click “SALE & APPOINTMENT” .
Step 10: Make sure your user account have the “Use Expired Item” access right.
Last Update: Aug 2024
https://wesshelp.wessconnect.com/2023/03/13/how-to-check-audit-logs-trails-of-past-sale/
Step 1: Click “Sale & Appointment” .
Step 2: Click “SALE TICKET” .
Step 3: Select a “Date” and “Search” button.
Step 4: Select the “Sale Ticket” need to check and click the pen icon “✏️” . 
Step 5: Click extend button “▾” .
Step 6: Click “Audit Trail” button.
Step 7: The audit trail will appear and shows the past modification with details.
Last update: July 2024
https://wesshelp.wessconnect.com/2023/07/12/how-to-share-prepaid-items-between-multiple-customers/
Scenario: Customer A and Customer B are willing to share their purchased prepaid with each other for usage.
Step 1: Click “Customer” .
Step 2: Click “CUSTOMER” .
Step 3: Select a customer (Customer A) and click the pen icon “✏️” to update.
[!] It can be anyone from the sharing group.
Step 4: Tick the Sharing Account checkbox “☑️” .
Step 5: Click on “APPLY” or other disk icons to save.
Step 6: Make sure the change has been saved.
Step 7: Copy the code from the “Sharing Account” field.
[!] You can assume SA code is one sharing group code.
Step 8: Click “CANCEL” .
Step 9: Select another customer (Customer B) and click the pen icon “✏️” to update.
Step 10: Tick the Sharing Account checkbox “☑️” .
Step 11: Paste the copied code into this field.
Step 12: After pasting, must choose previously mentioned customer (Customer A).
[!] You can apply this code to anyone who wants to share their purchased prepaid.
Step 13: Click on “APPLY” or other disk icons to save.
Step 14: Make sure the change has been saved.
Step 15: [Optional] To check if they are sharing the prepaid, buy any prepaid item as Customer A.
Step 16: [Optional] In another sale ticket, select Customer B .
Step 17: Click “Use Prepaid” .
Step 18: [Optional] Hover the mouse cursor on the ‘i’ icon “ⓘ” to show its owner.
In this example, Service 200 from TK04385 is purchased and owned by Customer A.
Step 19: [Optional] To check if Customer B can share prepaid as well, buy any prepaid items.
Step 20: [Optional] In new ticket, select Customer A and click “Use Prepaid” .
Step 21: [Optional] Hover the mouse cursor on the ‘i’ icon “ⓘ” to show its owner.
In this example, Service 200 from TK04387 is purchased and owned by Customer B.
Last update: Aug 2024
https://wesshelp.wessconnect.com/2023/07/12/how-to-cancel-customer-s-prepaid-items/
Step 1: Click “Sale & Appointment” .
Step 2: Click “SALE TICKET” .
Step 3: Click “NEW” .
Step 4: Enter the customer code or name to search and select a customer.
Step 5: Click “Refund Prepaid” .
Step 6: Tick the checkbox “☑️” of prepaid service.
Step 7: Type the “0” number zero in value.
Step 8. Click ADD & CLOSE icon “📁” .
Step 9: Here will show the selected item list.
Step 10: Click on “CHECK OUT” .

Step 11: Make sure the record has been saved .
Last update: Aug 2024
Step 1: Click “Sale & Appointment” .
Step 2: Click “SALE TICKET” .
Step 3: Click “NEW” .
Step 4: Enter the customer code or name to search and select a customer.
Step 5: Click “Use Prepaid” .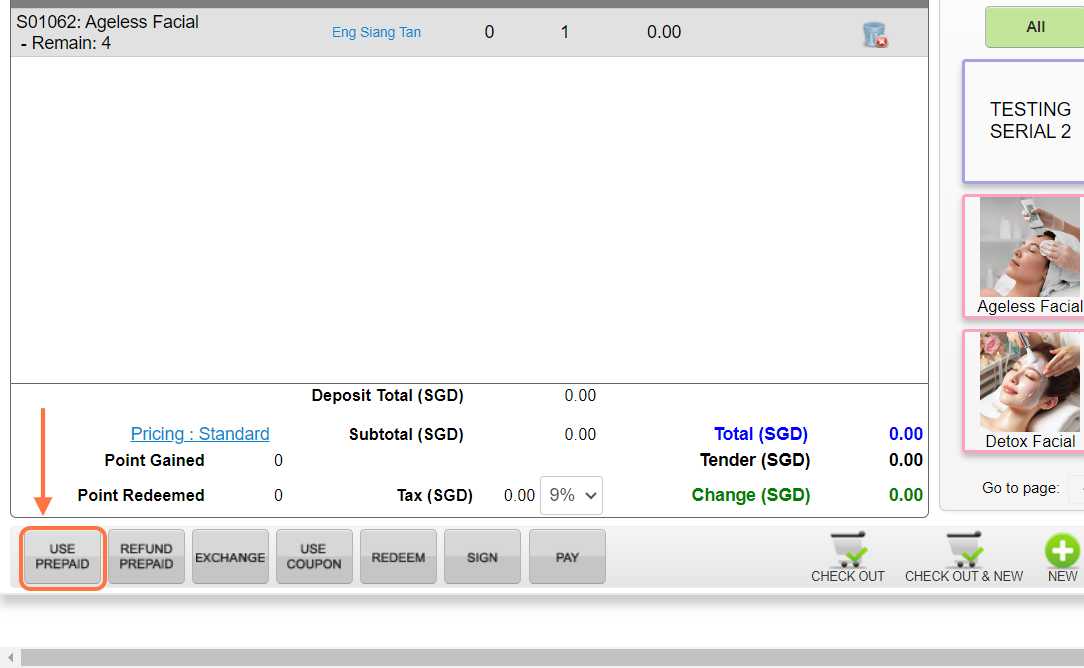
Step 6: Select a credit coupon.
Step 7: Click “ADD & CLOSE” .
Step 8: Another pop-up will show to let customer redeem available items.
Step 9: Click “ADD & CLOSE” .
Step 10: [Optional] Here can click on green dollar icon “$” to redeem it using multiple credit coupons.
Step 11: [Optional] Select one or multiple coupons and its values you want to use for redeem.
Step 12: Click “CHECK OUT” .
Step 13: Make sure the record has been saved.
Last Update: Aug 2024
https://wesshelp.wessconnect.com/2024/01/10/how-to-change-the-payment-method-for-a-refund-ticket/
Step 1: Click “Sale Appointment” .
Step 2: Click “SALE TICKET” .
Step 3: Select a ticket which involves a refund or click on new to create a ticket.
Step 4: Click the pen icon “✏️” to edit.
Step 5: Click “Pay” .
Step 6: Click “Paid By” field and select another payment method.
*Remark: DO NOT enter an amount in this field (the right of “Paid By”).
[!] The negative amount indicated the refund amount.
Step 7: Click “CHECK OUT” .
Step 8: Make sure the ticket has been checked out.
Last Updated: Aug 2024
Step 1: Click “Setting” .
Step 2: Click on “SALE SETTING” .
Step 3: Click “OTHERS” .
Step 4: Set “Commission Allocation” to “On” .
Step 5: [Optional] Set “Commission Allocation Limit Total” to “On” .
Step 6:[Optional] Set “Commission Allocation Limit 100%” to “On” .
Step 7: Click Save icon “💾” .
Step 8: Make sure the change has been saved.
Step 9: Next click “Sale & Appointment” .
Step 10: Click “SALE TICKET” .
Step 11: Click the pen icon “✏️” to edit.
Step 12: [Optional] Here can edit the staff-in-charge and “CHECK OUT” the ticket to save it.
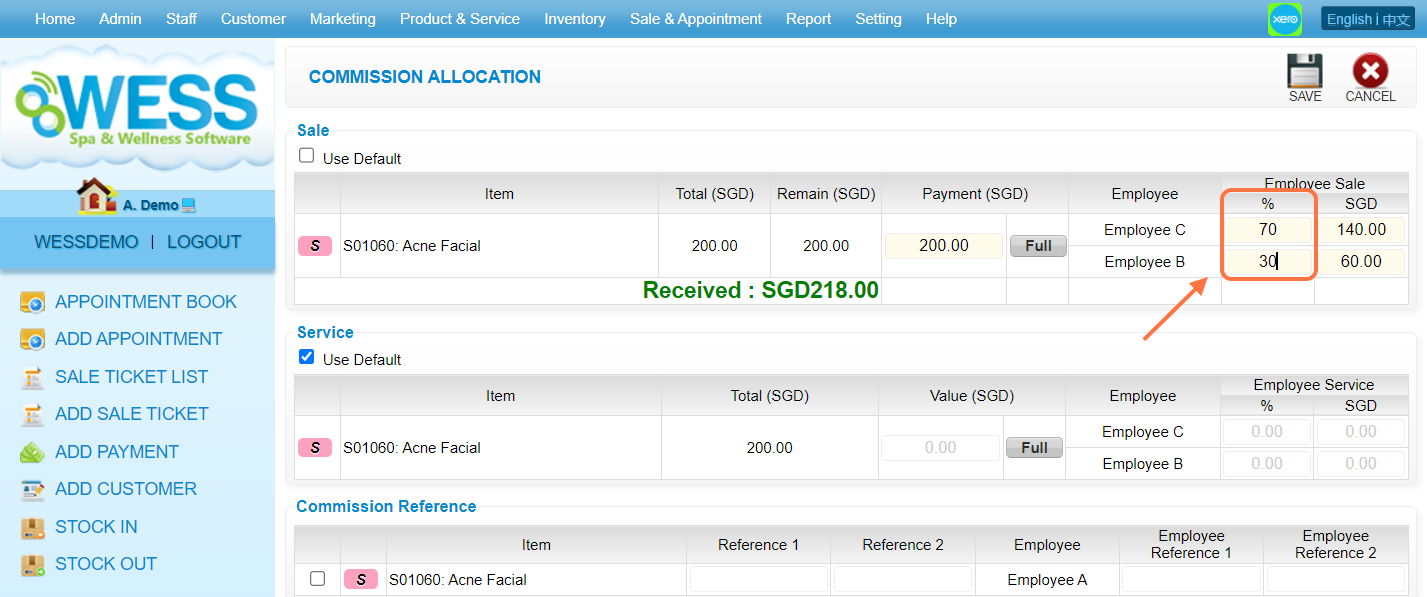
Step 13: Click “Commission” .
Step 14: Select a recent payment history and click on it.
[!] Commission is calculated per payment.
Step 15: Untick “Use Default” to start customize the commission allocation for this payment.
Step 16: Enter the amount for payment to overwrite the commission base amount.
Step 17: Here can click on “Full” to enter the total sales as payment amount.
Step 18: Then can change the commission value.
[!] Another field will be updated once entered the amount.
Step 19: Enter the allocation percentage.
[!] Another field will be updated once entered the amount.
Step 20: Here can repeat the steps 15 to 19 in this section as well.
[!] If the “Employee Service” column has a total value of more than 100% or “Value” amount, this allocation will be restricted from saving (refer to steps 5 & 6).
Step 21: Then “Commission Reference” section can write more details.
Step 22: Click “SAVE“.
Step 23: Make sure the change has been saved.
Last Updated: Aug 2024
https://wesshelp.wessconnect.com/2024/11/27/how-to-assign-a-serial-coupon/
Step 1: Click “Sale & Appointment” .
Step 2: Click on “SALE TICKET” .
Step 3: Click “NEW” .
Step 4: Set a “Customer” name and select a customer .
Step 5: Click “Employee” .
Step 6: Select an employee and click “SET“.
Step 7: Enter the serial number coupon name and select it .
Step 8: Make sure enter the correct “Serial Number” . 
Step 9: Click on the “➕” to add .
Step 10: Click “ADD & CLOSE” .
Step 11: Click the item .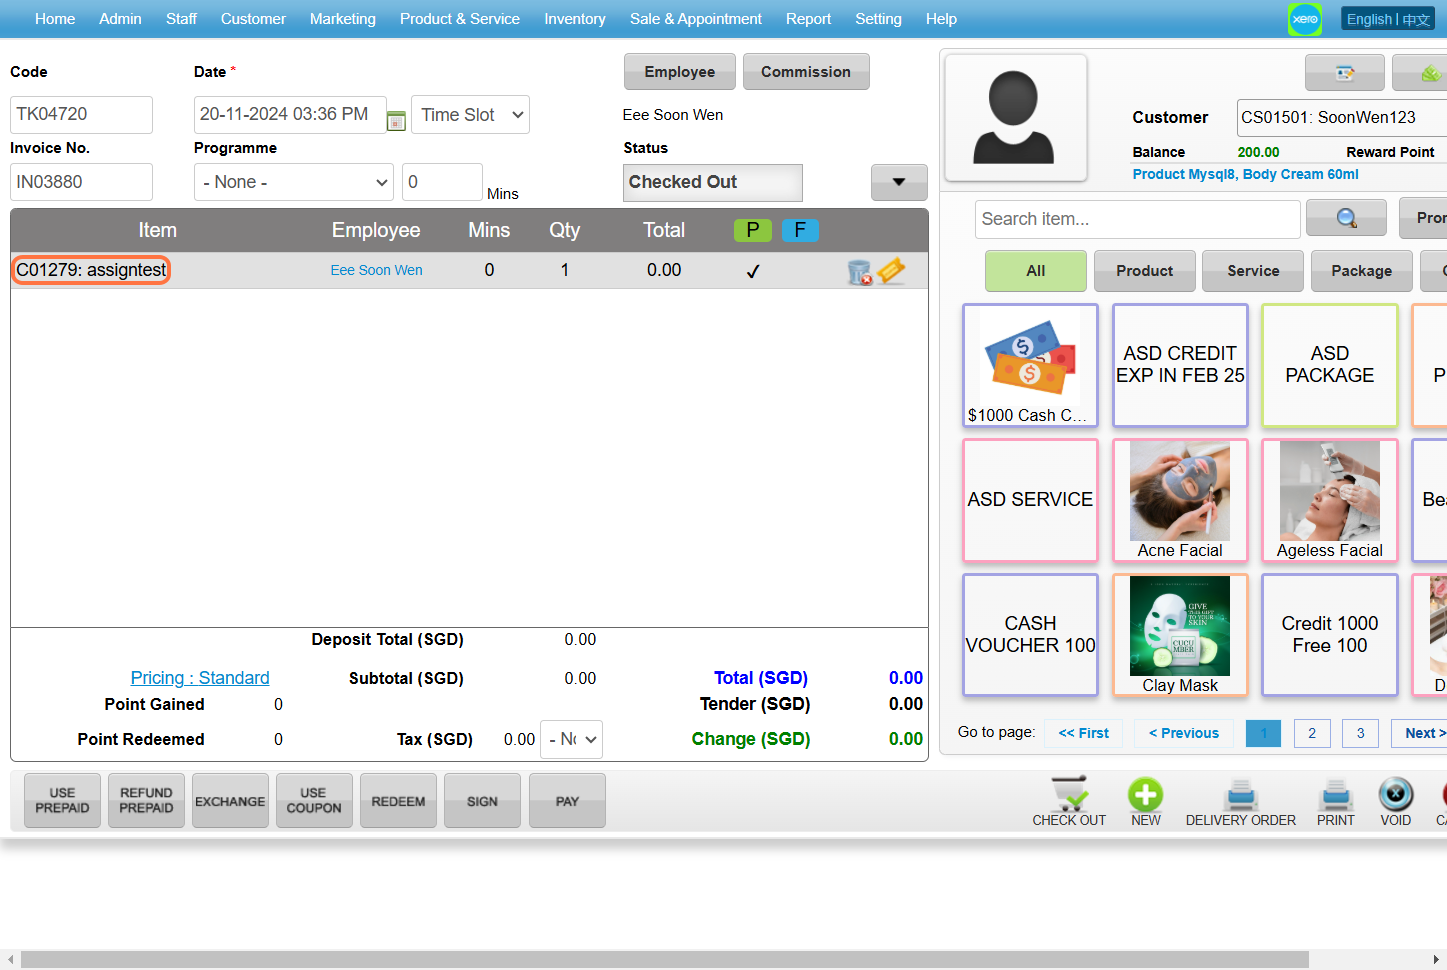
Step 12: Select “Prepaid” .
[!] If the prepaid option is not ticked, tick it.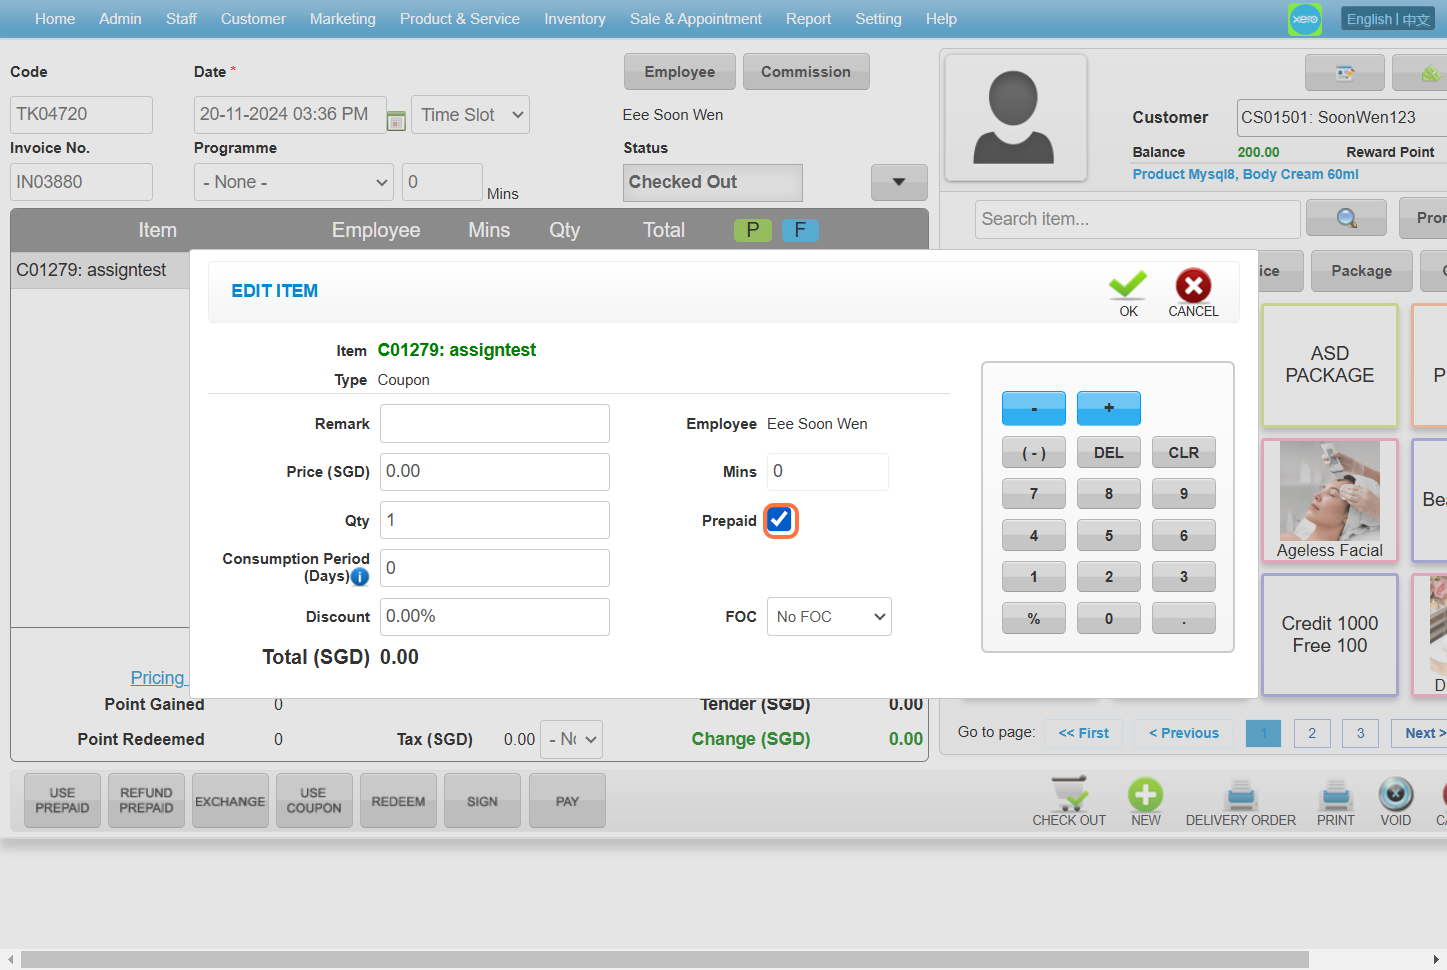
Step 13: Click “OK” .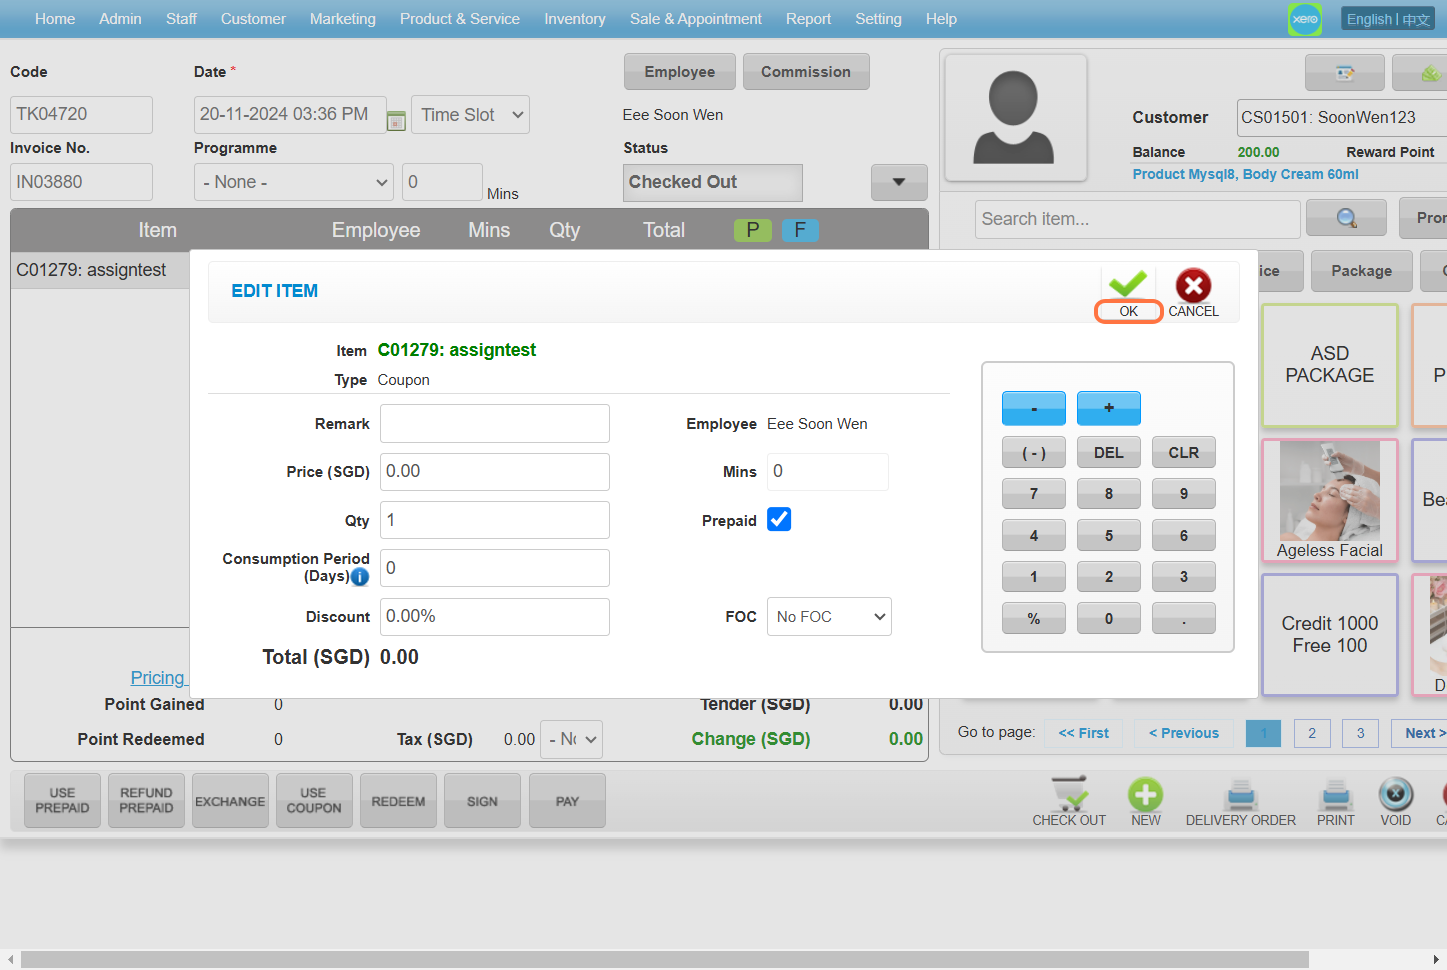
Step 14: Click “CHECK OUT” .
Last Updated: Nov 2024
https://wesshelp.wessconnect.com/2024/11/27/how-to-use-a-serial-coupon/
Step 1: Click “Sale & Appointment” .
Step 2: Click “SALE TICKET” .
Step 3: Click “NEW” .
Step 4: Set a “Customer” name and select a customer .
Step 5: Click “Employee” .
Step 6: Select an employee and click “SET“.
Step 7: Select the item .
Step 8: Click “USE PREPAID” . 
Step 9: Select the serial coupon .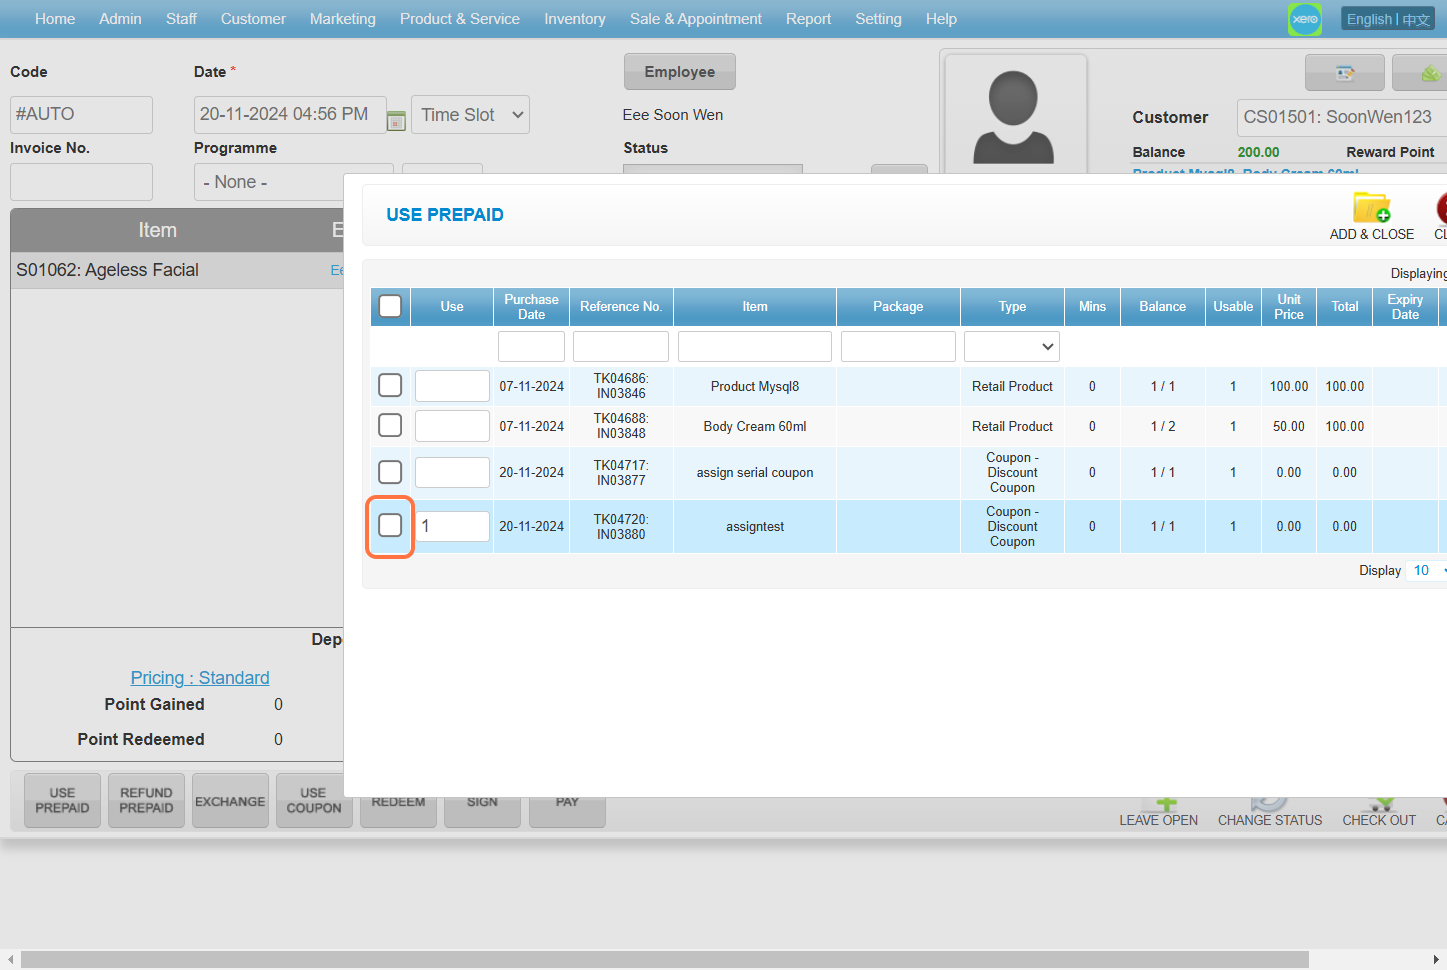
Step 10: Make sure enter the correct “Serial Number” .
Step 11: Click on the “➕” to add .
Step 12: Click “ADD & CLOSE” .
Step 13: Click “ADD & CLOSE” to add the coupon .
Step 14: Click “PAY” .
[!]The item costs 200, and a coupon worth 100 was applied, so 100 was deducted.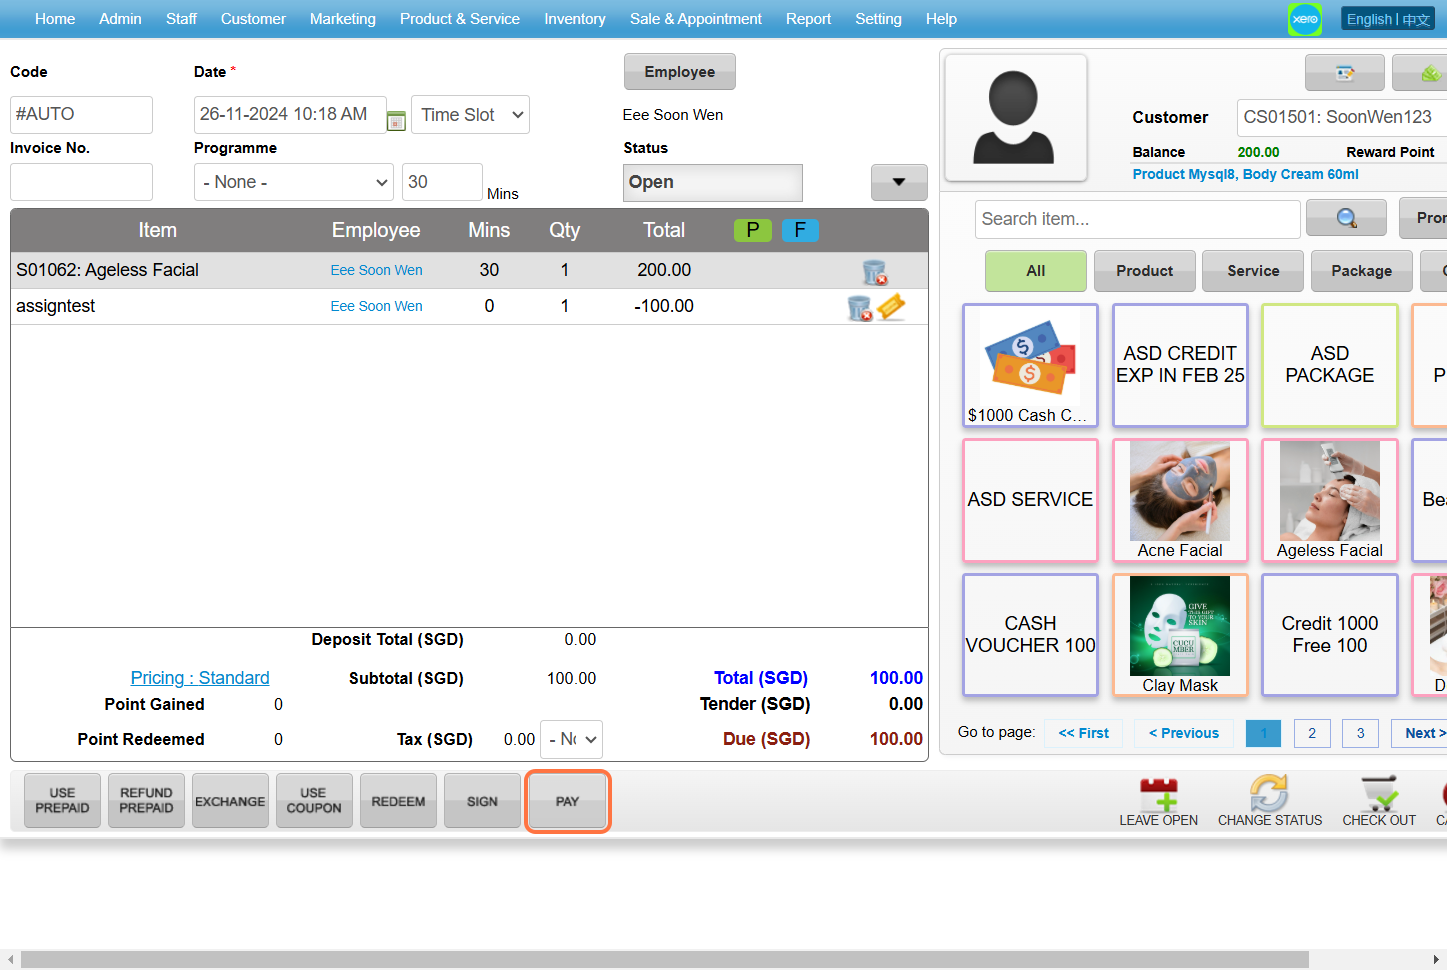
Step 15: Click “CHECK OUT” .
Last Updated: Nov 2024
https://wesshelp.wessconnect.com/2026/04/22/how-to-use-a-token-coupon/
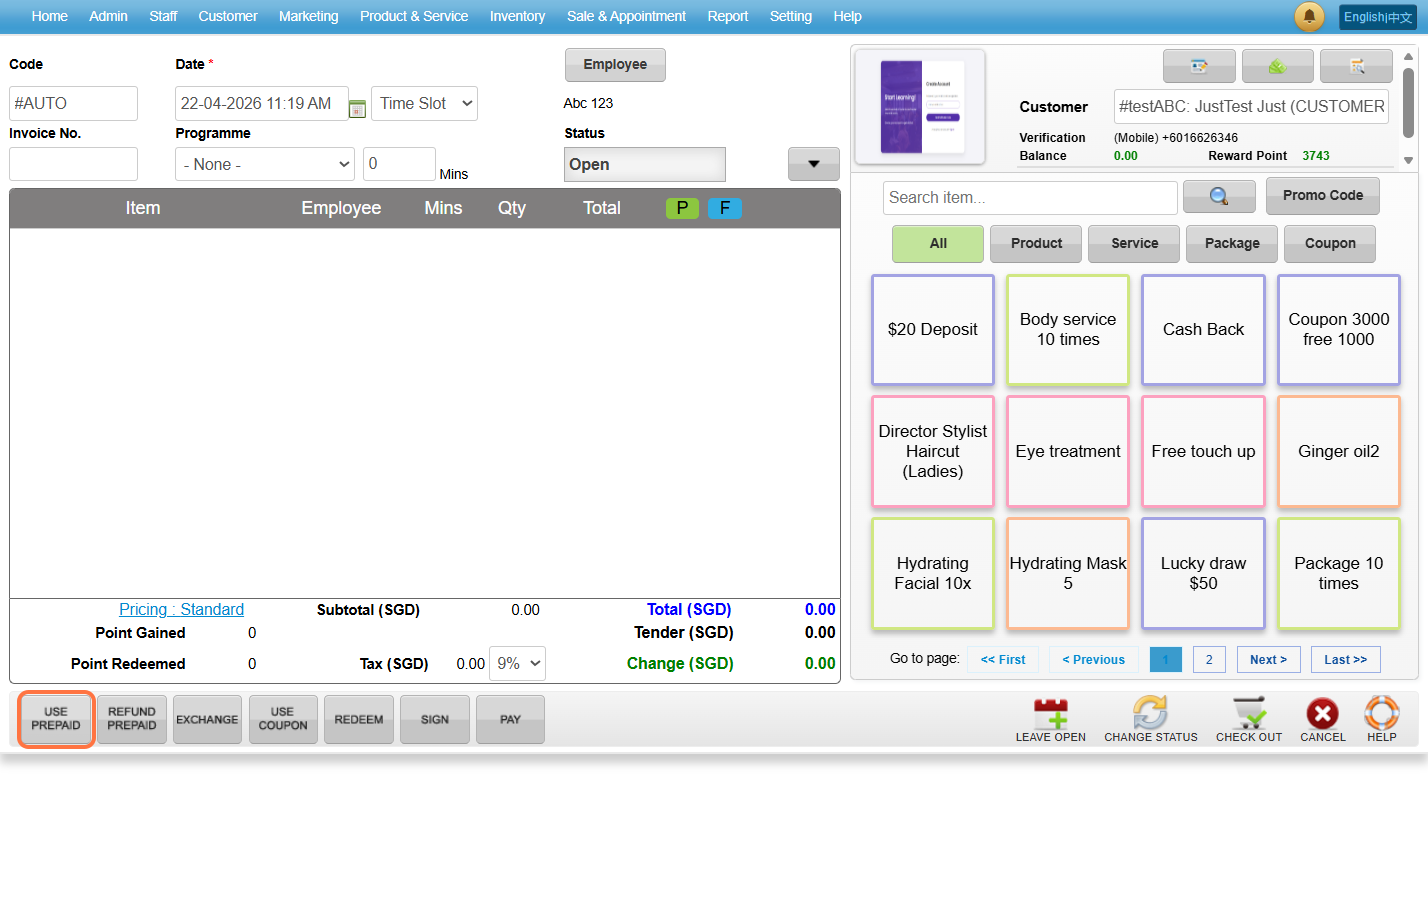
Step 1: Click on “Sale & Appointment”.
Step 2: Click on “SALE TICKET”.
Step 3: Click on “NEW”.
Step 4: Enter the “Customer’s Name”.
Step 5: Click on “Employee”.
Step 6: Select the employee and check it.
Step 7: Click on “SET” button.
Step 8: Click on “Use Prepaid”.
Step 9: Select the token coupon.
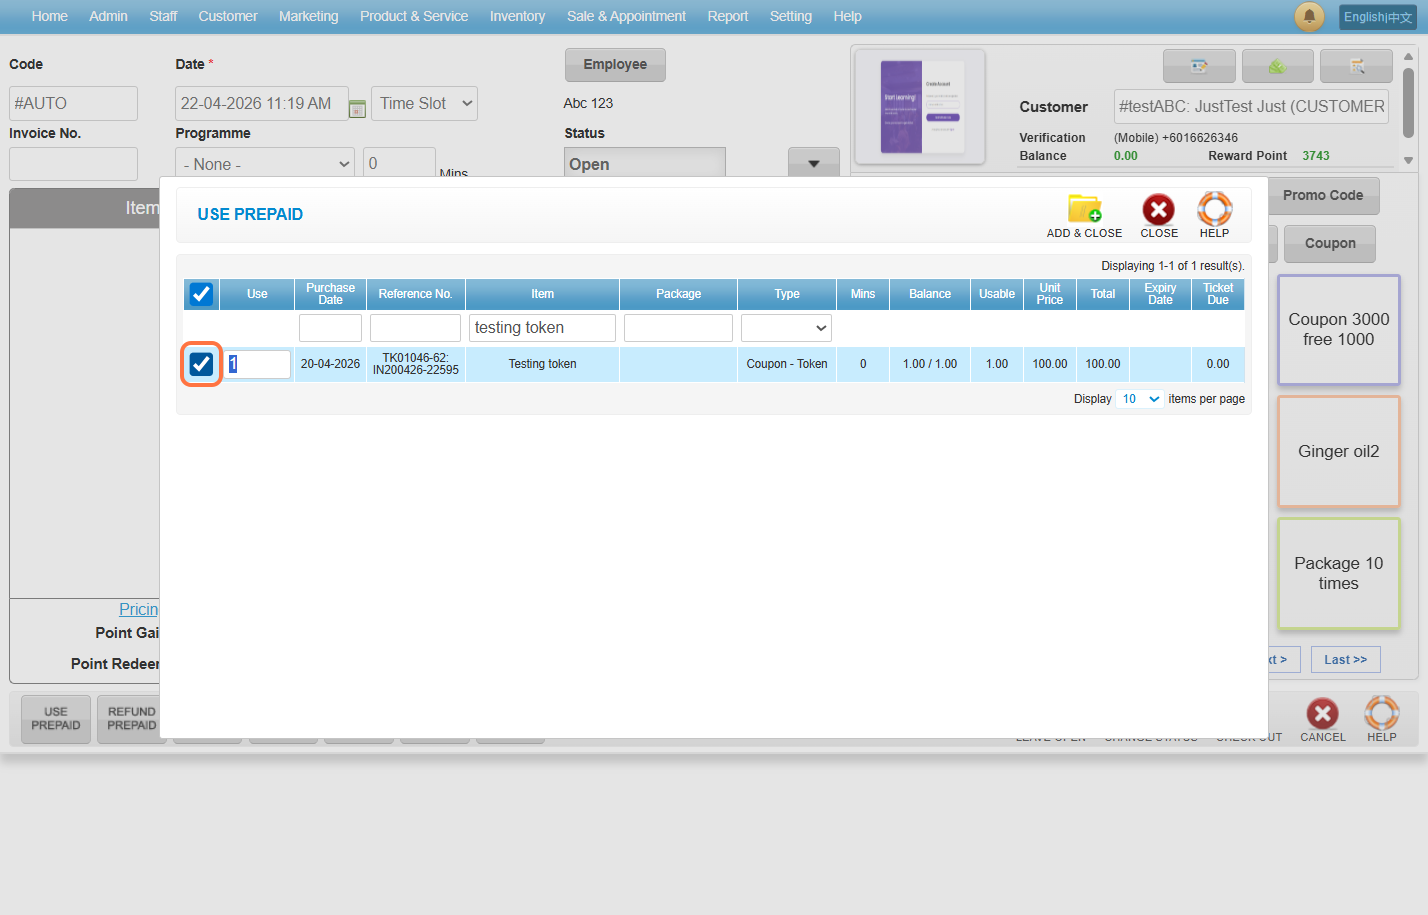
Step 10: Click on “ADD & CLOSE”.

Step 11: Select a service to redeem.
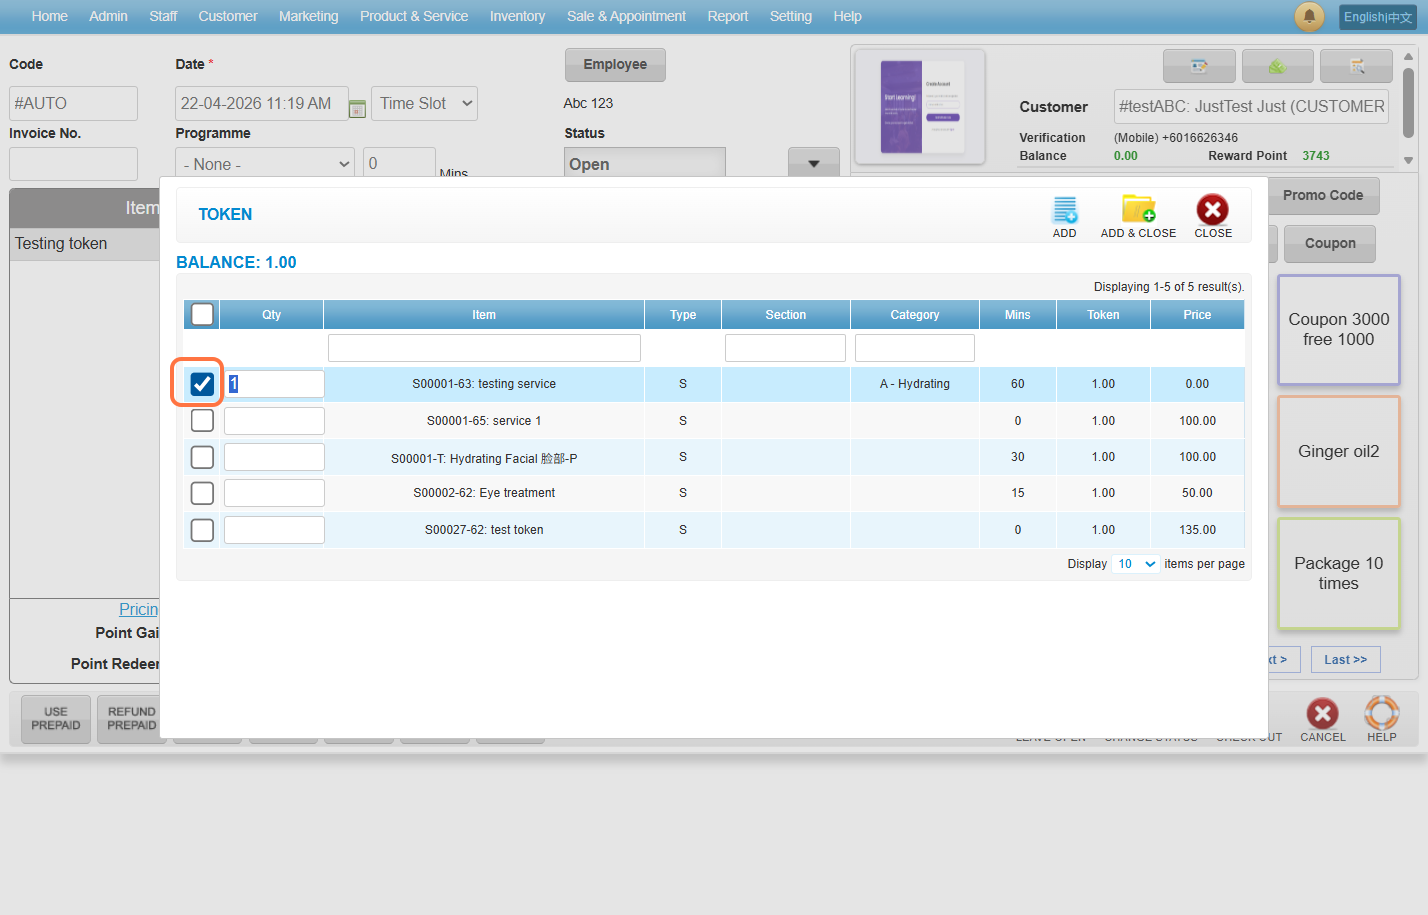
Step 12: Click on “ADD & CLOSE”.
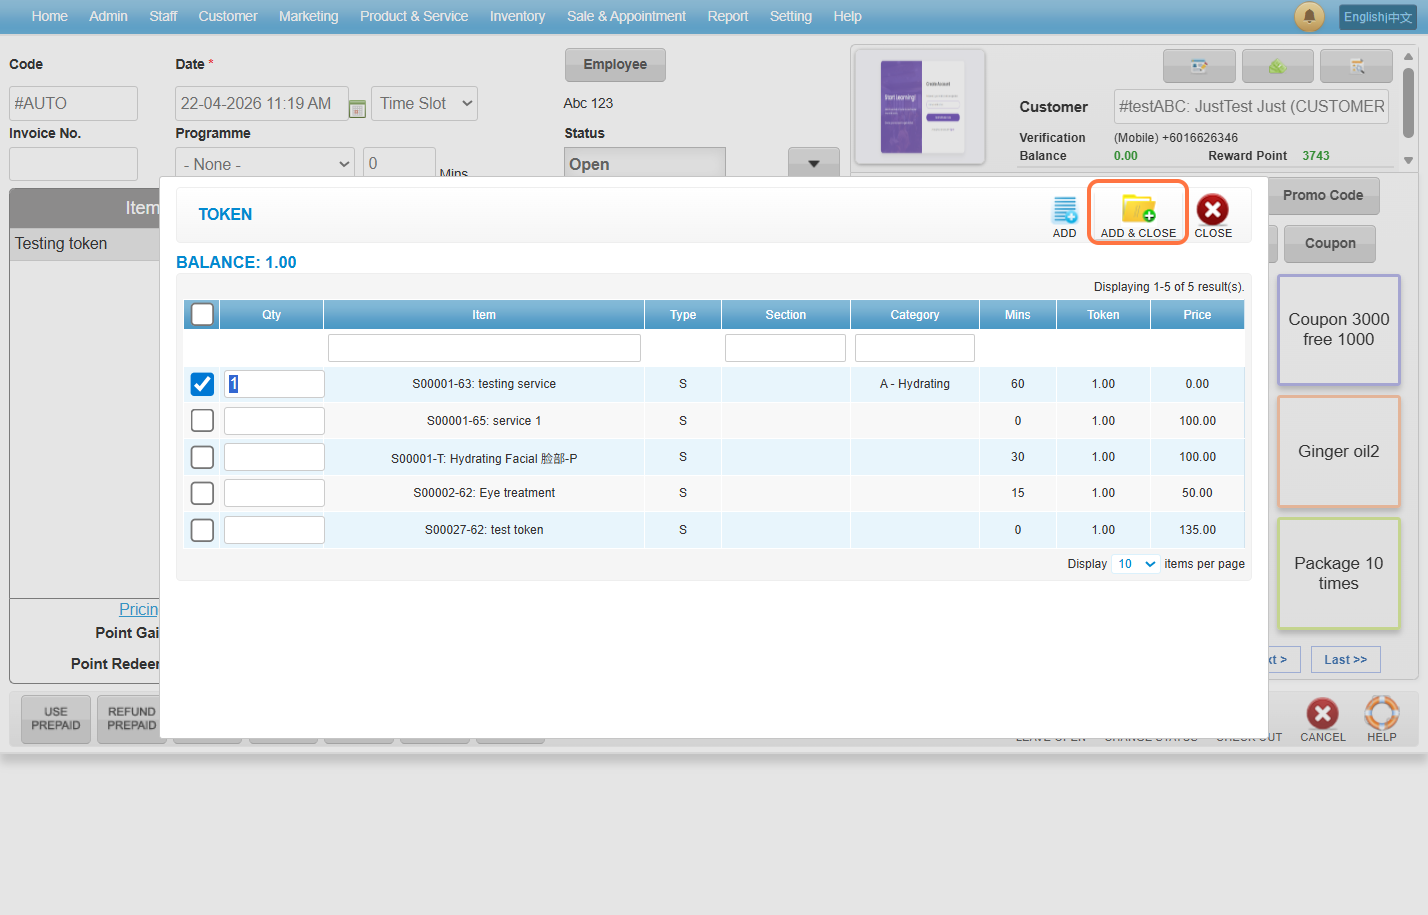
Step 13: Click on “CHECK OUT”.
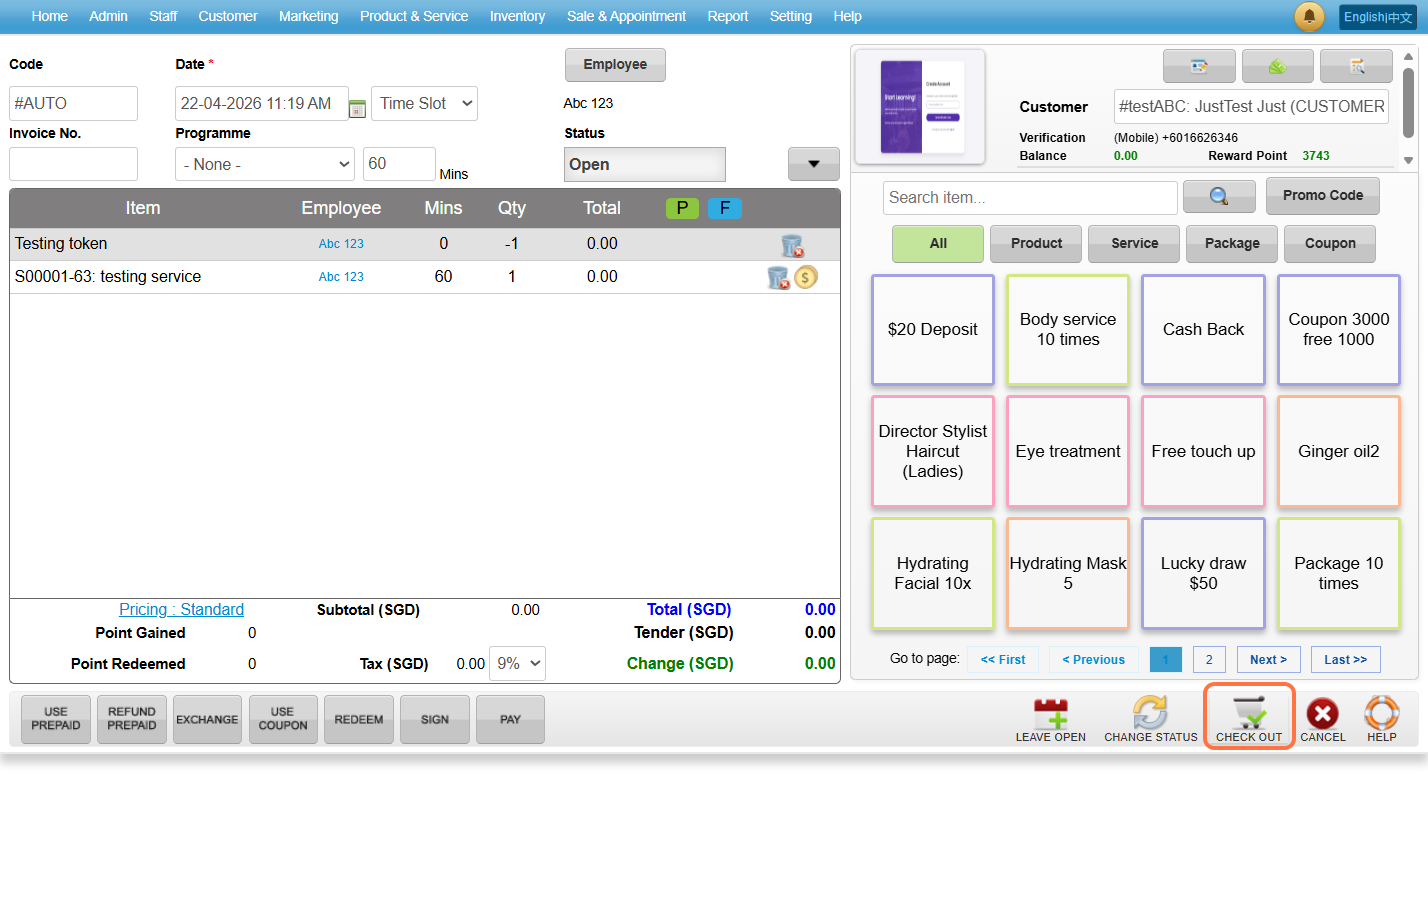
Last Updated: April 2026
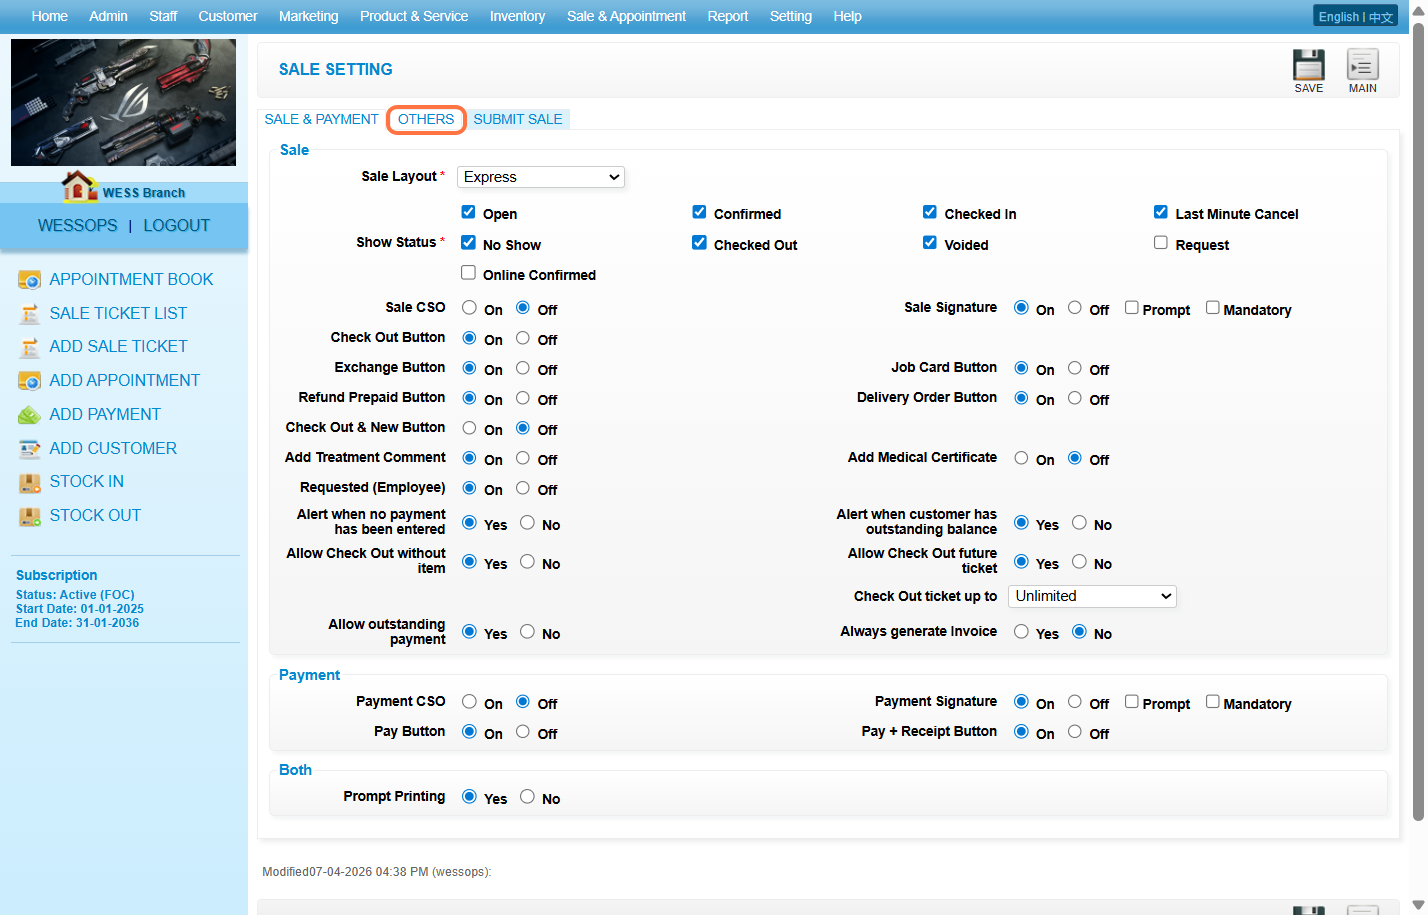
https://wesshelp.wessconnect.com/2024/11/29/how-to-create-a-job-card/
Step 1: Click “SETTING”.
Step 2: Click “SALE SETTING”.
Step 3: Set “Job Card Button” to “On” .
Step 4: Click “SAVE”.
Step 5: Make sure the change has been saved.
Step 6: Click “SALE & APPOINTMENT”.
Step 7: Click “SALE TICKET”.
Step 8: Click “NEW”.
Step 9: Enter the customer name.
Step 10: Click “Employee”.
Step 11: Choose the employee.
Step 12: Click “SET”.
Step 13: Click “Service”.
Step 14: Choose a service.
Step 15: Click “PAY”.
Step 16: Click “Full”.
Step 17: Click “CHECK OUT”.
Step 18: Click “JOB CARD”.
Step 19: Job card can be previewed here.
Last Updated: November 2024
https://wesshelp.wessconnect.com/2024/12/10/how-to-remove-expired-item-from-use-prepaid-list/
Step 1: Click “Sale & Appointment”.
Step 2: Click “SALE TICKET”.
Step 3: Click “NEW”.
Step 4: Click “Employee”.
Step 5: Choose the employee.
Step 6: Click “SET”.
Step 7: Enter the customer name.
Step 8: Click “REFUND PREPAID”.
Step 9: Choose the expired item.
Step 10: Enter “0” into the value.
Step 11: Click “ADD & CLOSE”.
Step 12: Click “CHECK OUT”.
Step 13: Make sure the change has been saved.
Last Updated: December 2024
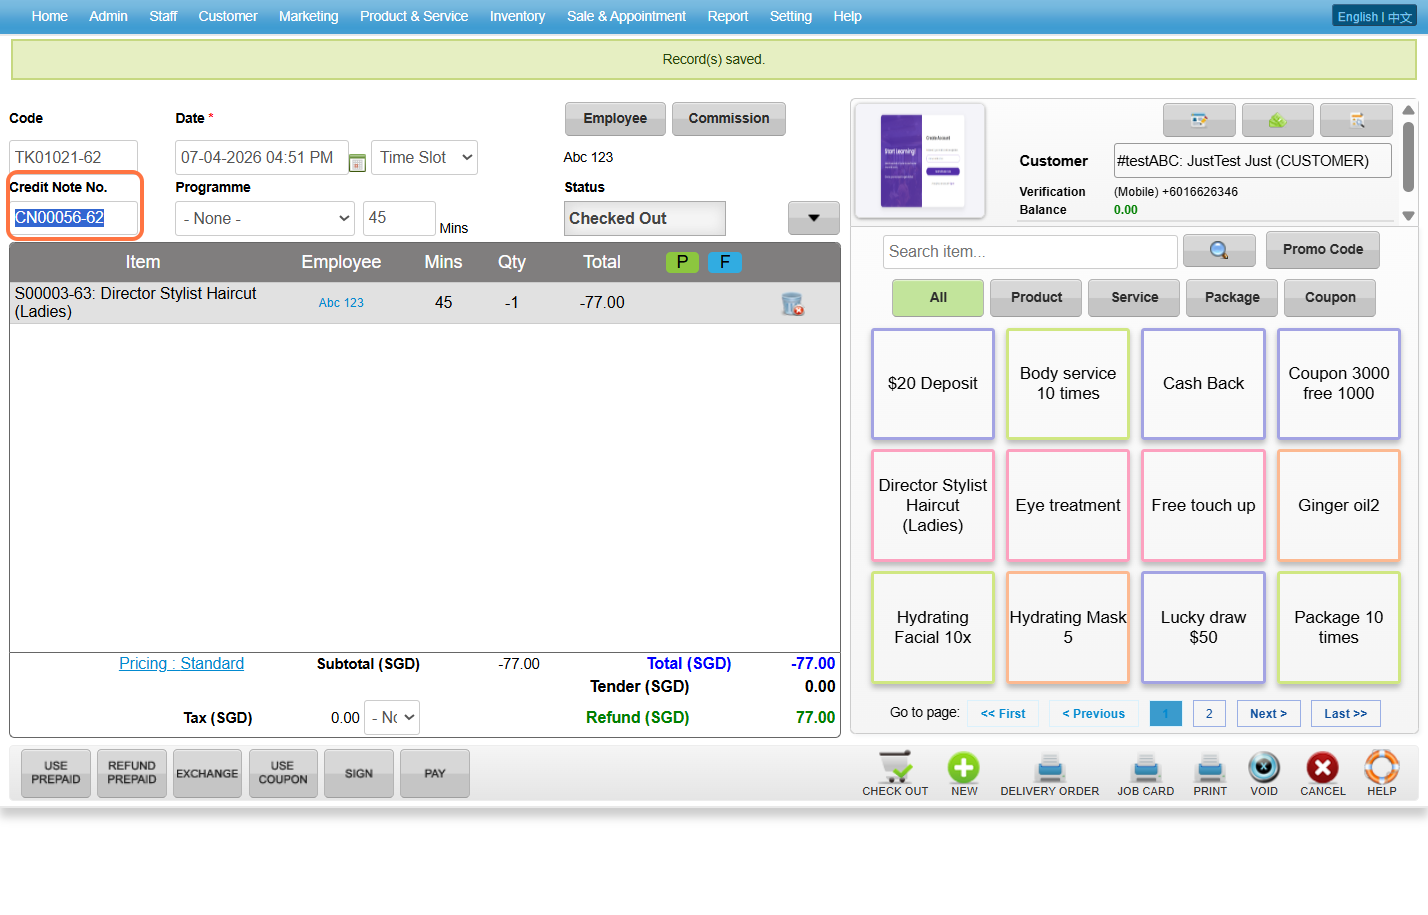
https://wesshelp.wessconnect.com/2026/03/30/how-to-generate-the-credit-note-no/
Step 1: Click on “Setting“.
Step 2: Click on “SALE SETTING“.
Step 3: Click on “OTHERS“.
Step 4: Select “Yes“.
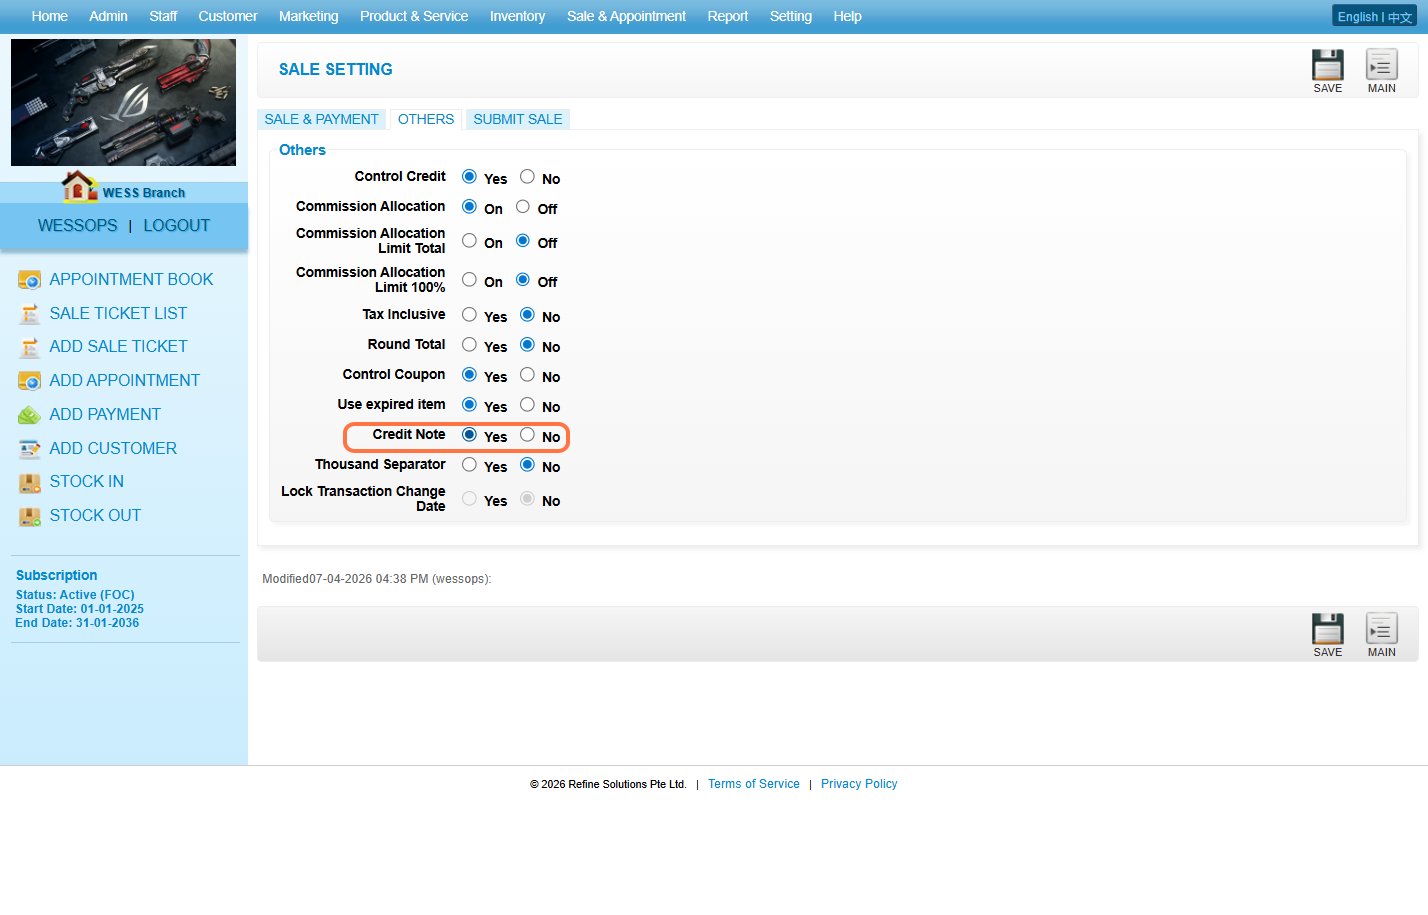
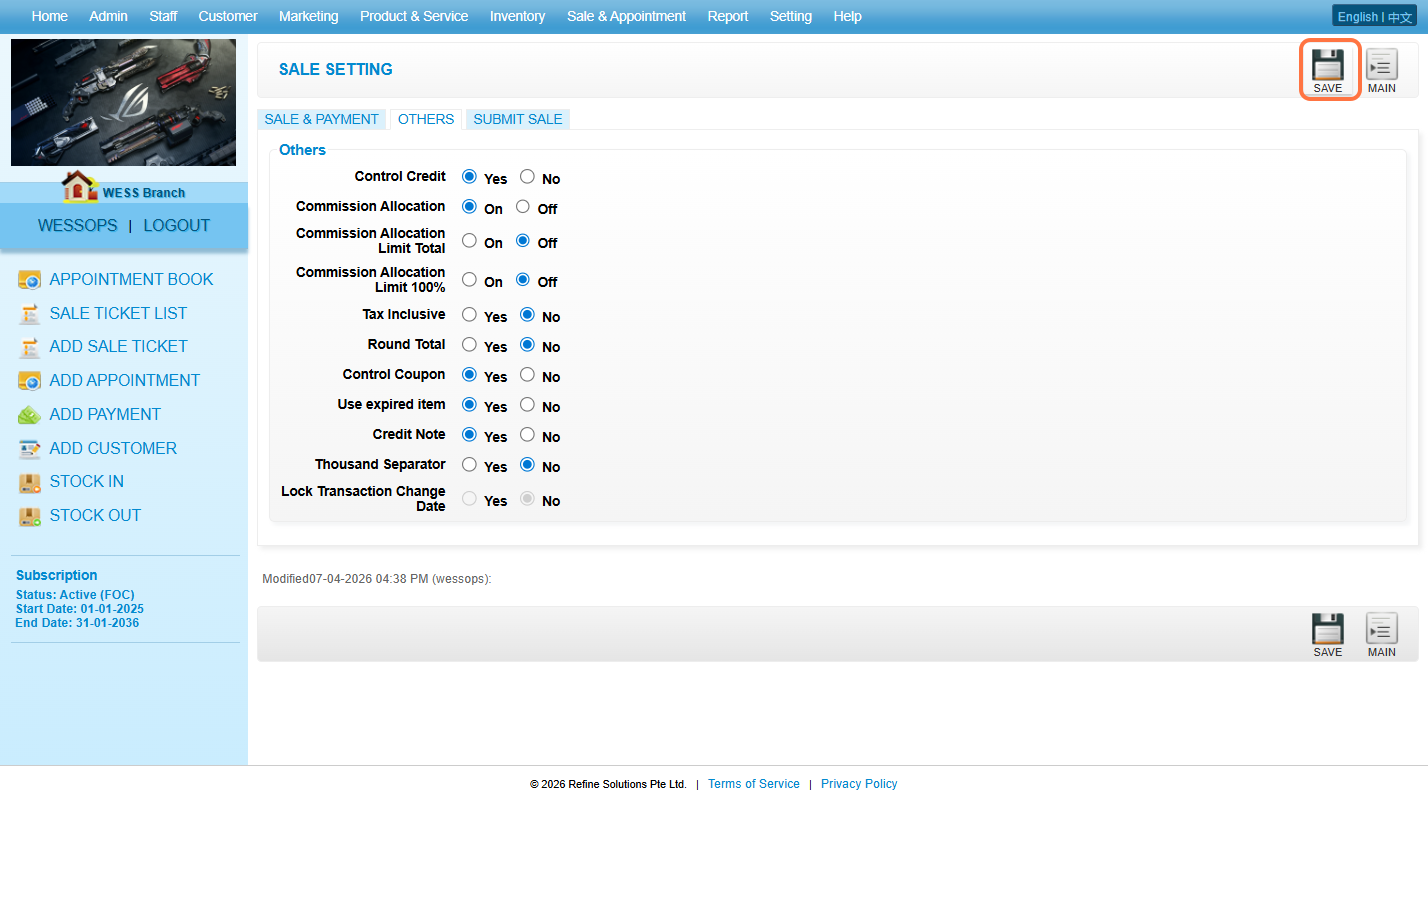
Step 5: Click the “Save” button.
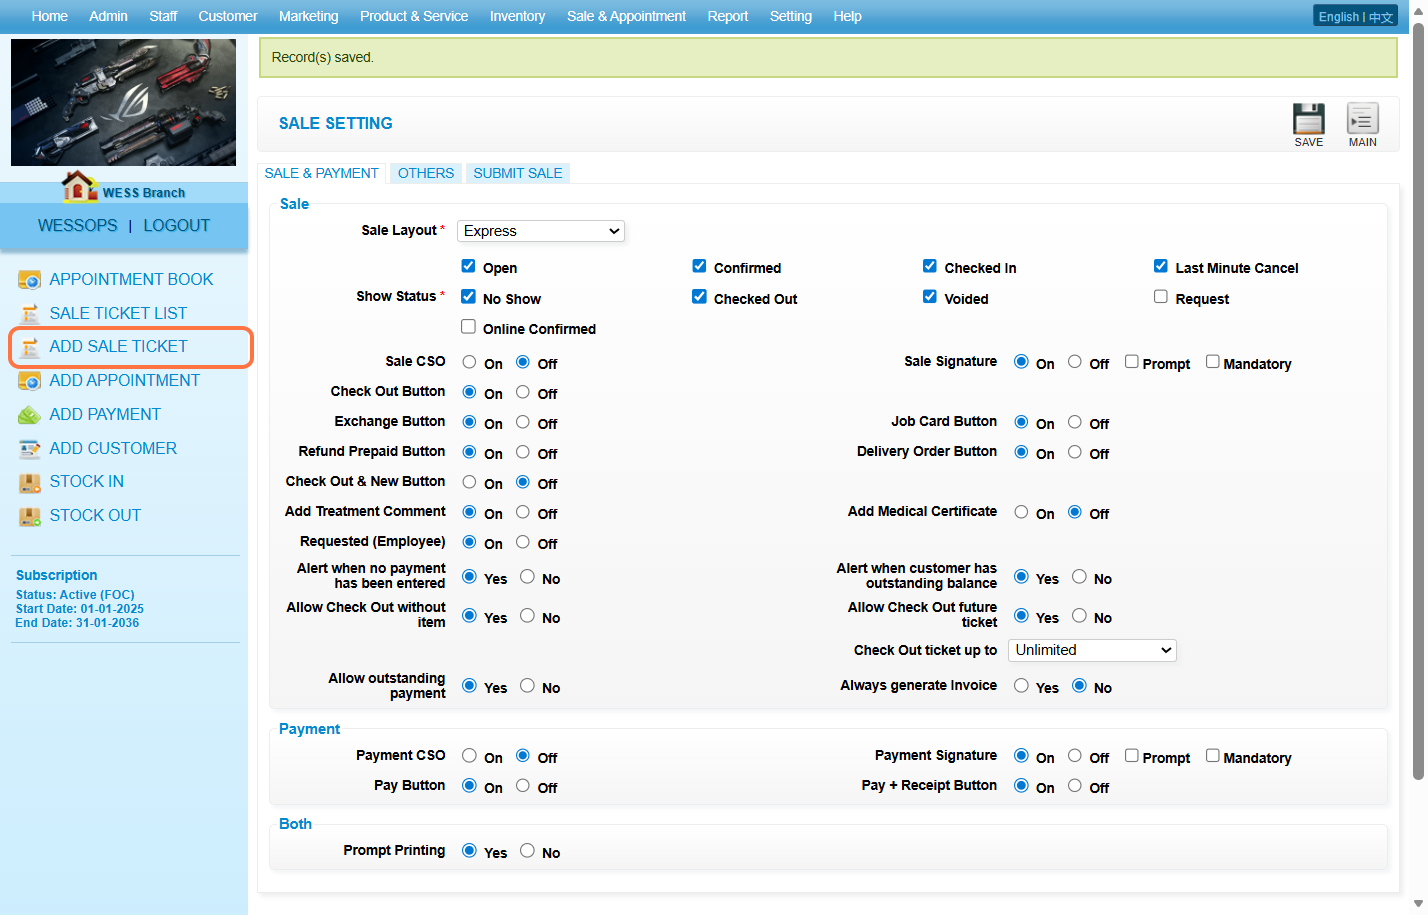
Step 6: Click on “ADD SALE TICKET“.
Step 7: Enter the customer’s name.
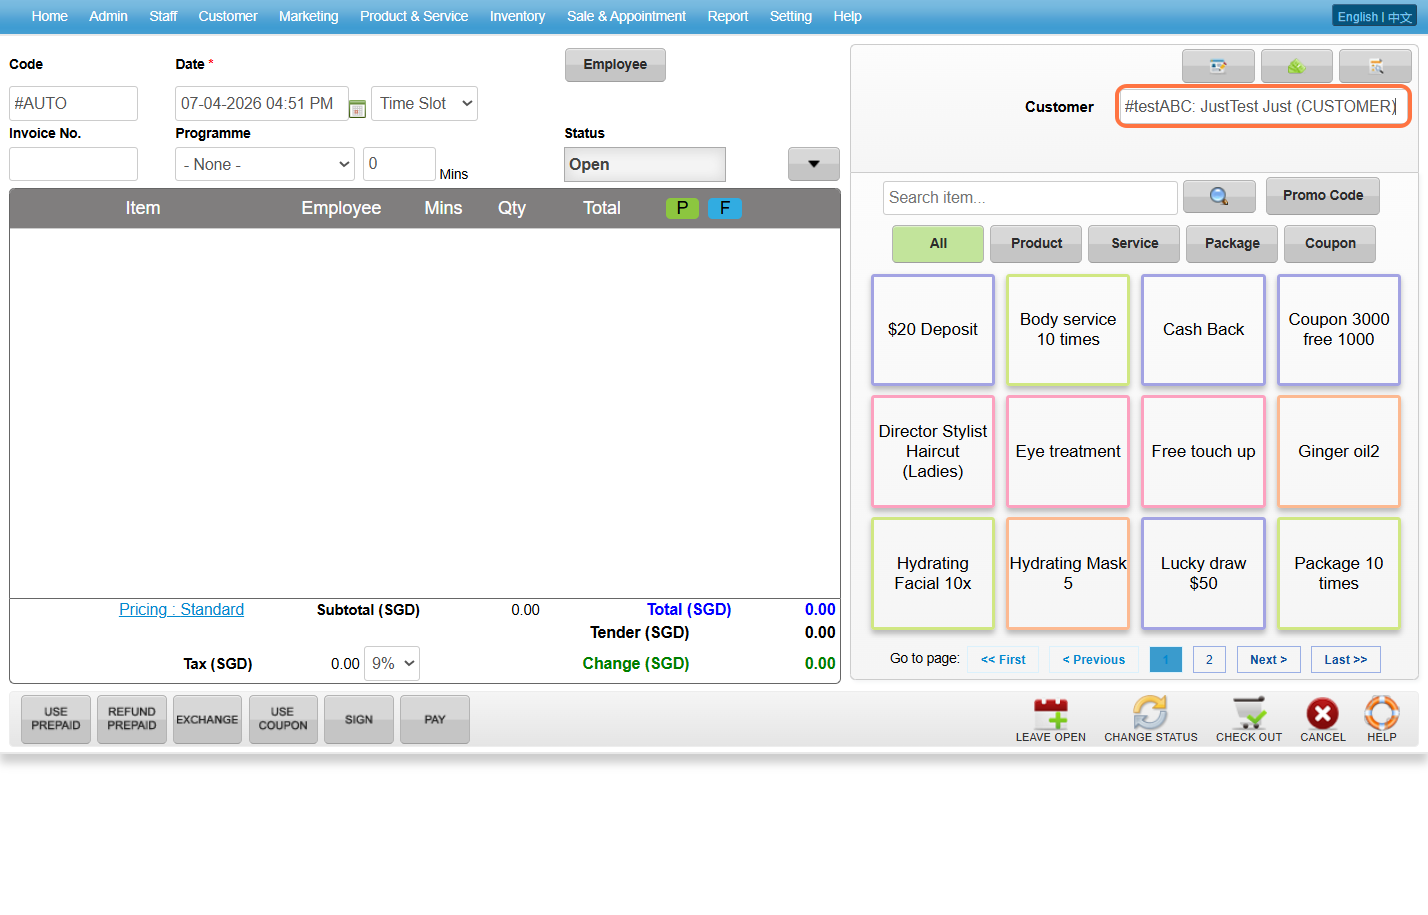
Step 8: Click on “Employee”.
Step 9: Select the employee.
Step 10: Click on “SET“.
ℹ️ Method 1 for Non-Prepaid Item
Step 1: Select the service.
Step 2: Click on the service in the item list.

Step 3: Put a “–” in front of 1 to process a refund for the service.
Step 4: Click on “OK“.
Step 5: Click on “CHECK OUT“.
 Step 6: System successful to generate the “Credit Note No“.
ℹ️ Method 2 for Prepaid Item
Step 1: Click on “Refund Prepaid“.
Step 2: Select which prepaid service you want to refund.
Step 3: Select the quantity need to be refund.
Step 4: Click on “ADD & CLOSE“.
Step 5: Click on “CHECKOUT”.
 Step 6: System successful to generate the Credit Note No.

Last Updated: April 2026
https://wesshelp.wessconnect.com/2023/10/24/how-to-add-a-payment-record/
Step 1: Click “Sale & Appointment“.
Step 2: Click “PAYMENT“.
Step 3: Click “NEW“.
Step 4: Enter the customer name or code and select a customer.
Step 5: [Optional] You can also click on Make Payment icon “💵” in the old ticket.
[!] This step is an alternative to Steps 1 to 4.
Step 6: Click “Payment” and enter a pay amount to declare.
Step 7: Click on the blue tick “✔️” to update.
Step 8: [Optional] You can click on “Full” button to fully pay the due amount.
Step 9: Enter a pay amount to “Pay By” field.
Step 10: Click on PAY icon “💲” to make confirm payment.
Step 11: Make sure the payment has been saved.
Last Update: Aug 2024
https://wesshelp.wessconnect.com/2021/06/17/how-to-edit-payment/
Step 1: Click “SALE & APPOINTMENT”
Step 2: Click “PAYMENT”
Step 3: Select the payment record
Step 4: Click “EDIT”
Step 5: You can make the changes if needed
Step 6: Click “PAY + RECEIPT”
Last update: August 2025
https://wesshelp.wessconnect.com/2021/06/17/how-to-void-payment/
Step 1: Click “SALE & APPOINTMENT”
Step 2: Click “PAYMENT”
Step 3: Select the payment record
Step 4: Click “EDIT”
Step 5: Click “VOID”
Last update: August 2025
https://wesshelp.wessconnect.com/2021/06/17/how-to-waive-payment/
Step 1: Click “ADD PAYMENT”
Step 2: Enter the customer name
Step 3: Click and enter the waive amount
Step 4: Click “PAY”
Last update: April 2021
https://wesshelp.wessconnect.com/2021/06/17/how-to-reprint-the-payments-receipt/
Step 1: Click “SALE & APPOINTMENT”
Step 2: Click “PAYMENT”
Step 3: Select the payment record
Step 4: Click “PRINT” to reprint
Last update: August 2025
https://wesshelp.wessconnect.com/2021/06/17/how-to-email-payment-receipt-to-customer/
Step 1: Click “Sale & Appointment”
Step 2: Click “PAYMENT”.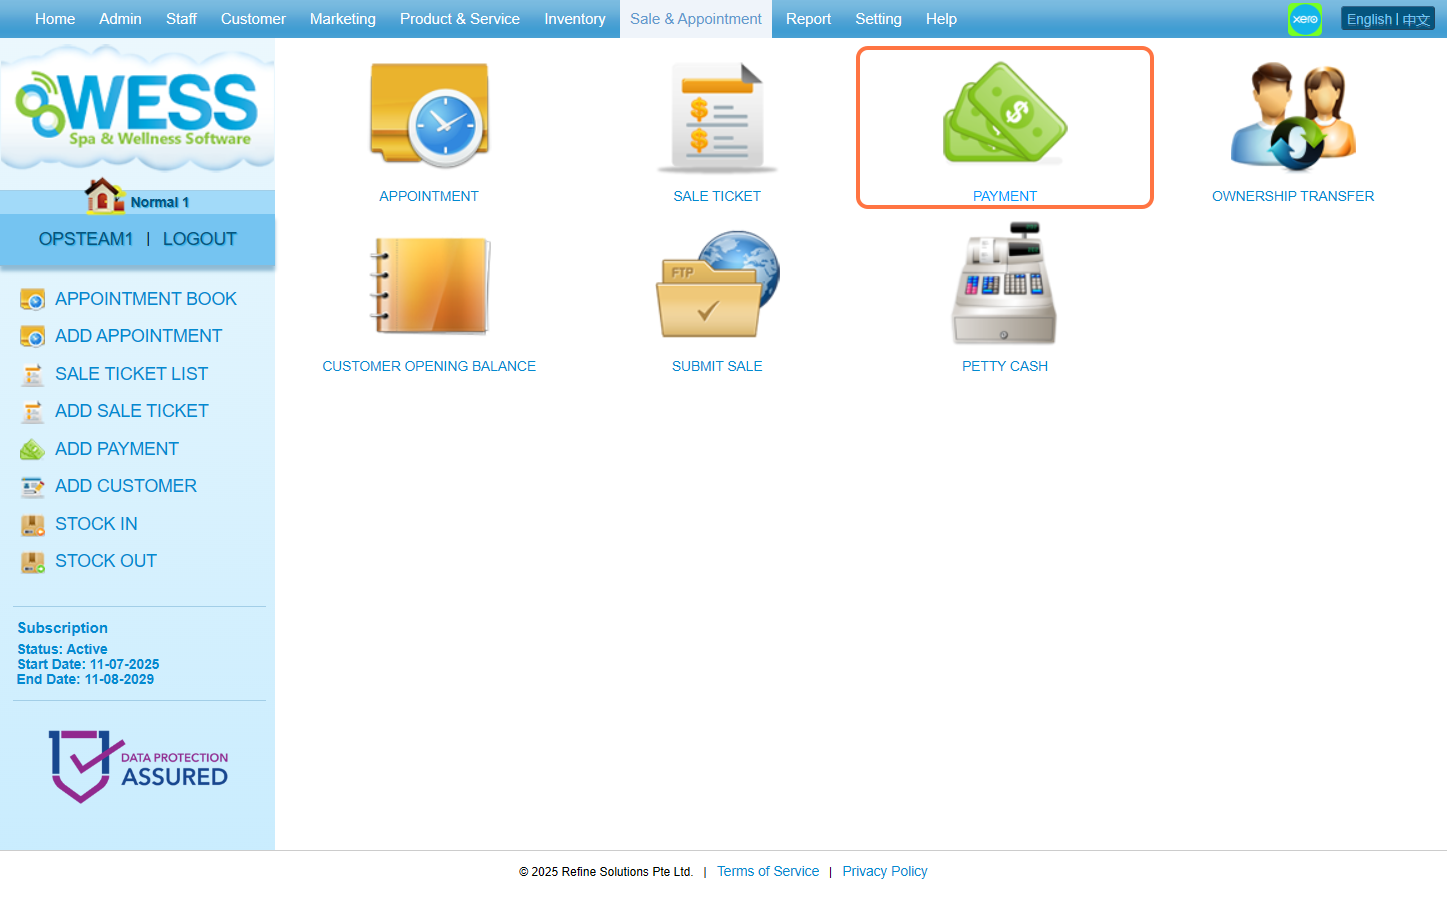
Step 3: Click on any of the past payment for which you want to send the receipt.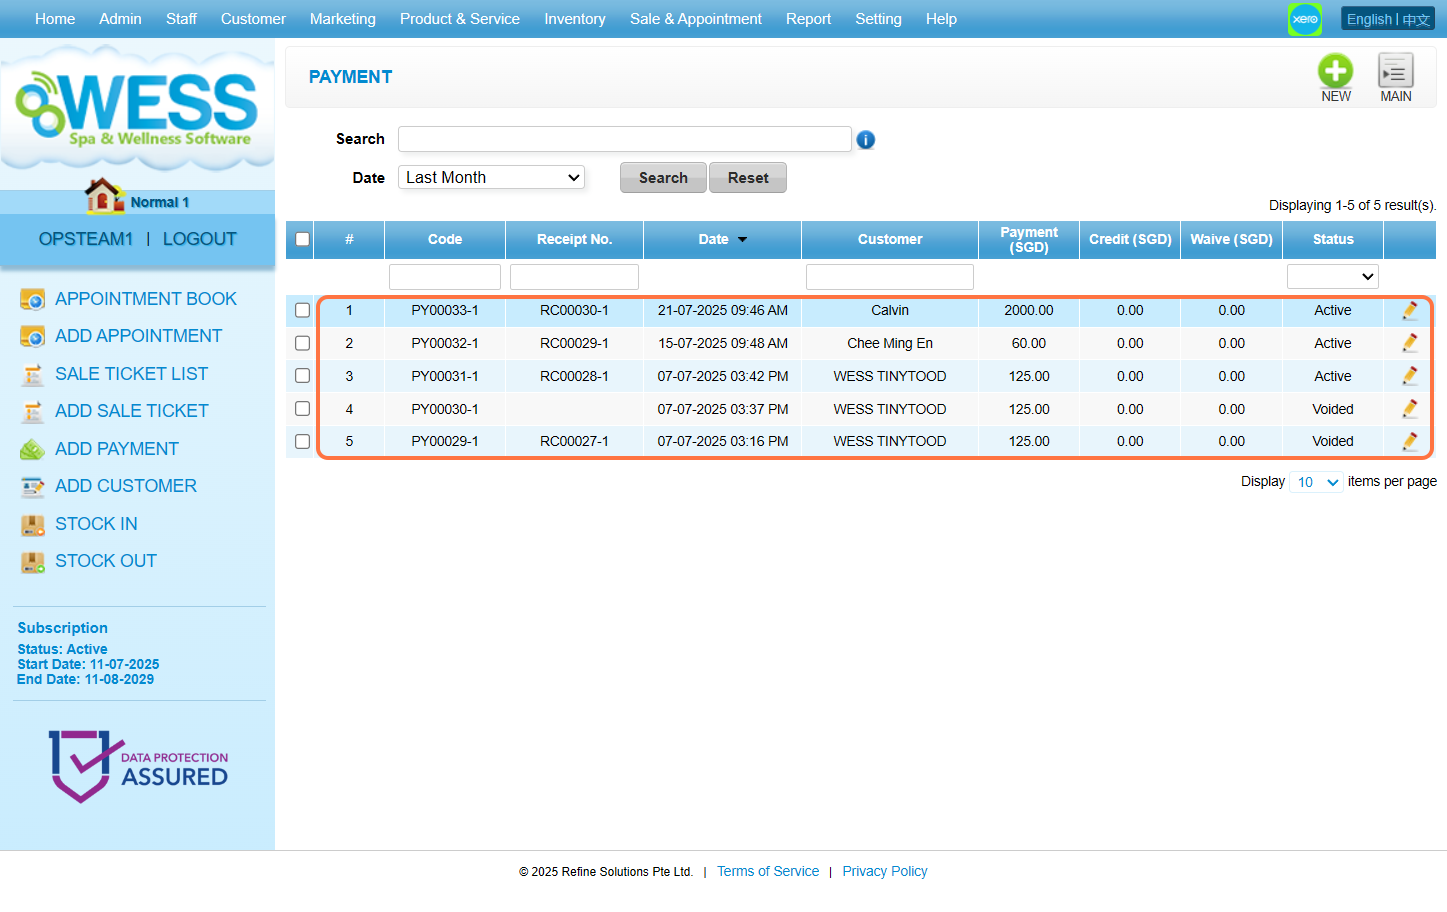
Step 4: Click “PRINT”.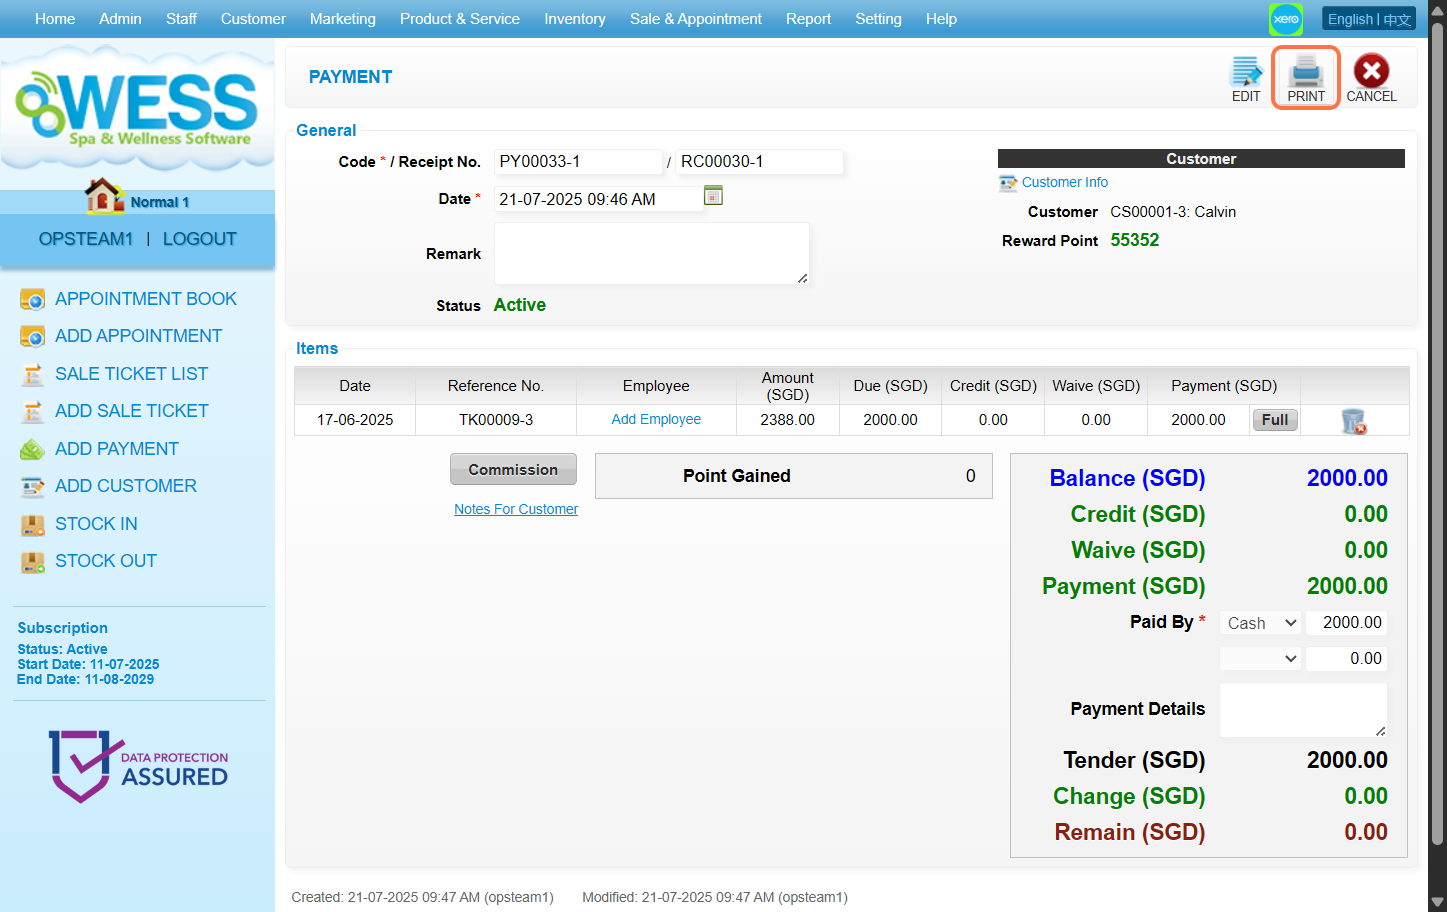
Step 5: Click “EMAIL”.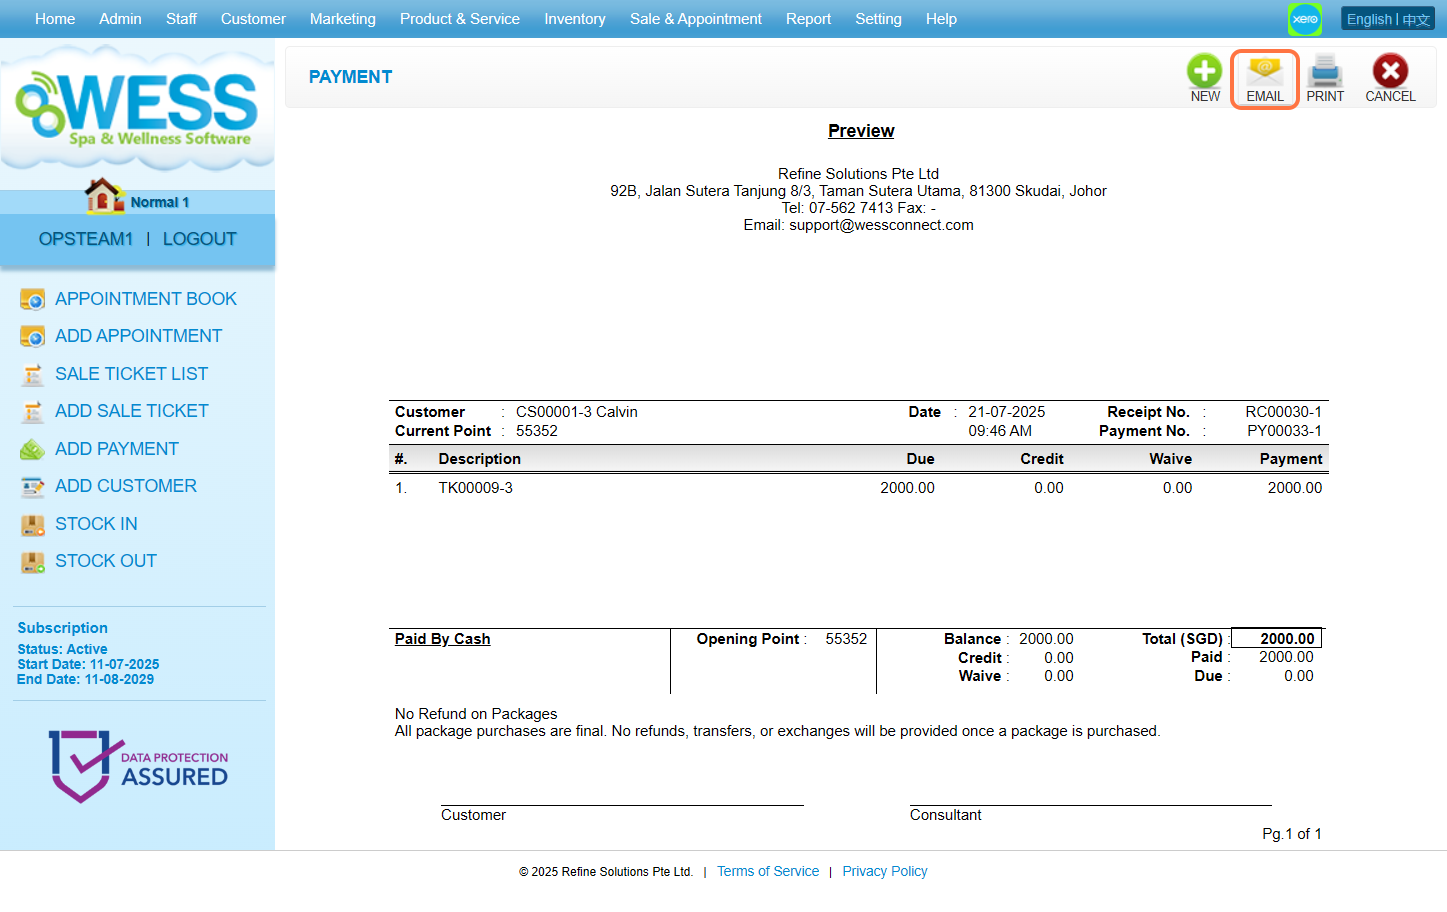
Step 6: Fill the textbox with the respective information accordingly.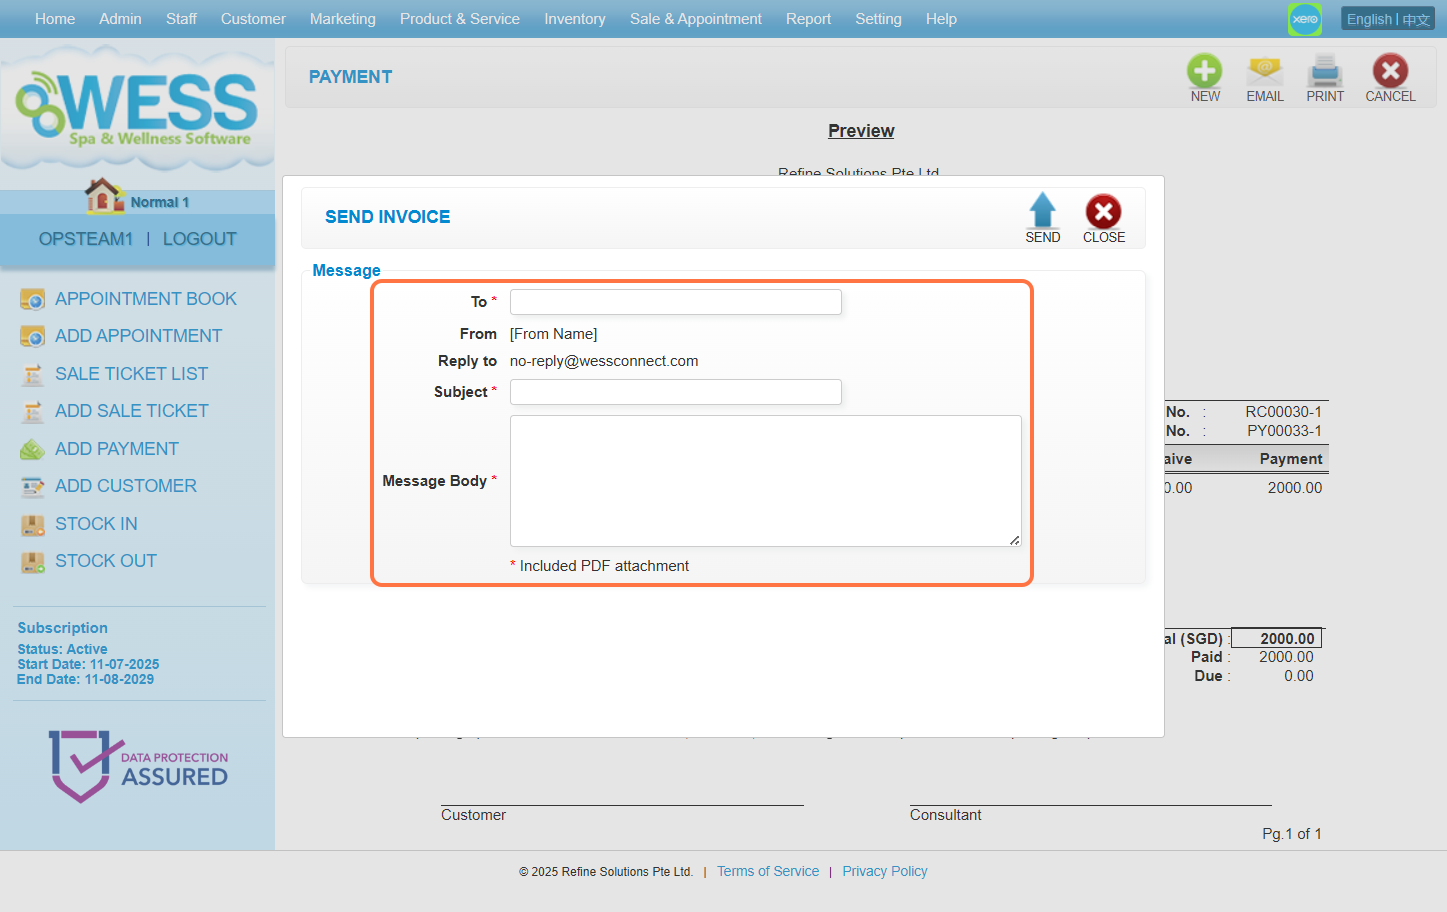
Step 7: Click “SEND”.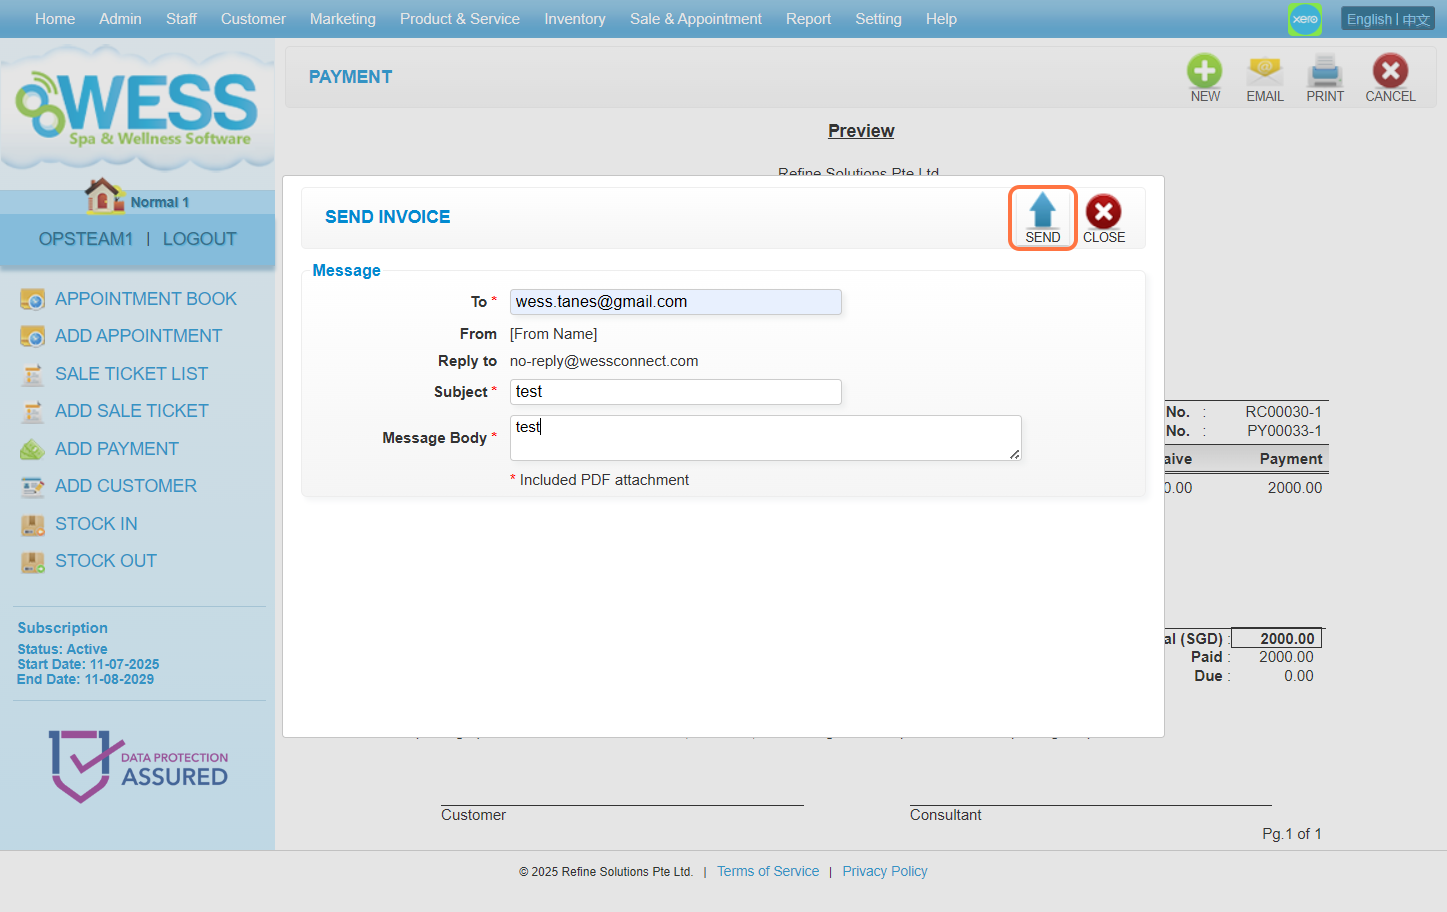
Last update: August 2025
https://wesshelp.wessconnect.com/2023/03/13/how-to-set-signature-to-available-for-every-payment/
Step 1: Click “Setting“.
Step 2: Click “SALE SETTING“.
Step 3: Click “On” and tick the “Prompt” checkbox “☑️” in the Payment Signature field.
Step 4: Click Save icon “💾”.
Step 5: Make sure the setting has been saved.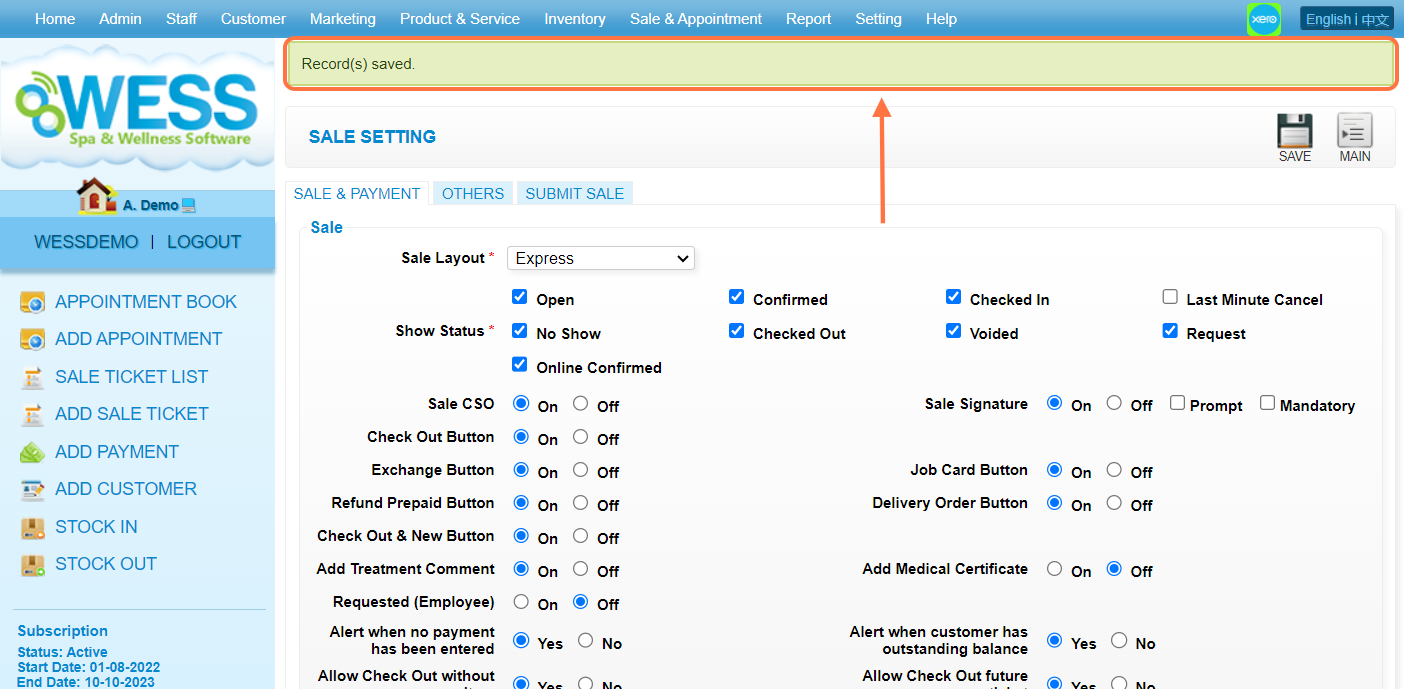
Last Update: July 2024
https://wesshelp.wessconnect.com/2023/07/12/how-to-pay-in-3-payment-methods/
Step 1: Make sure you have done adding items and assign employees/customers.
Step 2: Click “Pay“.
a. Payment method 1
Step 3: In “Paid By” dropdown select payment method, then fill in the payment amount.
b. Payment method 2
Step 4: When another payment method is required, click on this field and select the payment method and amount.
* The example below shows that payments can be made with Cash and VISA.
Step 5: Click “CHECK OUT” to confirm payment.
Step 6: Make sure the record has been changed. 
c. Payment method 3
Step 7: Click “Make Payment” button.
Step 8: Click “FULL” button.  Step 9: The amount to be paid is shown and click. Then in “Paid By” dropdown select payment method, then fill in the payment amount.
Step 10: [Optional] Payment can also be made using two different payment methods if required. And do the same as Step 9. 
Step 11: [Optional] Here can add a note to prove the customer is using. 
Step 12: Click any PAY icon “💲”.
Step 13: Make sure the record has been saved.
Step 14: Refresh after the payment is complete to show that the payment is complete.
Last update: Aug 2024
Step 1: Click “Setting“.
Step 2: Click “SALE SETTING“.
Step 3: Click “OTHERS“.
Step 4: Select “On” for “Commission Allocation” to enable using it.
Step 5: [Optional] Turn on this setting if you wish to keep payment value not more than its sale (refer Step 15)
[!] E.g.: Let’s say Product A sold for $500. The payment value cannot be $550.
Step 6: [Optional] Turn on this setting if you wish to keep the total allocation of the commission to 100% (refer Step 17 and after).
[!] E.g.: If Staff A has allocated 60% of the commission, Staff B cannot allocate another 65%.
Step 7: Click any Save icon “💾”.
Step 8: Make sure the setting has been saved.
Step 9: Click “Sale & Appointment“.
Step 10: Click “SALE TICKET“.
Step 11: Select an old sale ticket and click on the pen icon “✏️” to edit.
Step 12: Make sure these three sections are filled out and selected. 
Step 13: Click “Commission“.
Step 14: As commission calculation is based on payment, select a payment to allocate the commission.
[!] If you are not sure which to choose, you can keep selecting the latest one.
Step 15: Untick the “Use Default” checkbox “☑️” to do custom sale commission allocation.
Step 16: Enter a value for payment to calculate the commission.
[!] If you have done step 5, you will not be able to enter a value higher than the total sale.
Step 17: [Optional] You can click on “Full” to directly enter the total sales value.
Step 18: Enter the percentage of sale commission allocated to Staff A. Value will be reflected based on input. Then Staff B and so on.
[!] This step can be done differently, please refer to Step 19.
[!] If you did step 6, you will not be allowed to enter a value which causes a total percentage over 100%.
Step 19: [Optional] : Enter a value of the sale commission allocated to Staff A. Percentage will be reflected based on input. Then Staff B and so on.
[!] This step can be done differently, please refer to Step 18.
[!] If you did step 6, you will not be allowed to enter a value which causes a total percentage over 100%.
Step 20: This can be done by following the steps from step 15 to step 19.
Step 21: [Optional] You can add more details as references in this section.
Step 22: Click any Save icon “💾”.
Step 23: Make sure the record has been saved.
Last Update: Aug 2023
https://wesshelp.wessconnect.com/2025/01/17/how-to-create-payment-charge/
Step 1: Click “SETTING”.
Step 2: Click “CHARGE”.
Step 3: Click “NEW”.
Step 4: Enter the payment charge name.
Step 5: Enter the amount.
Step 6: Enter the description.
Step 7: Set “Published” to “Yes” .
Step 8: Click on “APPLY” or other disk icons to save.
Step 9: Make sure the new payment charge has been saved.
Last Updated: January 2025
https://wesshelp.wessconnect.com/2025/01/17/how-to-add-payment-charge/
Step 1: Click “SETTING”.
Step 2: Click “PAYMENT METHOD”.
Step 3: Click on the pen icon “✏️” to edit.
Step 4: Click “Add Item”.
Step 5: Choose the payment charge.
Step 6: Click “ADD & CLOSE”.
Step 7: Click “SAVE”.
Step 8: Make sure the change has been saved.
Last Updated: July 2025
https://wesshelp.wessconnect.com/2021/06/17/how-to-add-ownership-transfer/
Step 1: Click “SALE & APPOINTMENT”
Step 2: Click “OWNERSHIP TRANSFER”
Step 3: Click “NEW”
Step 4: Enter the customer name
Step 5: Click “TRANSFER PREPAID”
Step 6: Tick and enter the quantity that want to transfer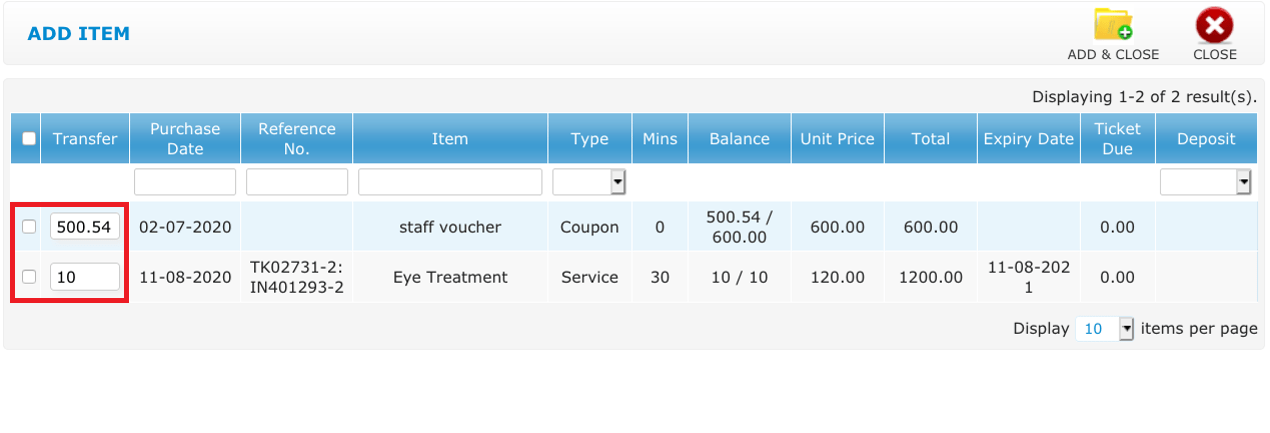
Step 7: Click “ADD & CLOSE”
Step 8: Click “SAVE”
Last update: August 2025
https://wesshelp.wessconnect.com/2021/06/17/how-to-edit-ownership-transfer/
Step 1: Click “SALE APPOINTMENT”
Step 2: Click “OWNERSHIP TRANSFER”
Step 3: Select the record
Step 4: Click “EDIT”
Step 5: You can make the changes if needed
Step 6: Click “SAVE”
Last update: August 2025
https://wesshelp.wessconnect.com/2021/06/17/how-to-void-ownership-transfer/
Step 1: Click “SALE & APPOINTMENT”
Step 2: Click “OWNERSHIP TRANSFER”
Step 3: Select the ownership transfer record
Step 4: Click “EDIT”
Step 5: Click “VOID”
Last update: August 2025
https://wesshelp.wessconnect.com/2021/06/17/how-to-add-customer-opening-balance/
Step 1: Click “SALE & APPOINTMENT”
Step 2: Click “CUSTOMER OPENING BALANCE”
Step 3: Click “NEW”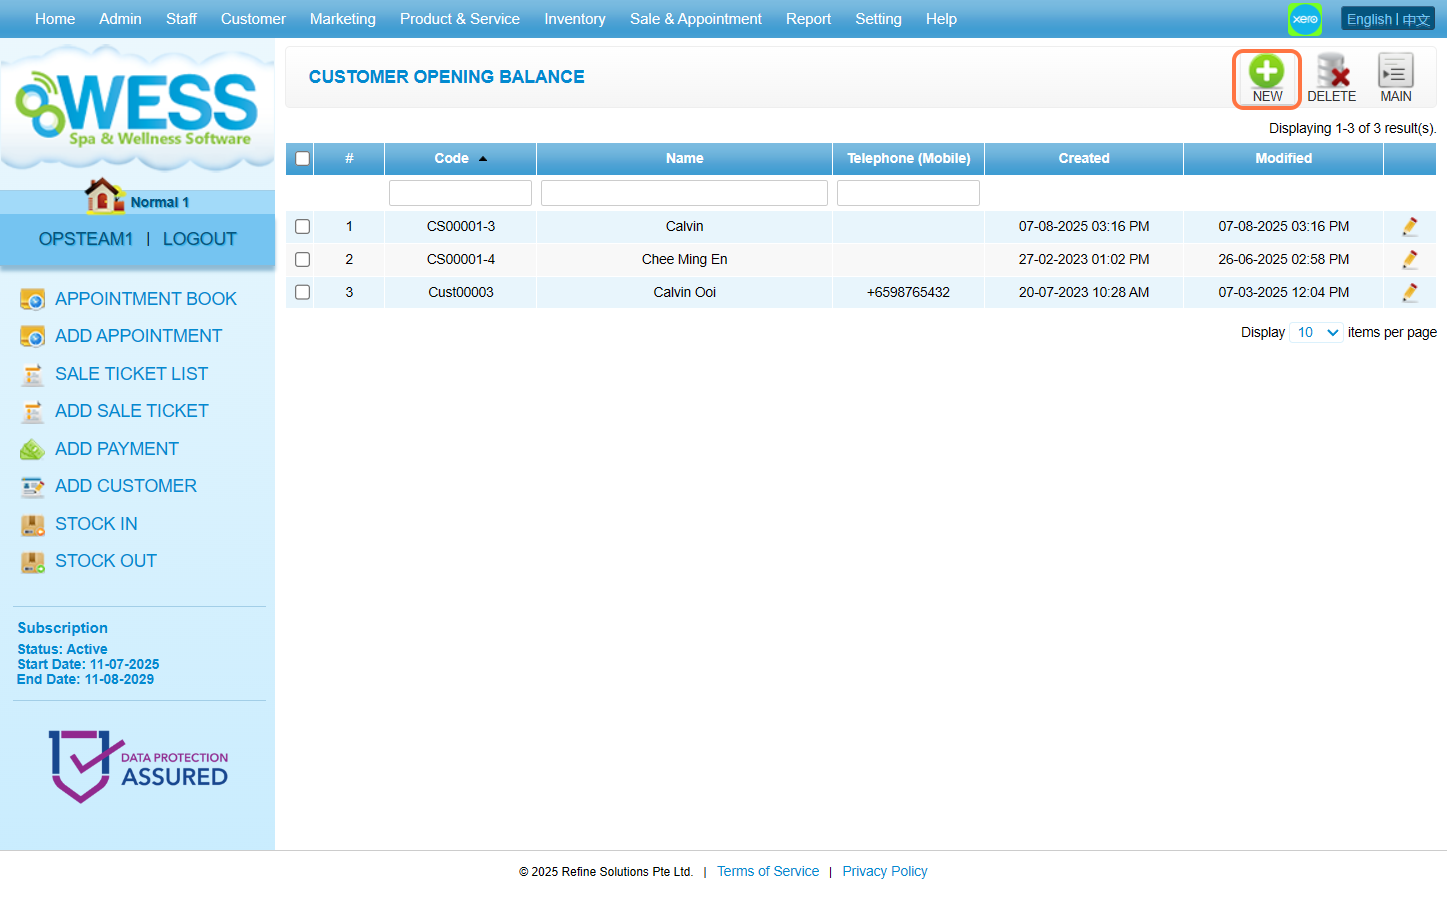
Step 4: Enter the customer name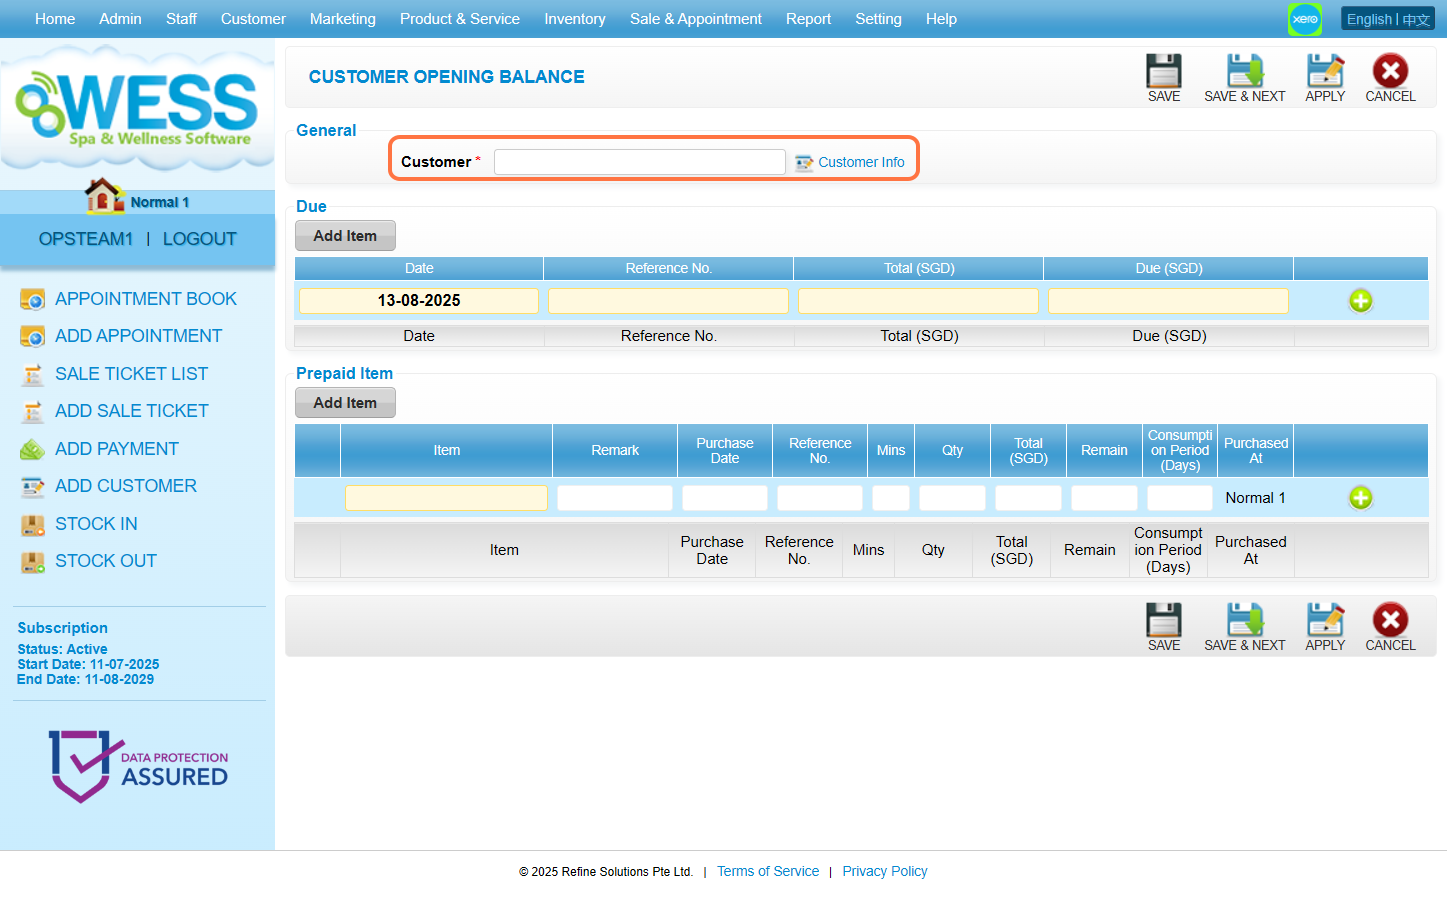
Step 5: Fill in the cash amount that customer owe the salon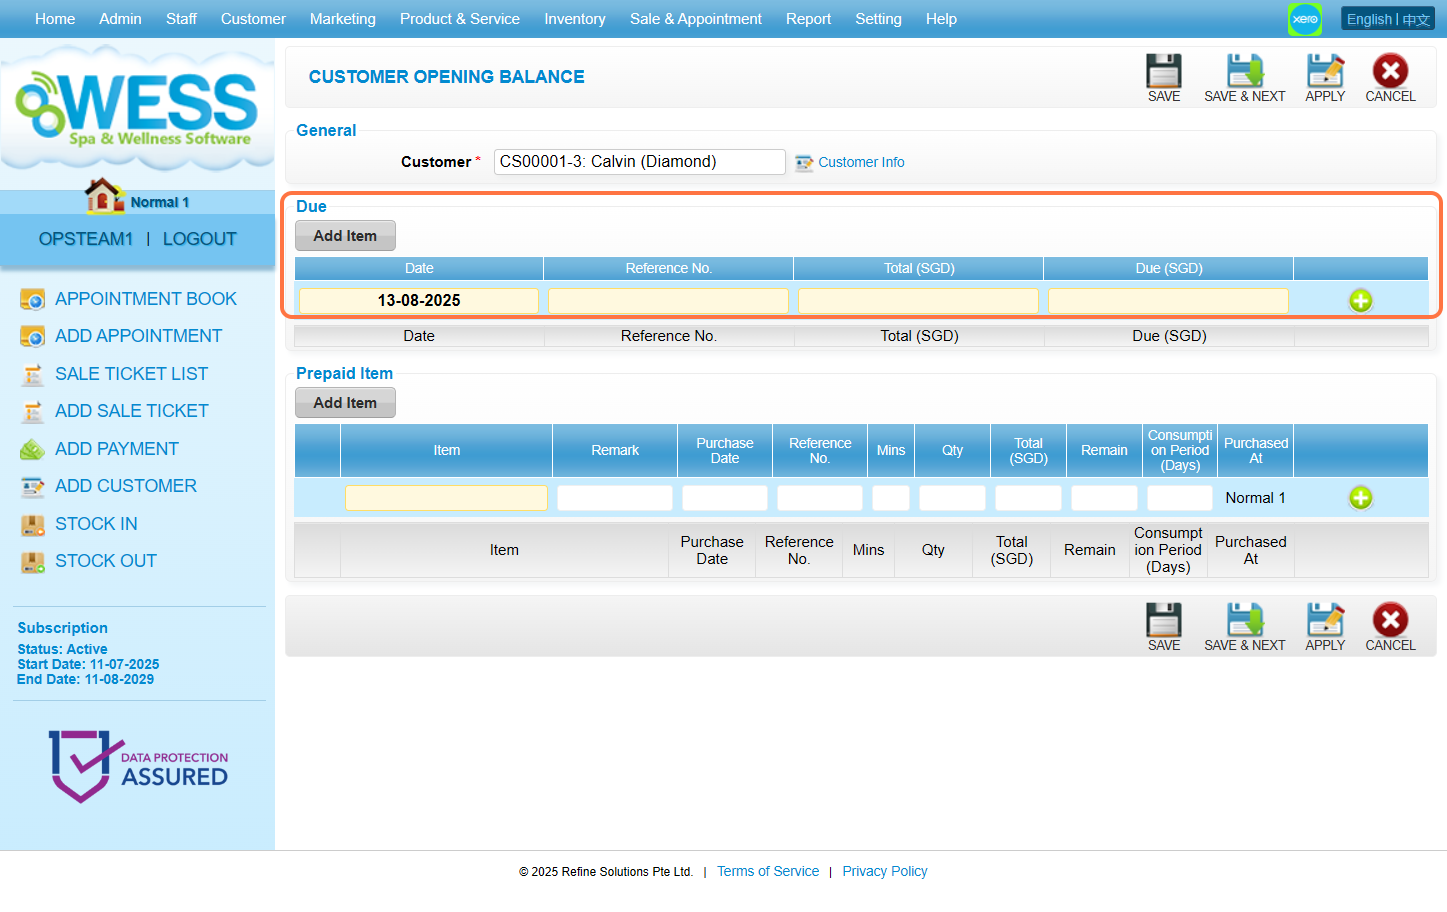
Step 6: Fill in the remaining package session from customer (eg: Retail & Salon Products, Services, Coupons). 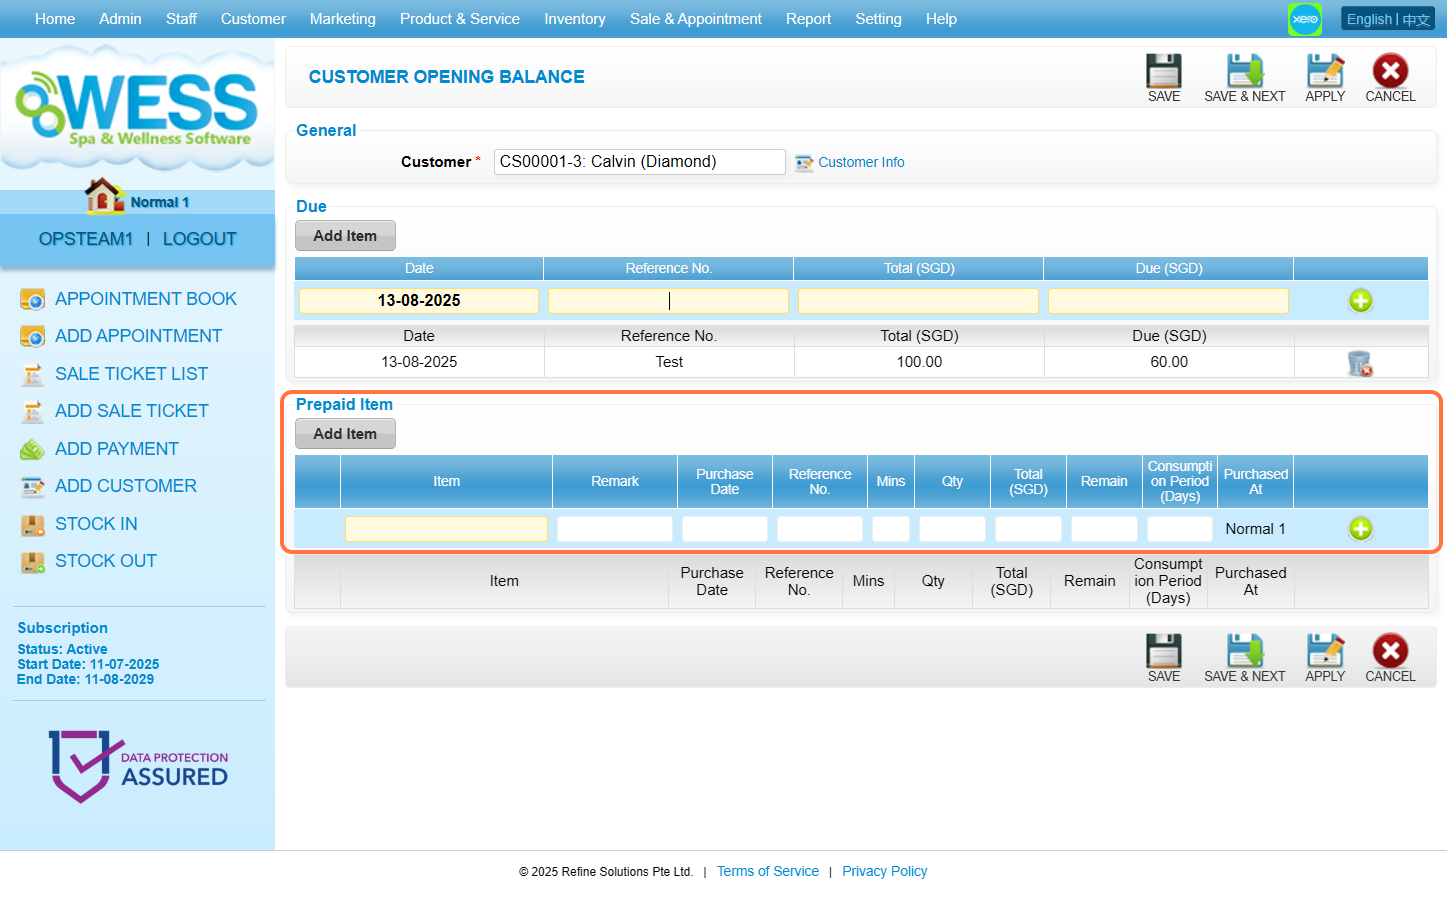
Step 7: Click “SAVE”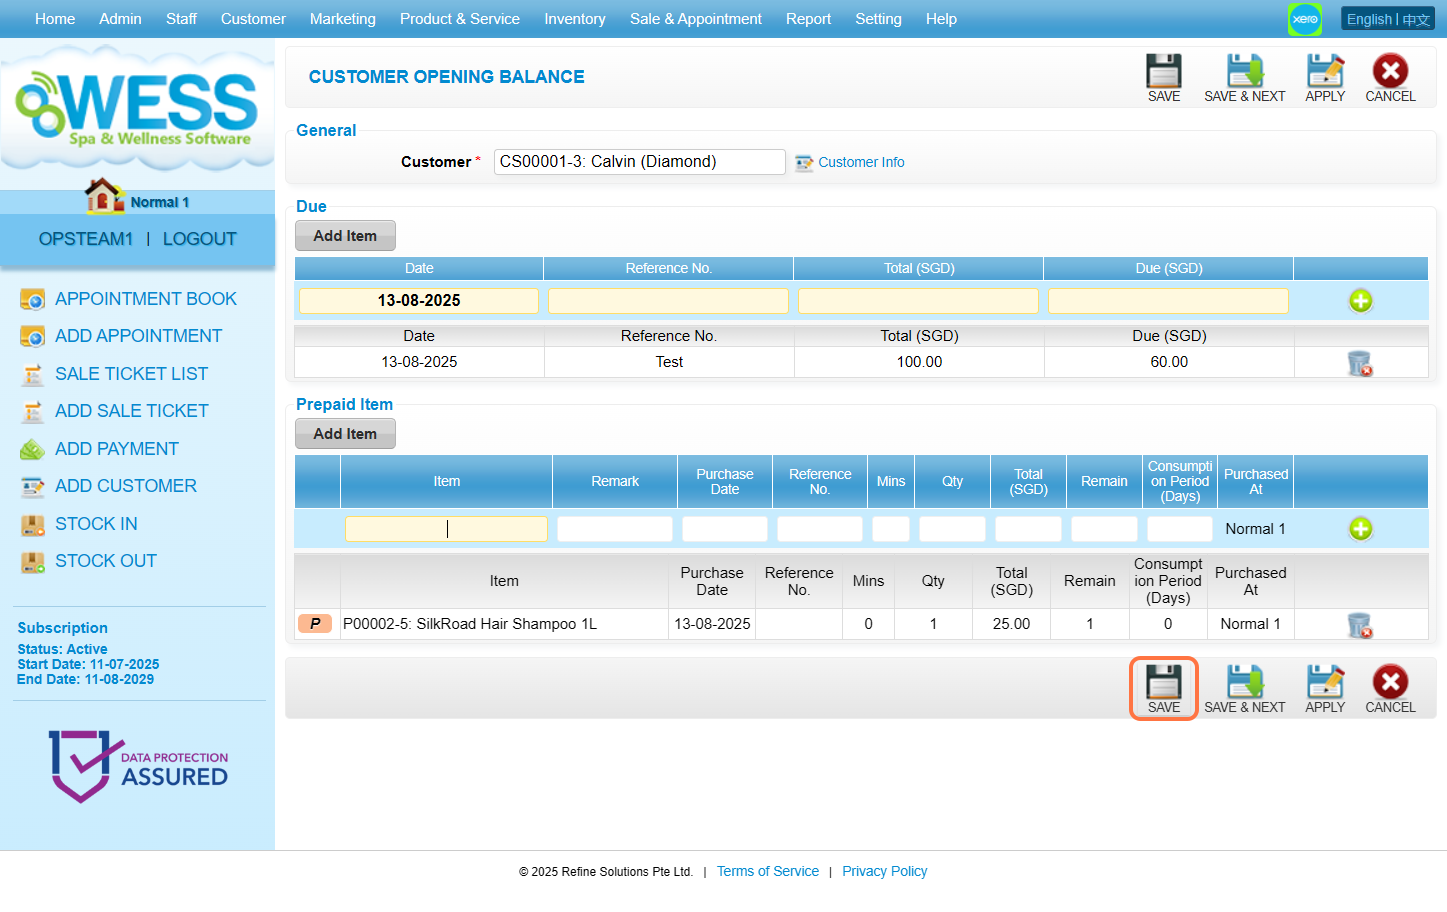
Last update: August 2025
https://wesshelp.wessconnect.com/2021/06/17/how-to-edit-customer-opening-balance/
Step 1: Click “SALE & APPOINTMENT”
Step 2: Click “CUSTOMER OPENING BALANCE”
Step 3: Select the user
Step 4: Click “EDIT”
Step 5: You can make the changes if needed
Step 6: Click “SAVE”
Last update: August 2025
https://wesshelp.wessconnect.com/2021/06/17/how-to-delete-the-customer-opening-balance/
Step 1: Click “SALE & APPOINTMENT”
Step 2: Click “CUSTOMER OPENING BALANCE”
Step 3: Select the customer opening balance record want to delete
Step 4: Click “DELETE”
Last update: August 2025
https://wesshelp.wessconnect.com/2021/06/17/customer-opening-balance-important-note/
If you want to insert the customer’s credit, do take note that the “QTY” column should enter the correct figure
(* Example: $1000 free $200 credit. The “QTY” you should key in $1200 instead of $1000 (or $1))


Last update: April 2021
Step 1: Click “SALE & APPOINTMENT”
Step 2: Click “SUBMIT SALE”
Step 3: Click “NEW”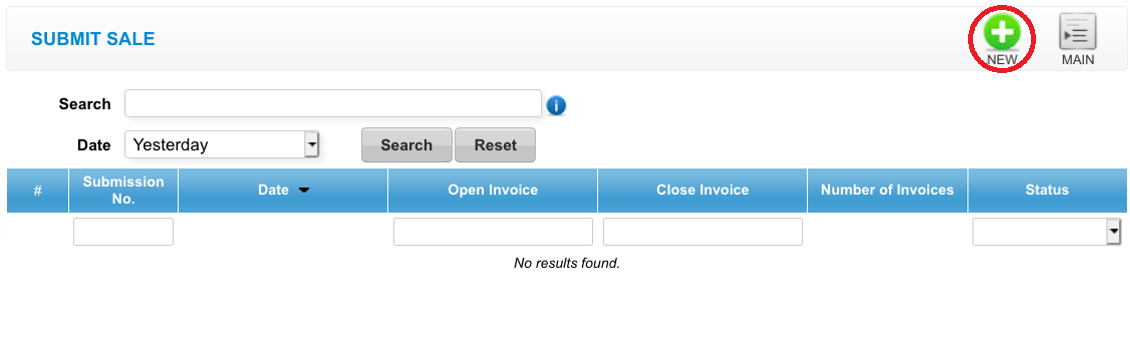
Step 4: Click and select the date
Step 5: Click “GENERATE”
Step 6: Click “SUBMIT”
Last update: August 2025
https://wesshelp.wessconnect.com/2021/06/17/how-to-resubmit-fail-sale/
Step 1: Click “SALE & APPOINTMENT”
Step 2: Click “SUBMIT SALE”
Step 3: Select the fail sale want to resubmit
Step 4: Click “SUBMIT”
Last update: August 2025
https://wesshelp.wessconnect.com/2021/06/17/how-to-add-petty-cash
Step 1: Click “SALE & APPOINTMENT”
Step 2: Click “PETTY CASH”
Step 3: Click “NEW”
Step 4: Fill in petty cash details
Step 4: Click “SAVE”
Last update: August 2025
https://wesshelp.wessconnect.com/2021/06/17/how-to-edit-petty-cash/
Step 1: Click “SALE & APPOINTMENT”
Step 2: Click “PETTY CASH”
Step 3: Select the petty cash record
Step 4: Click “EDIT”
Step 5: You can make the changes if needed
Step 6: Click “SAVE”
Last update: August 2025
https://wesshelp.wessconnect.com/2021/06/17/how-to-void-petty-cash/
Step 1: Click “SALE & APPOINTMENT”
Step 2: Click “PETTY CASH”
Step 3: Select the petty cash record want to void
Step 4: Click “EDIT”
Step 5: Click “VOID”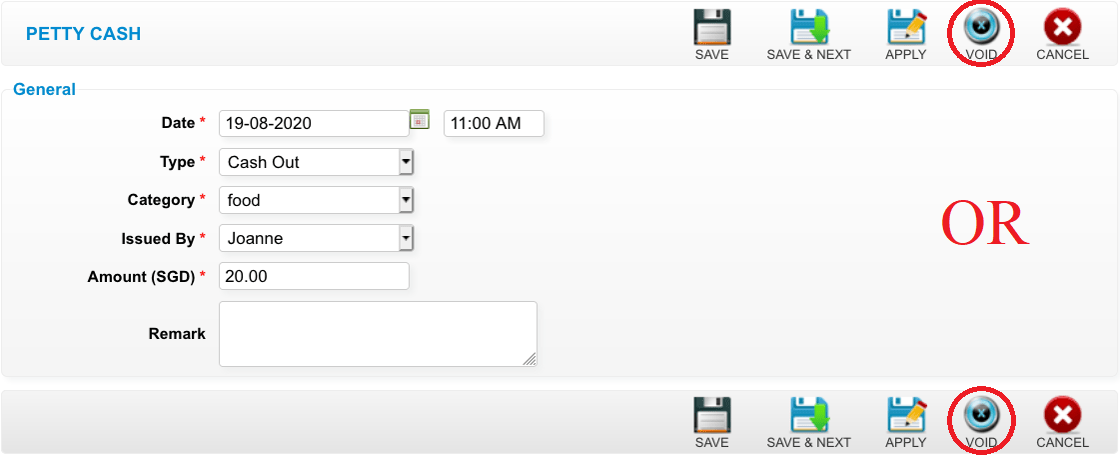
Last update: August 2025
https://wesshelp.wessconnect.com/2021/06/17/how-to-add-petty-cash-category/
Step 1: Click “SETTING”
Step 2: Click “PETTY CASH CATEGORY”
Step 3: Click “NEW”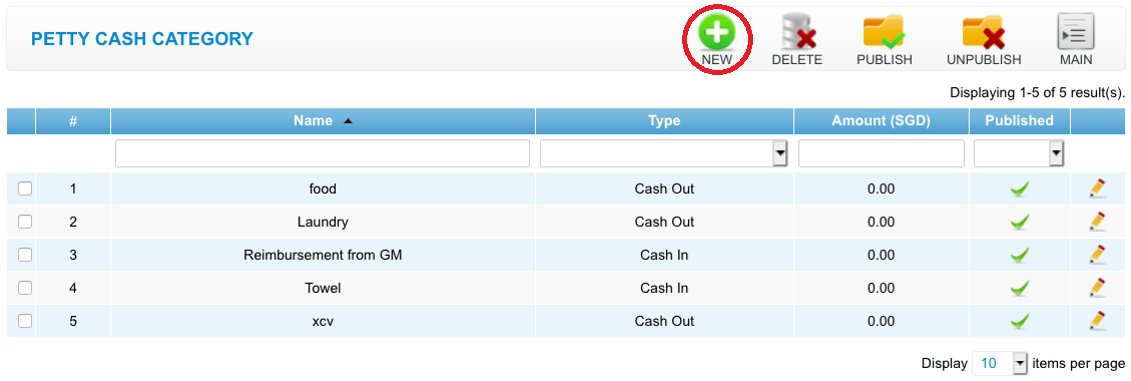
Step 4: Fill in petty cash details
Step 5: Click “SAVE”
Last update: April 2021
https://wesshelp.wessconnect.com/2021/06/17/service-employee-cannot-be-blank/
This issue is because sometimes when you change a prepaid service to a non-prepaid service, so the system will no auto-assign service employees to the item.
Solution:
Step 1: Click on the employee of the service
Step 2: Tick at the service column, tick an employee
Step 3: Click “SET”

This is because the prepaid item in this ticket already used or the outstanding balance for this ticket already paid. So if you want to void this ticket, you may check which case can apply to this ticket.
CASE 1:
“If the prepaid item already used in other tickets.”
Step 1: So you may need to find out which ticket the customer consumes the prepaid item
Step 2: Edit the ticket and delete the item / void the ticket
Step 3: After that go back to the ticket and void it
CASE 2:
“If the outstanding balance already paid.”
Step 1: You may go to Payment and check which day and which record the customer paid the balance
Step 2: Click Edit and void the record
Step 3: After that, you may go back to the ticket and void it

This is because the staff from other outlet is misclick the outlet. This happened is because the user using multiple browser tabs to login to the different outlet.
Solution:
Step 1: Go to “STAFF” > “STAFF” > “APPT ORDERING” > remove the staff from the below list
Step 2: You may ignore it. Because the staff name will disappear next day
Last update: April 2021
Step 1: Click on “VOID“, you will receive an error message.
Step 2: Click on “View” on the error message.
Step 3: Click on “EDIT“.
Step 4: Click on “Delete” to remove the prepaid usage.
Step 5: Click on “CHECK OUT” to saved.
Step 6: Make sure the changes has been saved.
Step 7: Click on “VOID“.
Step 8: Make sure the record has been saved.
Step 9: Here can check the ticket status is “Voided“.
Last Update: July 2024