
https://wesshelp.wessconnect.com/2021/06/16/how-to-blast-message-with-e-mail/
Step 1: Click “MARKETING” .
Step 2: Click “EMAIL” .
Step 3: Click “NEW” .
Step 4: Filter the targeted customers if needed.
Step 5: Click “GENERATE” .
Step 6: You can change the message body .
Step 7: Click “TEMPLATE” .
Step 8: You also can select the email template.
Step 9: Click “OK” .
Step 10: Click “SEND” to send out.
Last update: April 2021
https://wesshelp.wessconnect.com/2021/06/16/how-to-change-email-sender/
Step 1: Click “SETTING”
Step 2: Click “EMAIL SETUP”
Step 3: Enter the sender name and sender email address
Step 4: Click “SAVE”
Last update: April 2021
https://wesshelp.wessconnect.com/2021/06/16/how-to-create-message-template/
Step 1: Click “SETTING”
Step 2: Click “MESSAGE TEMPLATE”
Step 3: Click “NEW”
Step 4: Enter the template name and message body
Step 5: Click “SAVE”
Last update: April 2021
https://wesshelp.wessconnect.com/2021/06/16/email-important-note/
Note: Configuration is needed in domain in order to send email from the system.
***Please contact our support team to get more information. Thank you.
Last update: April 2021
https://wesshelp.wessconnect.com/2021/06/16/how-to-blast-message-with-sms/
Step 1: Click “MARKETING”
Step 2: Click “SMS”
Step 3: Click “NEW”
Step 4: Filter the targeted customers if needed
Step 5: Click “GENERATE”
Step 6: You can edit the message body
Step 7: Click “TEMPLATE”
Step 8: You also can select the sms template
Step 9: Click “OK”
Step 10: Click “SEND” to send out
Last update: April 2021
Step 1: Click “SETTING”
Step 2: Click “SMS SETUP”
Step 3: Click “ADD ITEM”
Step 4: Enter the “PREPEND CODE” & “FOR NUMBER PATTERN” and click “✚”
Step 5: Click “SAVE”
Last update: April 2021
https://wesshelp.wessconnect.com/2021/06/16/how-to-create-message-template-2/
Step 1: Click “SETTING”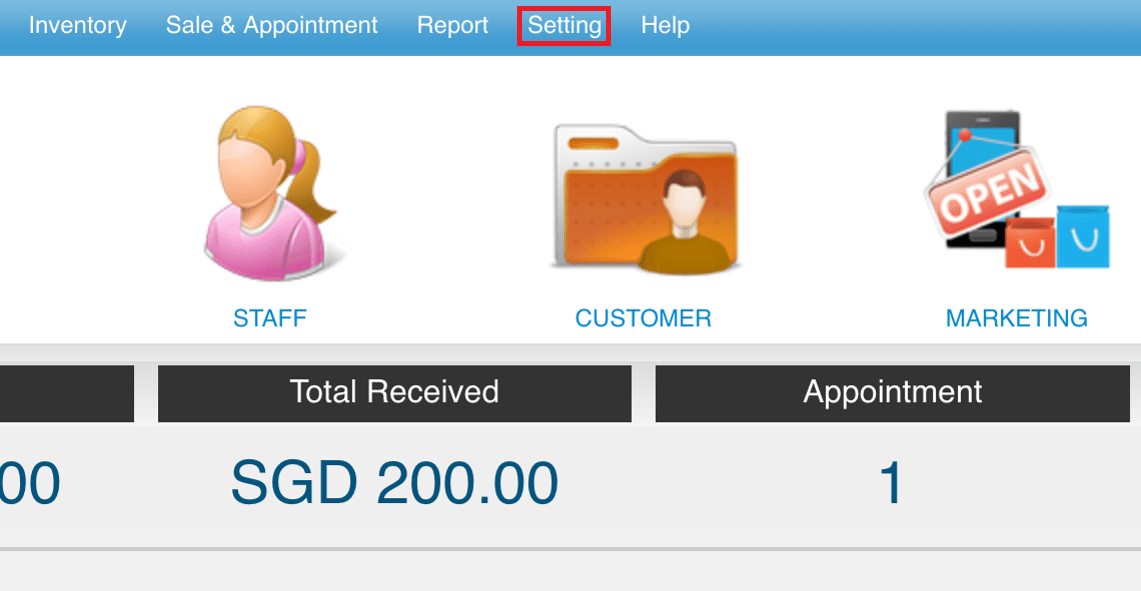
Step 2: Click “MESSAGE TEMPLATE”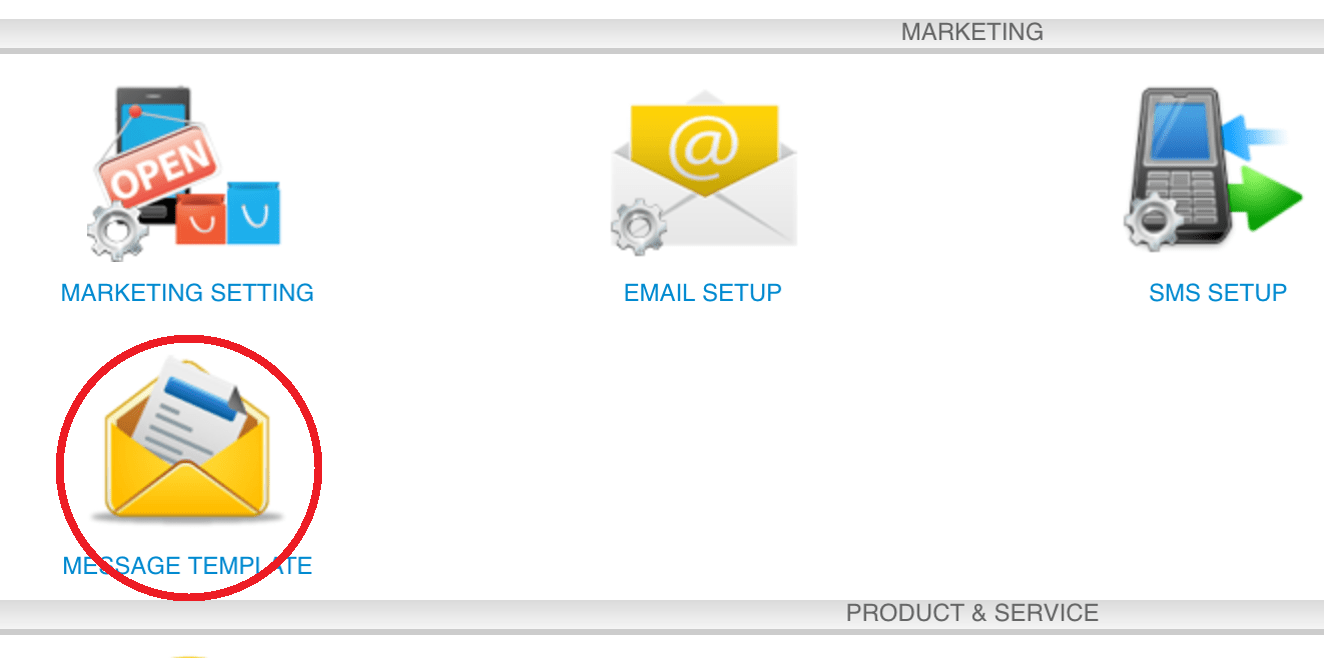
Step 3: Click “NEW”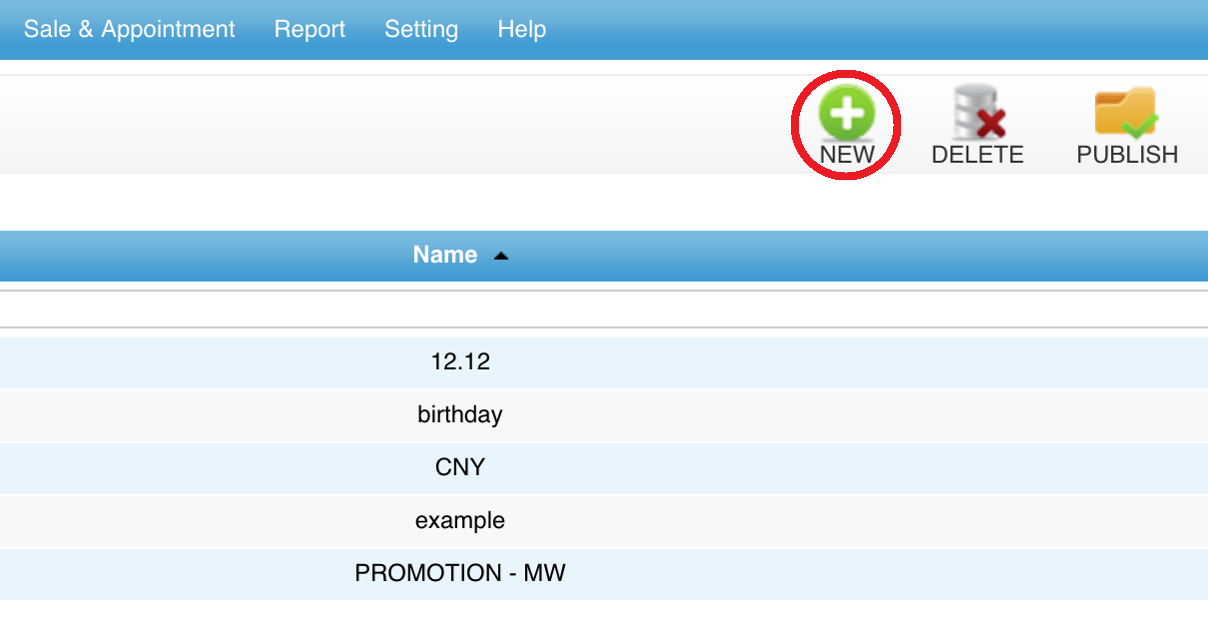
Step 4: Enter the template name and message body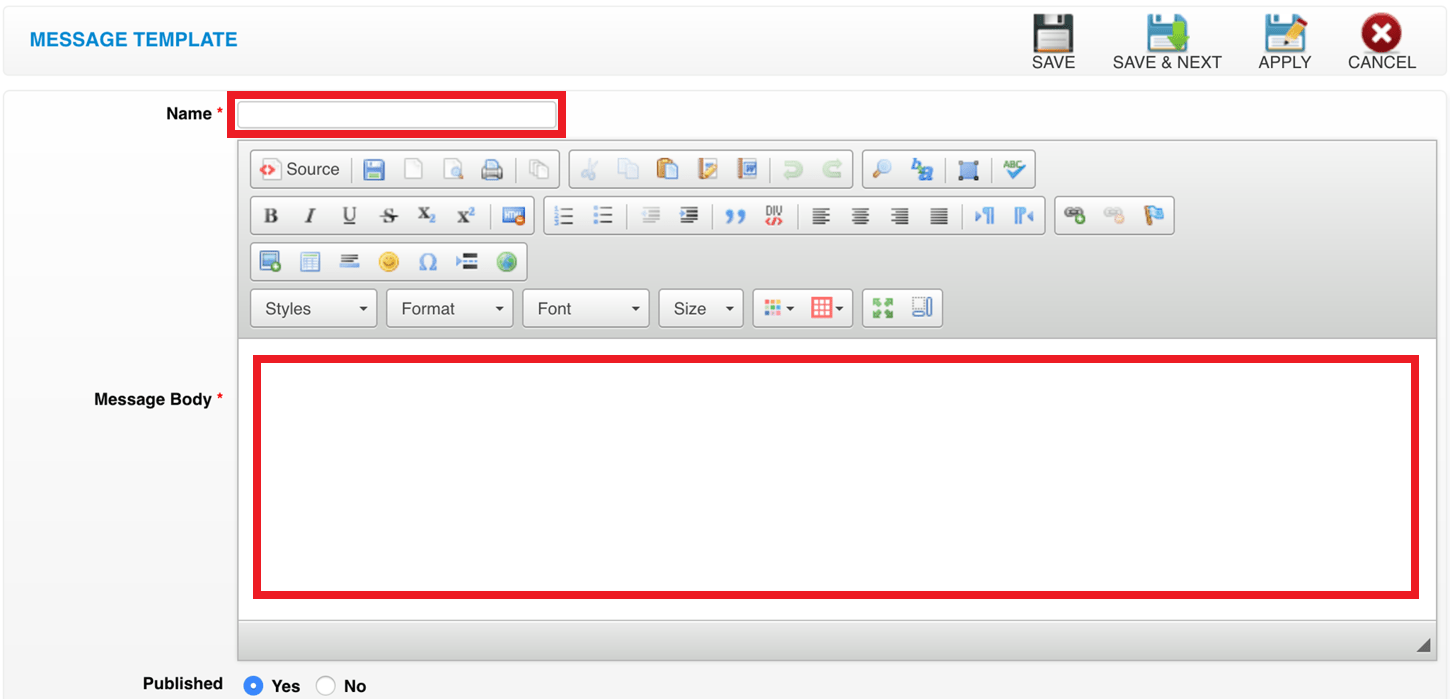
Step 5: Click “SAVE”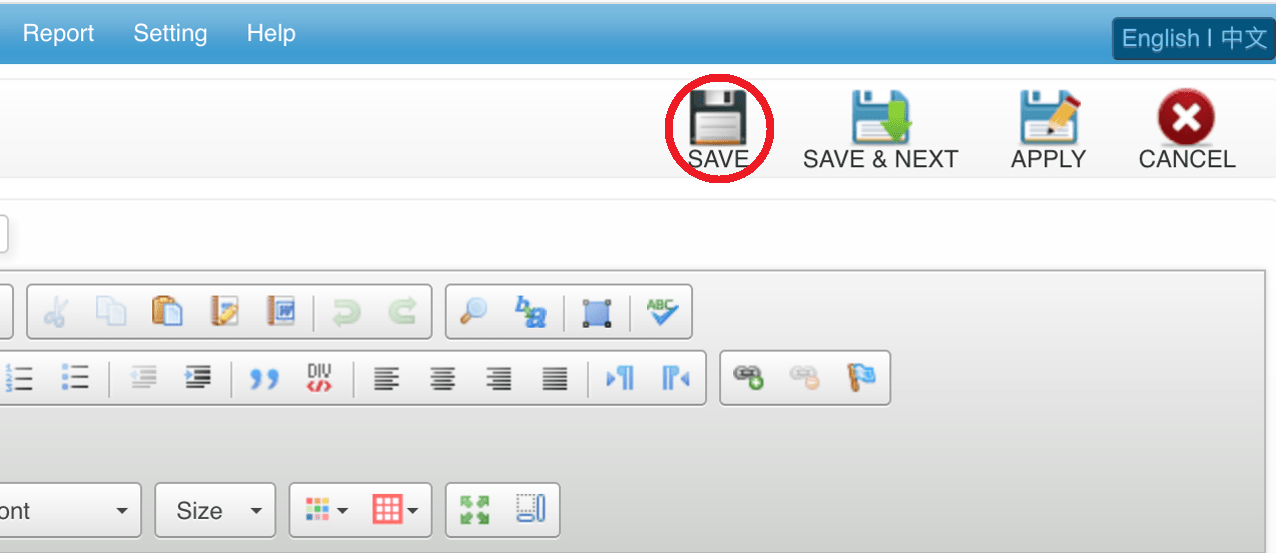
Last update: April 2021
https://wesshelp.wessconnect.com/2021/06/16/how-to-generate-contact-list/
Step 1: Click “MARKETING”
Step 2: Click “CONTACT”
Step 3: Click “NEW”
Step 4: Filter the targeted customers if needed
Step 5: Click “GENERATE”
Step 6: You can tick as processed and fill in remark to record
Last update: April 2021
https://wesshelp.wessconnect.com/2021/06/16/how-to-create-promo-code/
Step 1: Click “MARKETING”
Step 2: Click “PROMO CODE”
Step 3: Click “NEW”
Step 4: Fill in promo details
*Promotion Item -Search for the name and code of the discount coupon and credit coupon. 
Step 5: Click “SAVE”
Last update: April 2021
https://wesshelp.wessconnect.com/2024/08/06/how-to-publish-the-unpublished-promo-code/
Step 1: Click “Marketing” .
Step 2: Click “PROMO CODE” .
Step 3. Select “No” to show the unpublished promo code.
[ℹ️] Method 1
Step 4: Click on the pen icon “✏️” to edit.
Step 5: Set “Published” to “Yes” .
Step 6: Click any Save icon “💾” .
Step 7: Make sure the change has been saved.
[ℹ️] Method 2
Step 8: Click on the “❎” to publish.
Step 9: Make sure the change has been saved.
Last update: Aug 2024
https://wesshelp.wessconnect.com/2024/08/06/how-to-unpublish-an-expired-promo-code/
Step 1: Click “Marketing” .

Step 2: Click “PROMO CODE” .
[ℹ️] Method 1
Step 3: Click on the pen icon “✏️” to edit.
Step 4: Set “Published” to “No” .
Step 5: Click any Save icon “💾” .
Step 6: Make sure the change has been saved.
[ℹ️] Method 2
Step 7: Click on the “✔️” to unpublish.
Step 8: Make sure the change has been saved.
Last Updated: Aug 2024
https://wesshelp.wessconnect.com/2024/01/10/how-to-send-messages-to-customers-with-prepaid-items/
Step 1: Click on “Report“.
Step 2: Click on “CUSTOMER PREPAID DETAIL“.
Step 3: Configure the filter before generating a report.
Step 4: Click on “Generate“.
Step 5: Click on SEND icon “🢁”.
Step 6: Select a message method, “Email” or “SMS“.
Step 7: Edit the message here before sending it to them.
Last Updated: July 2024
https://wesshelp.wessconnect.com/2021/06/16/how-to-set-follow-up-message/
Step 1: Click “SETTING”
Step 2: Click “MARKETING SETTING”
Step 3: Fill in follow up message
Step 4: Click “SAVE”
Last update: April 2021
https://wesshelp.wessconnect.com/2021/06/16/how-to-set-online-booking-message/
Step 1: Click “SETTING”
Step 2: Click “MARKETING SETTING”
Step 3: Fill in online booking message
Step 4: You can move your mouse icon to the “i” icon to know more available merge tags (*these merge tags can use in message)
Step 5: Click “SAVE”
Last update: April 2021
https://wesshelp.wessconnect.com/2026/03/06/how-to-set-cancel-appointment-message/
Step 1: Click “SETTING”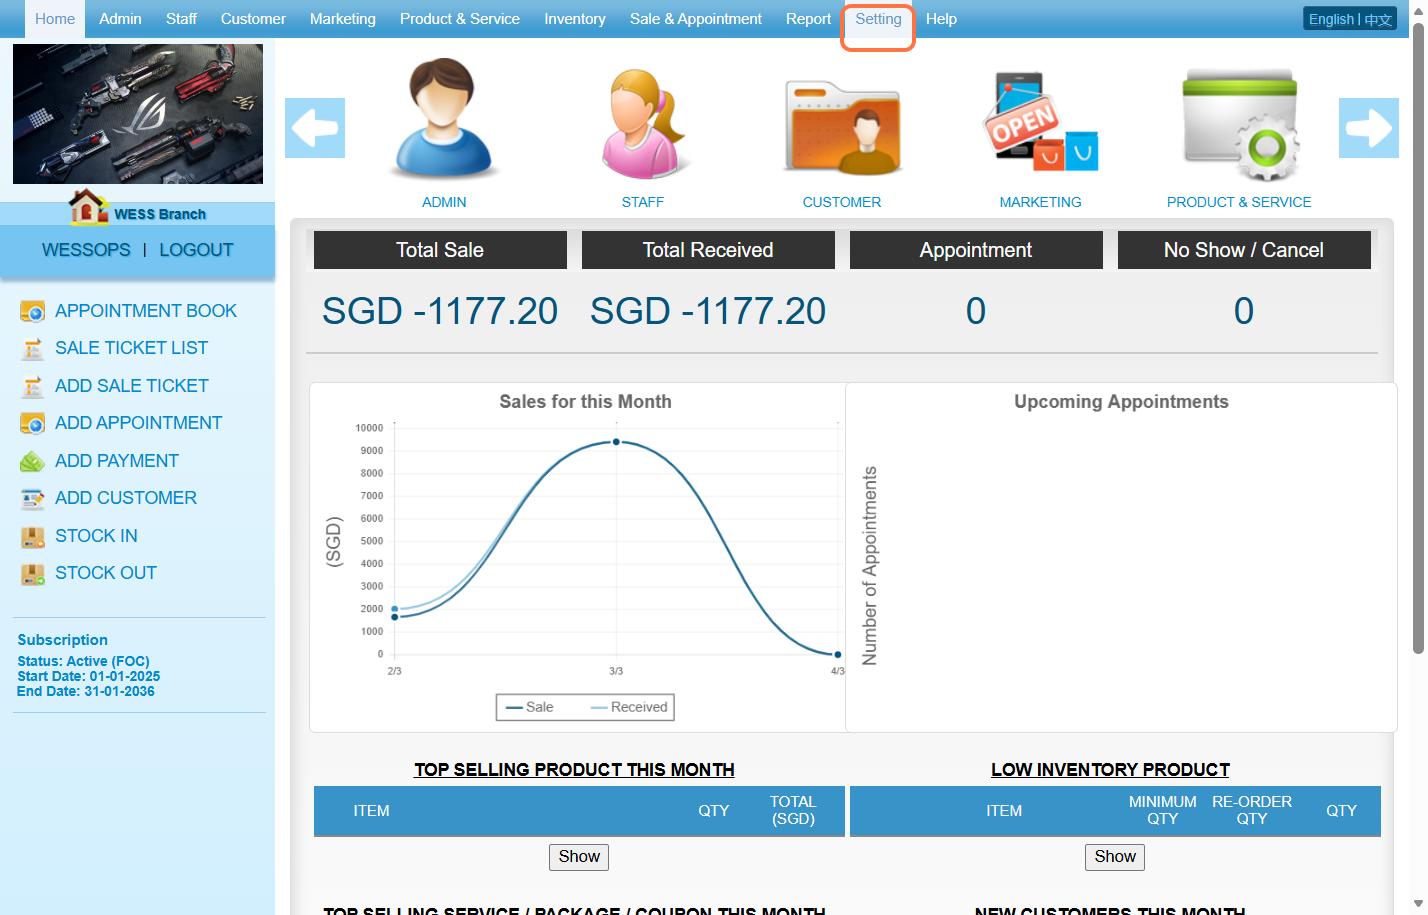
Step 2: Click “MARKETING SETTING”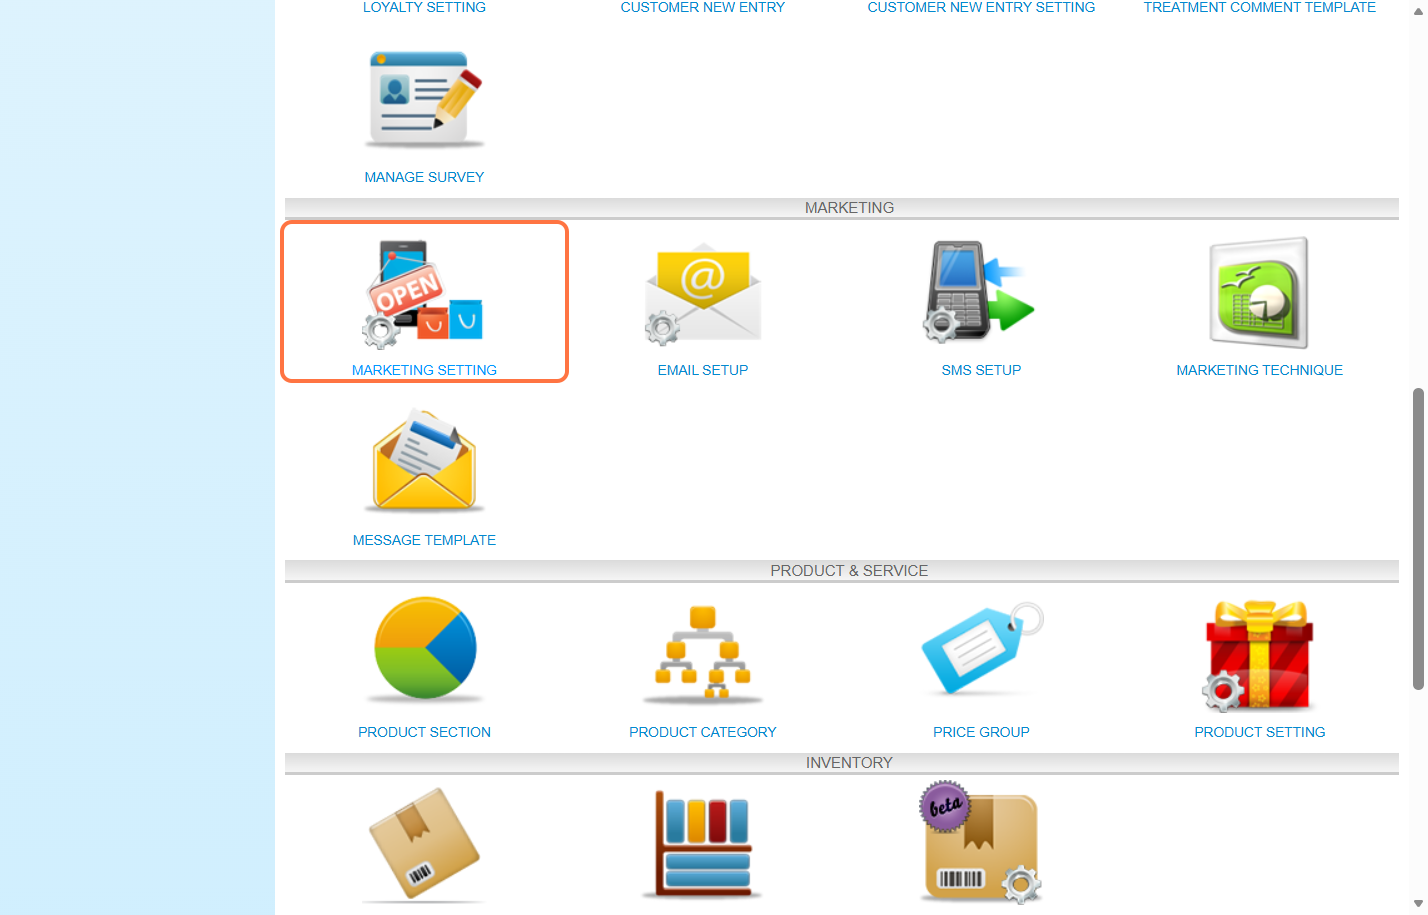
Step 3: You can choose to send this message to the customer by email or SMS.
Step 4: You can fill in the appointment cancellation message here.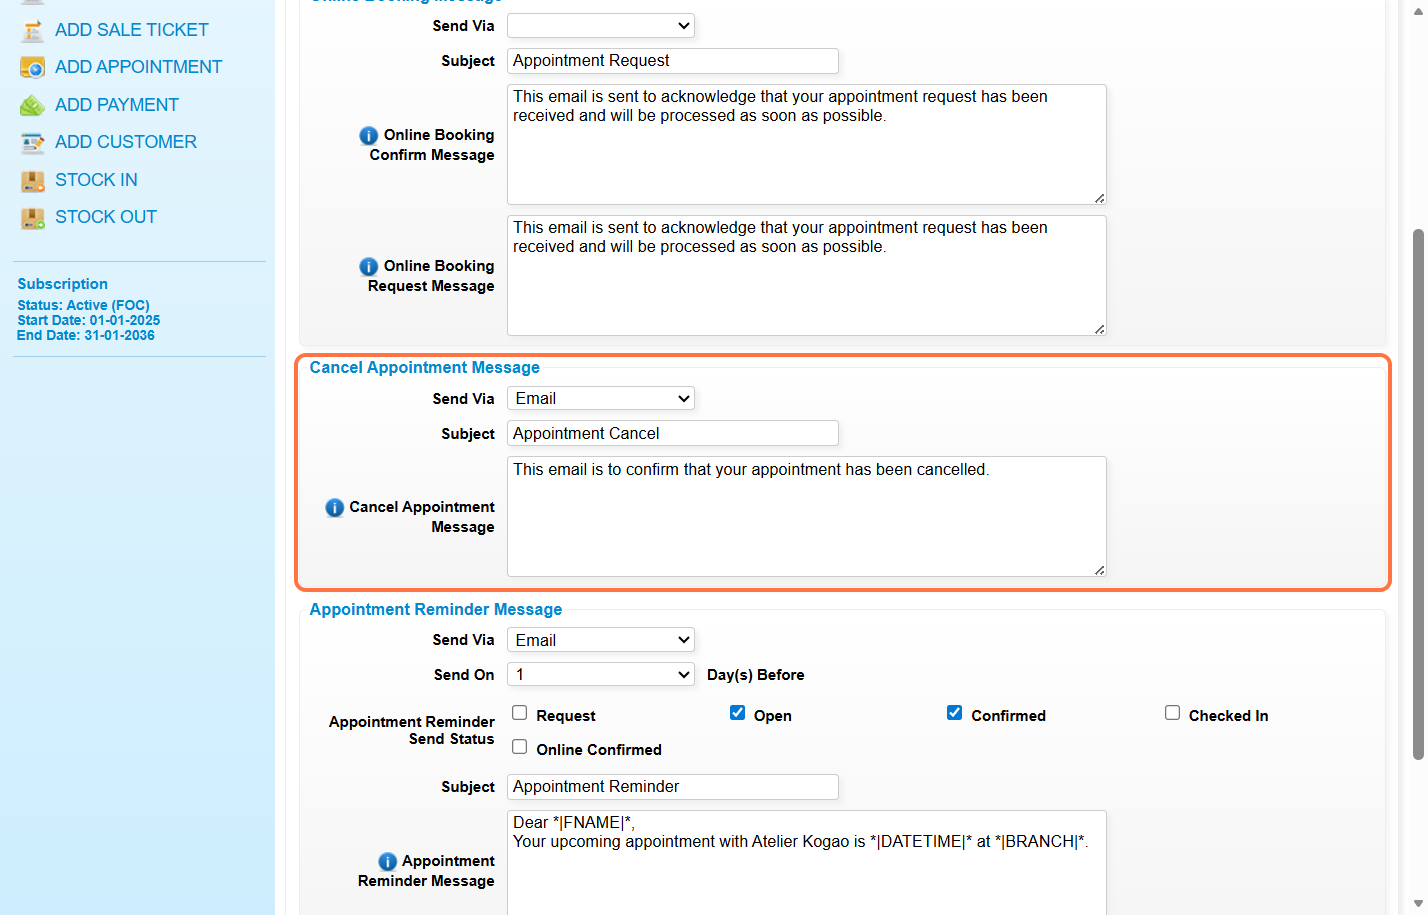
Step 5: You can move your mouse icon to the “i” icon to know more available merge tags(*these merge tags can use in message)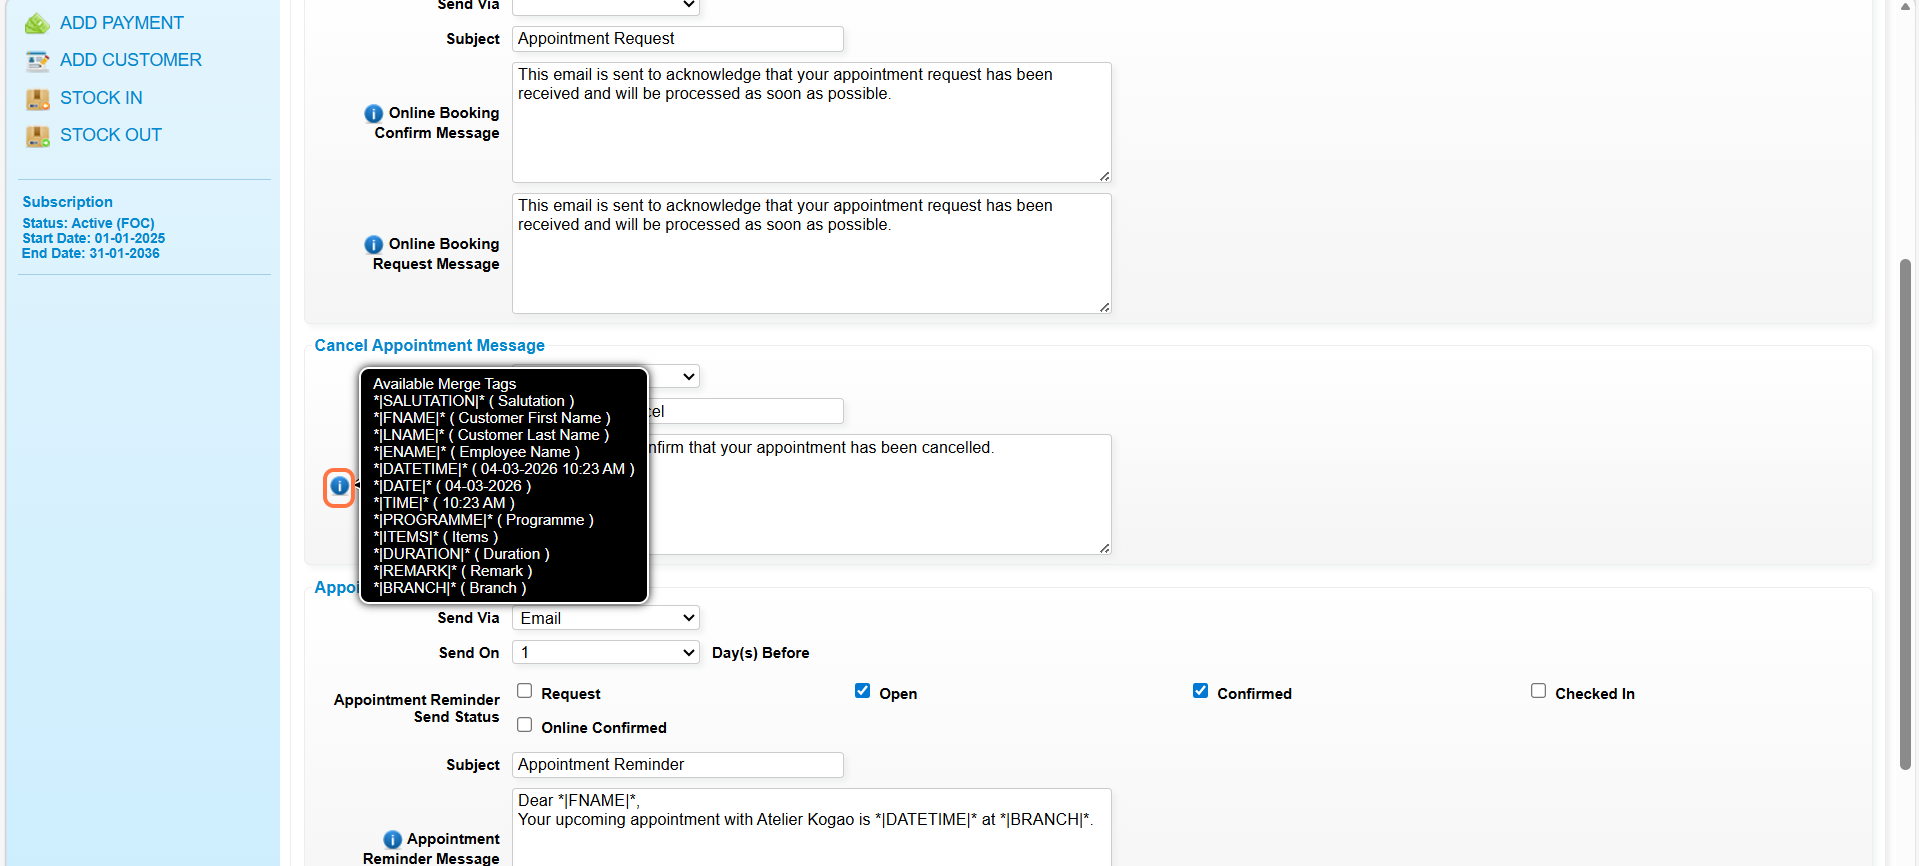
Step 6: Click “SAVE”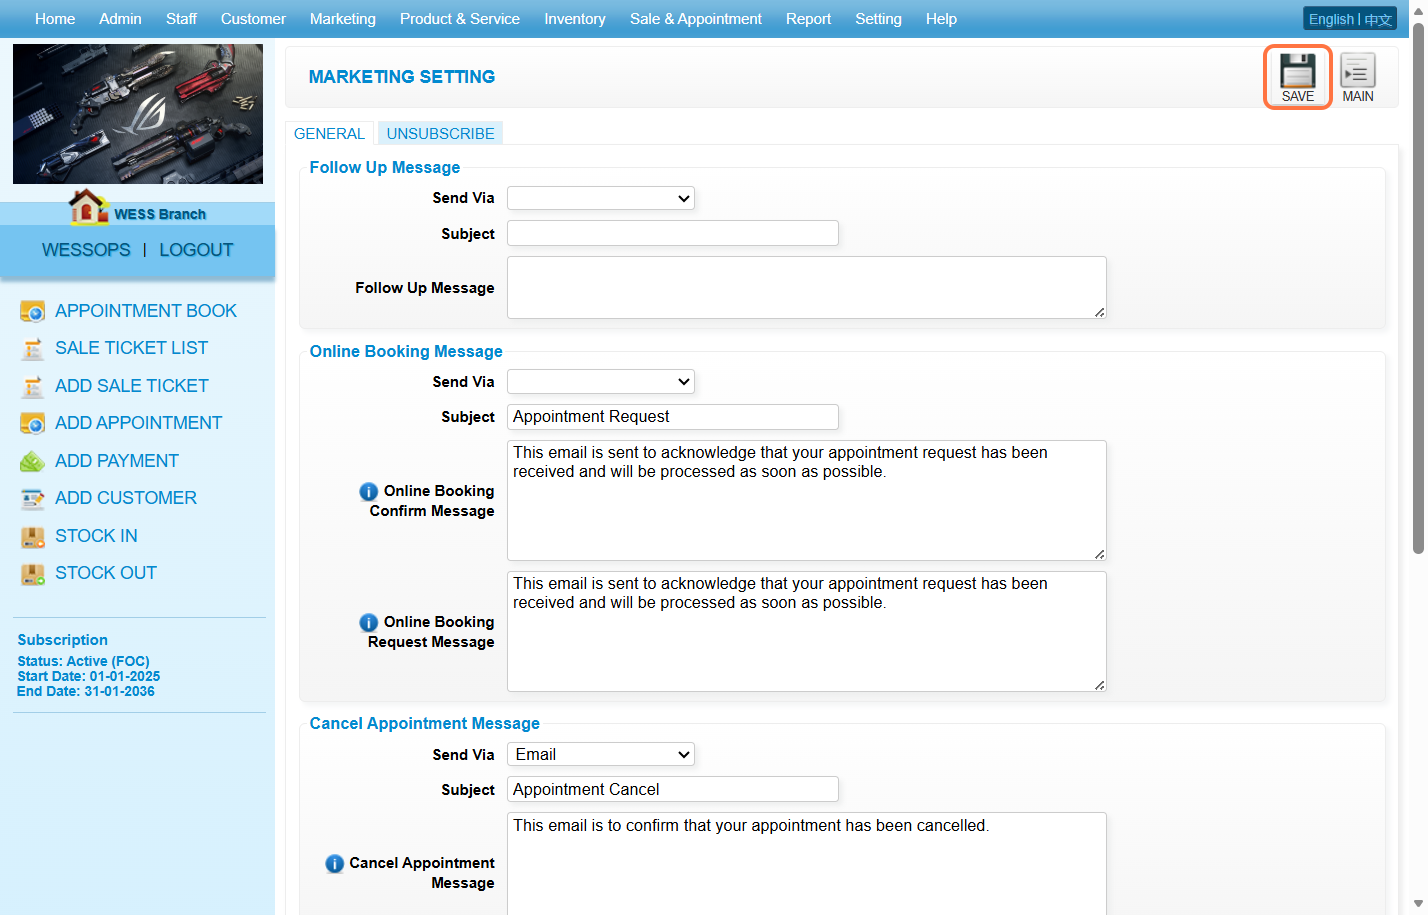
Last update: March 2026
https://wesshelp.wessconnect.com/2021/06/16/how-to-set-appointment-reminder-message/
Step 1: Click “SETTING”
Step 2: Click “MARKETING SETTING”
Step 3: Fill in appoinment reminder message
Step 4: You can move your mouse icon to the “i” icon to know more available merge tags (*these merge tags can use in message)
Step 5: Click “SAVE”
Last update: April 2021