
https://wesshelp.wessconnect.com/2025/01/20/how-to-add-a-new-user/
步骤1:点击 “后台管理” . 
步骤2:点击 “用户” .
步骤3:点击 “NEW(新建)” .
步骤4:创建一个 ”Username” .
步骤5:创建一个 “Password” .
[!] 密码必须至少包含以下内容::
a. 长度8位数
b. 一个大写字母 【A-Z】
c. 一个小写字母【a-z】
d. 一个数字【1-0】
e. 一个特殊符号 【例如: ’@‘、’#‘、’_ ‘ 或其他】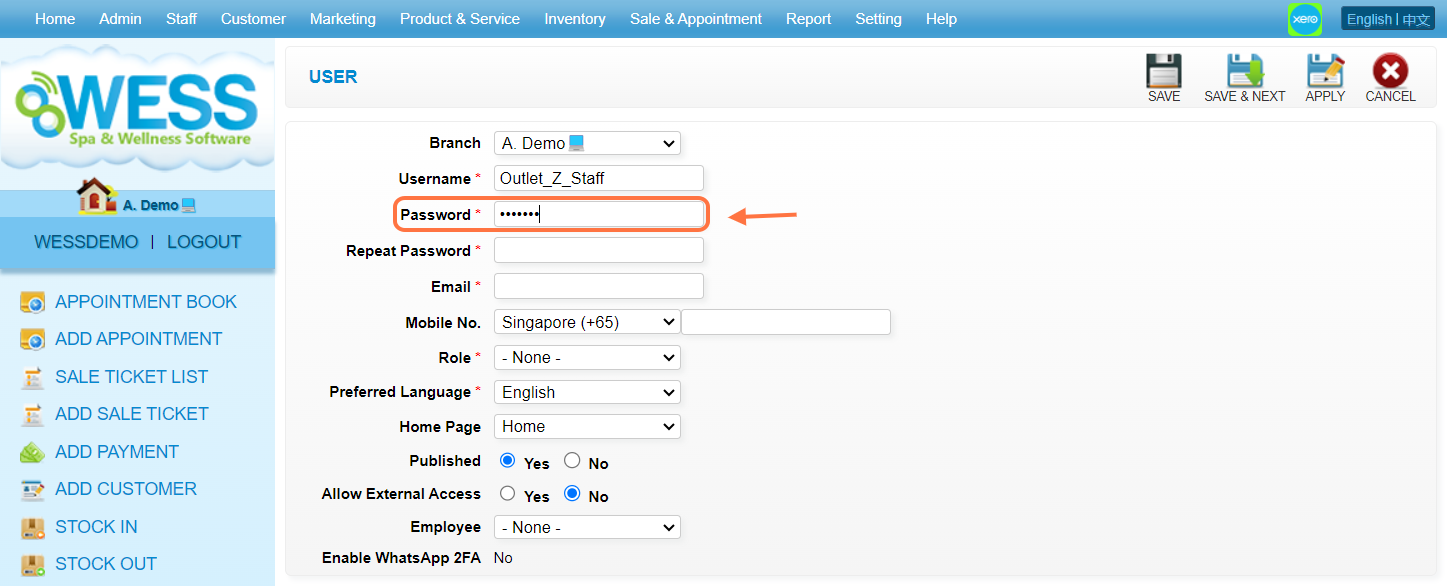
步骤6: 重复 密码 以此确定密码。
步骤7:输入一个 有效 “email(邮箱)” .
Step 8: Select a phone number format 并输入 phone number.
步骤9:选择一个 ”role(职责)” 给 新用户.
[!] 角色可以确定该用户具有哪些访问权限
步骤10:选择一个 “Preferred Language” 每当 用户登录 至WESS。
Step 11: Make sure the “published(公开)” 被设置为 “Yes (是)“.
Step 12: Make sure “Allow External Access (允许外部访问)” 被设置为 “No(不)“.
[!] 该设置允许用户从出口以外的网络登录 WESS。
Step 13: [Optional] 点击 ”员工” 以 选择盘点库存的员工.
[!] Select an employee to become an admin.
步骤14: 点击 ”APPLY (应用)”或其他 磁盘图标 以用来 保存.
步骤15:确保 新用户 已 保存.
Last Updated: September 2024
https://wesshelp.wessconnect.com/2024/11/28/how-to-change-the-user-password/
步骤1 : 点击 “Admin” .
步骤2:点击 “USER” .
步骤3:点击 pen icon “✏️” 以用来 edit.
步骤4:输入一组 new password.
[!] 密码必须至少包含以下内容:
a. 八个字母
b. one uppercase letter [A-Z]
c. one lowercase letter [a-z]
d. one number [1-0]
e. one special character [exp: ‘@’ , ‘#’ , ‘_’ or etc]
步骤5: 重复 · password(密码) 以此确定密码。
步骤6:点击 “APPLY” 或其他 磁盘图标 以用来 save.
步骤7:确保 更改 已 saved.
Last Updated: November 2024
https://wesshelp.wessconnect.com/2024/12/02/how-to-unpublish-a-user-who-is-no-longer-available/
[ℹ️] Method 1
步骤1 : 点击 “Admin” .
步骤2:点击 “USER” .
步骤3:点击 pen icon “✏️” 以用来 edit .
Step 4: Set “Published” 以用来 “No(不)” 。
[ℹ️] Method 2
步骤5:点击 “APPLY” 或其他 磁盘图标 以用来 save.
步骤6:确认 更改 已 saved.
步骤7:点击 “✔️” 以用来 unpublish.
步骤8:确保 更改 已 saved.
Last Updated: December 2024
https://wesshelp.wessconnect.com/2024/12/03/how-to-publish-the-unpublished-user/
步骤1 : 点击 “Admin” .
步骤2:点击 “USER” .
Step 3. Select “No” to show the unpublished user.
ℹ️ 方法 1
步骤4:点击 pen icon “✏️” 以用来 edit.
步骤5:设置 “Published” 以用来 “Yes” .
步骤6:点击 “APPLY” 或其他 磁盘图标 以用来 save.
步骤7:确保 更改 已 saved.
ℹ️ 方法 2
步骤8:点击 “❎” 以用来 publish.
步骤9:确保 更改 已 保存
Last Updated: December 2024
https://wesshelp.wessconnect.com/2024/12/03/how-to-restrict-user-access-to-the-system/
步骤1 : 点击 “Admin” .
步骤2:点击 “USER” .
步骤3:点击 pen icon “✏️” 以用来 edit.
Step 4: Set “Allow External Access” 以用来 “No(不)” 。
[!] Make sure you have the main account with “Allow External Access” on to prevent a total lockout.
步骤5:点击 “APPLY” 或 other disk icons 以用来 save.
步骤6:确认 更改 已 saved.
Last Updated: December 2024
https://wesshelp.wessconnect.com/2023/11/09/how-to-set-the-branch-access-for-a-user-2/
步骤1:点击 “后台管理” .
步骤2:点击 “USER(用户)” .
步骤3:点击 铅笔图标 ”✏️” 以用来 更改.
步骤4:选择 “分行“ 使得用户 只 的账号进行 登录 在这个 部门.
步骤5: 【选择性】 用户可以 移除 · 限制 并且让 用户访问所有分支.
步骤6:点击 “APPLY (应用)”或其他 磁盘图标 以用来 保存.
步骤7:确保 更改 已 保存.
最新更新:7月2024
https://wesshelp.wessconnect.com/2023/11/09/how-to-check-my-accounts-access-right-2/
步骤1:点击 username (用户名).
步骤2:点击 ”MY ROLE(我的职责)” .
步骤3:可在此处检查访问权限。如果 无法执行某些操作,请 联系 你的 管理员 因为有些访问可能被隐藏。
[!] 如果您在系统中的职责最高(管理员/经理/所有者),请联系 WESS 支持人员。
最新更新:7月2024
https://wesshelp.wessconnect.com/2023/11/09/how-to-add-a-new-legal-host-ip/
步骤1:当设备 与外部网络连接,用户将 收到 · 错误信息 包含 IP 地址.
步骤2:在主账户里,点击 “Setting(设置)” .
步骤3:点击 "BRANCH(部门/分行)” .
步骤4:点击 LEGAL HOST or “🖥️” .
步骤5:输入 IP 显示 来自错误信息 【参考第一步】。
步骤6:点击 ”➕“以 添加.
步骤7:【选择性】用户可以 点击IP 地址以便进行更改 它。
第八步:【选择性】点击蓝色图标”✔️“以 更新.
步骤9:点击 “APPLY (应用)”或其他 磁盘图标 以用来 保存.
步骤10:确保 更改 已 保存.
步骤11:【选择性】你可以点击 垃圾桶图标”🗑“ 以用来 移除.
[!] 确保点击磁盘图标保存更改。
最新更新于:2023年11月
https://wesshelp.wessconnect.com/2024/08/06/how-to-login-to-wess/
步骤1:输入你的 username (用户名).
[!] 确保你的账号存在。
步骤2:输入你的password(密码)“.
步骤3:点击 “Login(登录)” 按钮。
步骤4: 选择 部门 登录。并点击 “Enter“.
步骤5:登录 成功界面. 
最后更新:8月2024年
https://wesshelp.wessconnect.com/2024/12/02/how-to-create-shortcut/
步骤1 : 点击 “Setting” .
步骤2:点击 “SHORTCUT” .
步骤3:拖动任何你想要的功能 right to the left .
步骤4:【选择性】将不必要的功能长按并拖移从 left to the right.![Step 4: [Optional] Drag unnecessary features from the left to the right.](https://images.tango.us/workflows/55953e59-c4a8-40a3-a9c5-e84591d72d52/steps/f70867ac-3faa-430d-8163-3c7e25cf564b/09544d73-6f4b-435a-b339-d080e8b0b98e.png?mark-x=734&mark-y=151&m64=aHR0cHM6Ly9pbWFnZXMudGFuZ28udXMvc3RhdGljL2JsYW5rLnBuZz9tYXNrPWNvcm5lcnMmYm9yZGVyPTQlMkNGRjc0NDImdz02MTgmaD02NiZmaXQ9Y3JvcCZjb3JuZXItcmFkaXVzPTEw)
步骤5:点击任何 Save icon “💾” .
步骤6:确认 更改 已 saved.
第七步:【选择性】 移除 all shortcuts, click “Clear All” .![Step 7: [Optional] To remove all shortcuts, click “Clear All” .](https://images.tango.us/workflows/55953e59-c4a8-40a3-a9c5-e84591d72d52/steps/91e6135e-b165-4d64-896c-bb55b932a6f9/44dd8dd4-6ef4-44ca-b38c-46289e5b72a2.png?mark-x=607&mark-y=172&m64=aHR0cHM6Ly9pbWFnZXMudGFuZ28udXMvc3RhdGljL2JsYW5rLnBuZz9tYXNrPWNvcm5lcnMmYm9yZGVyPTQlMkNGRjc0NDImdz0xMDYmaD01NyZmaXQ9Y3JvcCZjb3JuZXItcmFkaXVzPTEw)
Last Updated: December 2024
https://wesshelp.wessconnect.com/2024/12/27/how-to-edit-the-own-user-password/
步骤1:点击 username.
Step 2: Create a “Password” .
[!] 密码必须至少包含以下内容:
a. 八个字母
b. one uppercase letter [A-Z]
c. one lowercase letter [a-z]
d. one number [1-0]
e. one special character [exp: ‘@’ , ‘#’ , ‘_’ or etc]
Step 3: Repeat the password(密码) 以此确定密码。
步骤4:点击 Save icon “💾”.
步骤5:确保 更改 已 saved.
Last Updated: December 2024
https://wesshelp.wessconnect.com/2023/11/14/how-to-create-a-new-role/
步骤1:点击 “后台管理” .
步骤2:点击 “ROLE(角色)” .
步骤3:点击 "NEW(新建)” .
步骤4:输入职位 名称.
步骤5:【选择性】填写详情在 “表格详情” .
步骤6:确保 “published(公开)” 被设置为 “Yes (是)” .
步骤7:【选择性】点击另一个标签
步骤8:点击 “Enable …” 以 允许访问 到 特定功能.
步骤9:选择任何 权限 给该用户应具备。
步骤10:点击 “APPLY (应用)”或其他 磁盘图标 以用来 保存.
步骤11:确保 更改 已 保存.

最后更新: 七月 2024年
https://wesshelp.wessconnect.com/2023/11/14/how-to-edit-role-access-right/
步骤1:点击 “后台管理” .
步骤2:点击 “ROLE(角色)” .
步骤3:点击 铅笔图标 ”✏️” 以用来 更改.
第四步:选择任何 权限 给该用户应具备。
步骤5:点击 “APPLY (应用)”或其他 磁盘图标 以用来 保存.
步骤6:确认 更改 已 保存.
最后更新: 七月 2024年
https://wesshelp.wessconnect.com/2023/11/14/how-to-unpublish-a-role-that-is-no-longer-available/
步骤1:点击 “后台管理” .
步骤2:点击 “ROLE(角色)” .
[ℹ️] Method 1
步骤3:点击 铅笔图标 ”✏️” 以用来 更改.
步骤4:设置 ”published(公开)” 为 “No(不)” .
步骤5:点击 “APPLY (应用)”或其他 磁盘图标 以用来 保存.
步骤6:确认 更改 已 保存.
[ℹ️] Method 2
步骤7:点击青色 ”✔️“以 不公开.
步骤8:确保 更改 已 保存.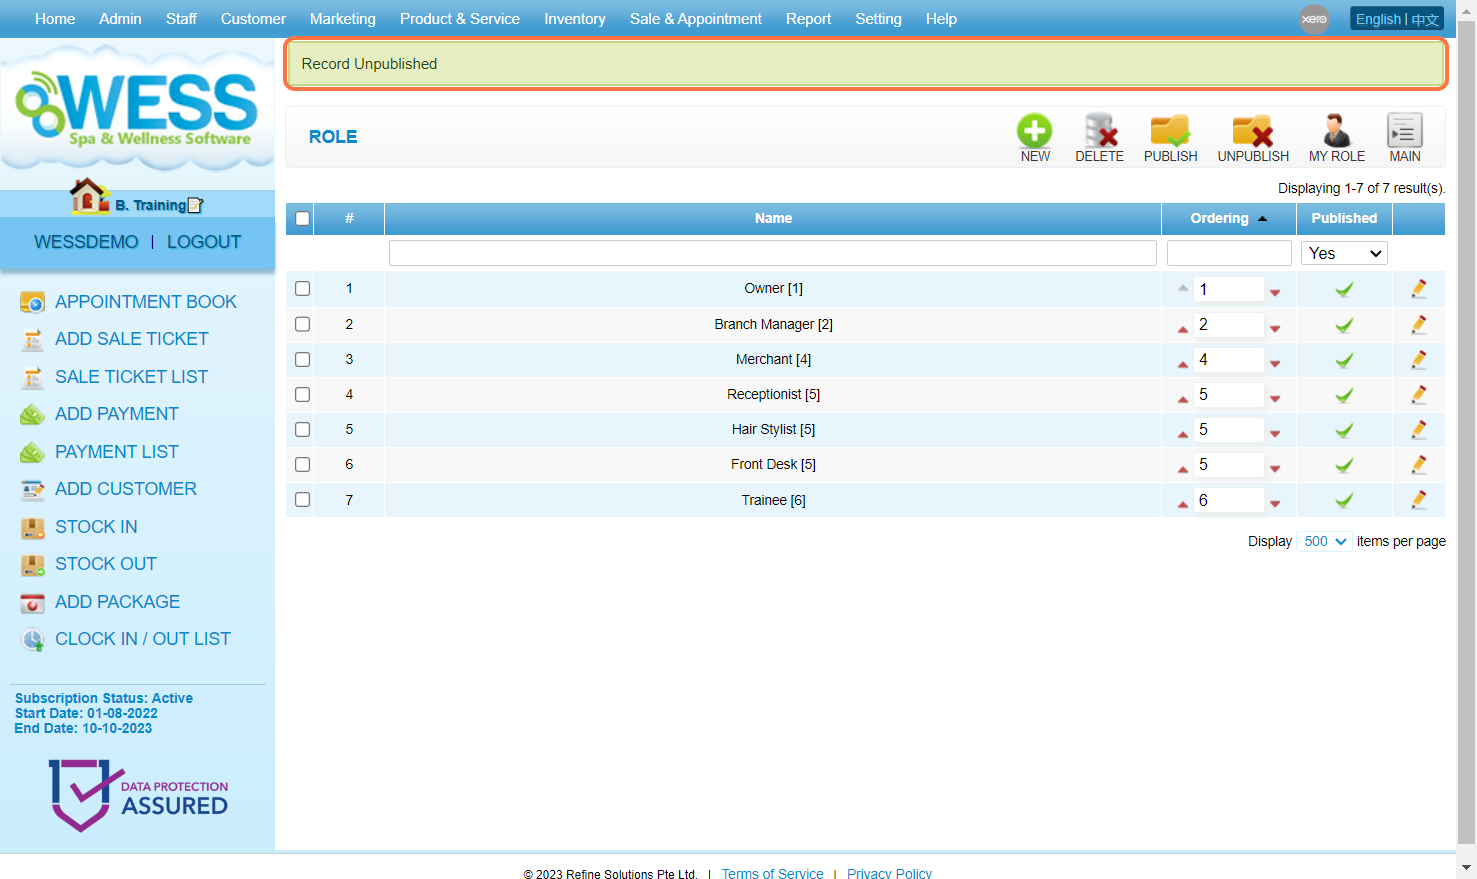
最后更新: 七月 2024年
https://wesshelp.wessconnect.com/2023/11/14/how-to-publish-the-unpublished-role/
步骤1:点击 “后台管理” .
步骤2:点击 “ROLE(角色)” .
步骤3:选择 “No(不)“ 以显示 不公开的角色.
[ℹ️] Method 1
步骤4:点击 铅笔图标 ”✏️” 以用来 更改.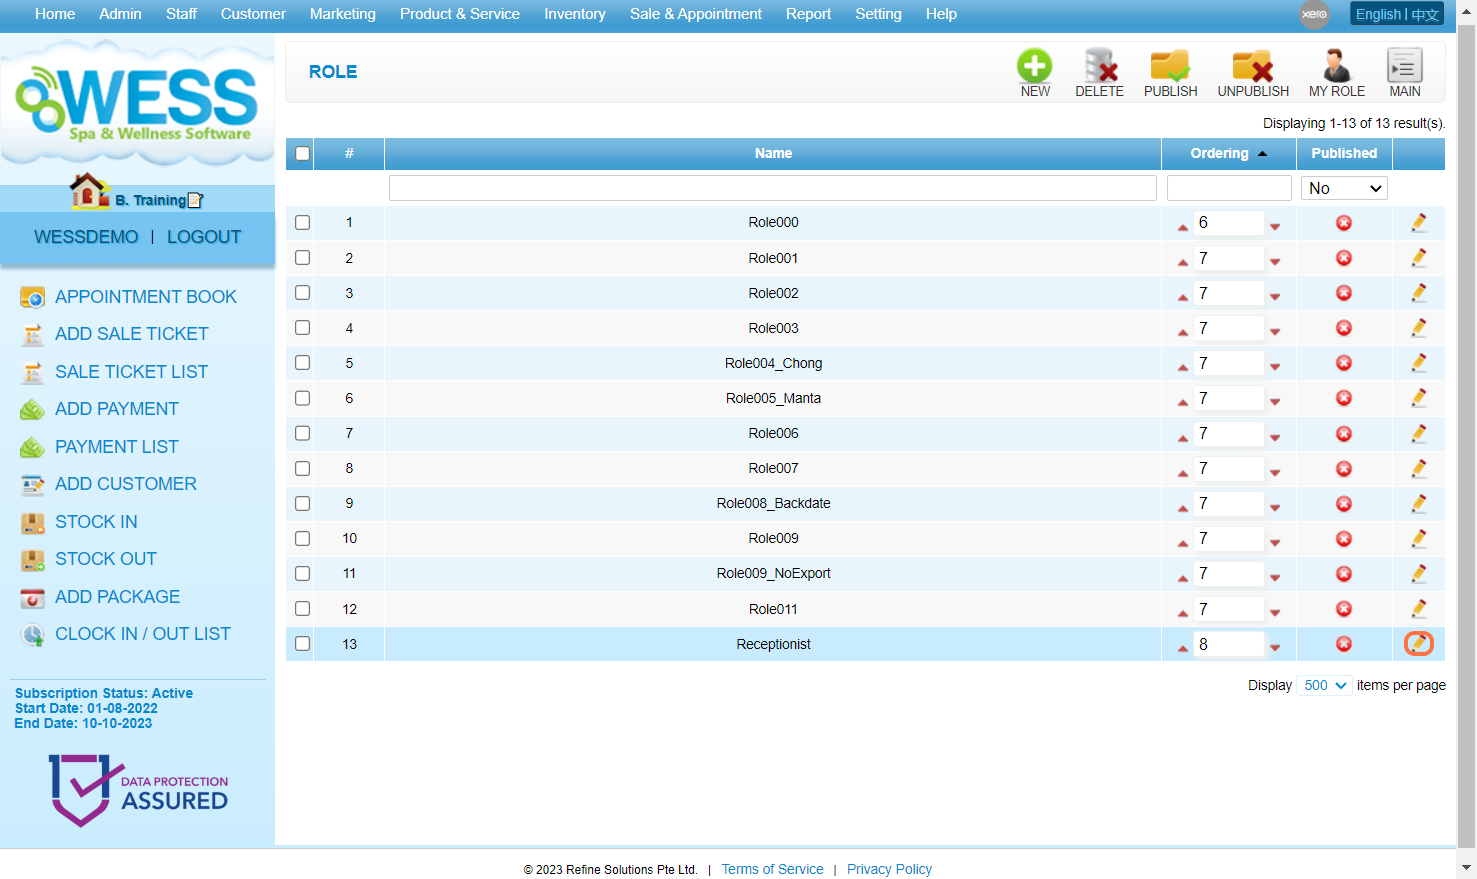
步骤5:设置 “published(公开)” 为 “Yes (是)” .
步骤6:点击 “APPLY (应用)”或其他 磁盘图标 以用来 保存.
步骤7:确保 更改 已 保存.
[ℹ️] Method 2
第八步:点击 “❎” 以便 公开.
步骤9:确保 更改 已 保存.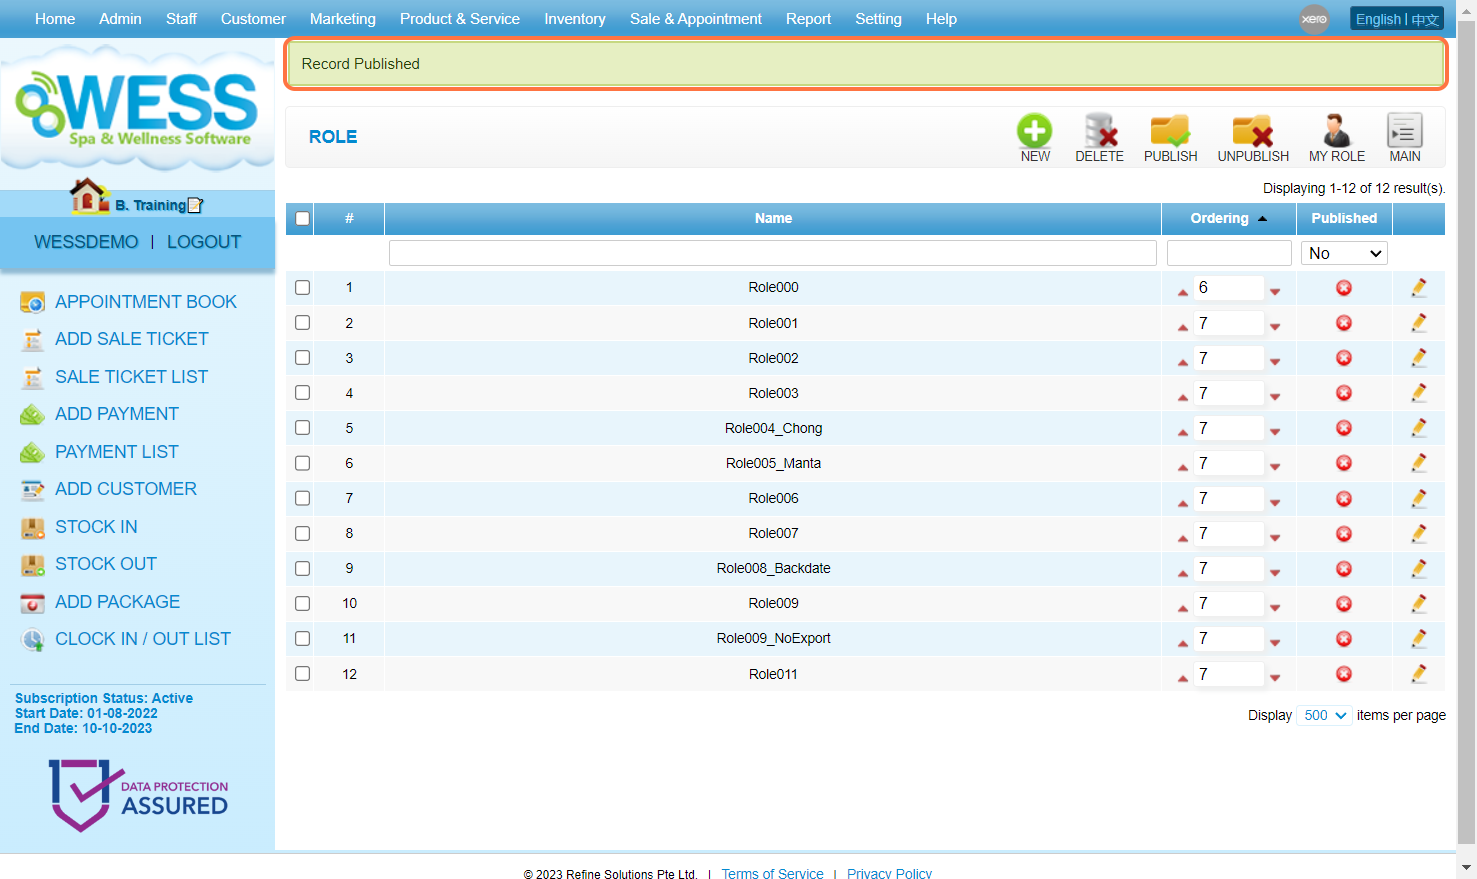
最后更新: 七月 2024年
https://wesshelp.wessconnect.com/2023/11/14/how-to-adjust-the-role-ordering/
步骤1:点击 “后台管理” .
步骤2:点击 “ROLE(角色)” .
步骤3:点击 上移图标"🔺" 以用来 增加 · 优先角色/职位.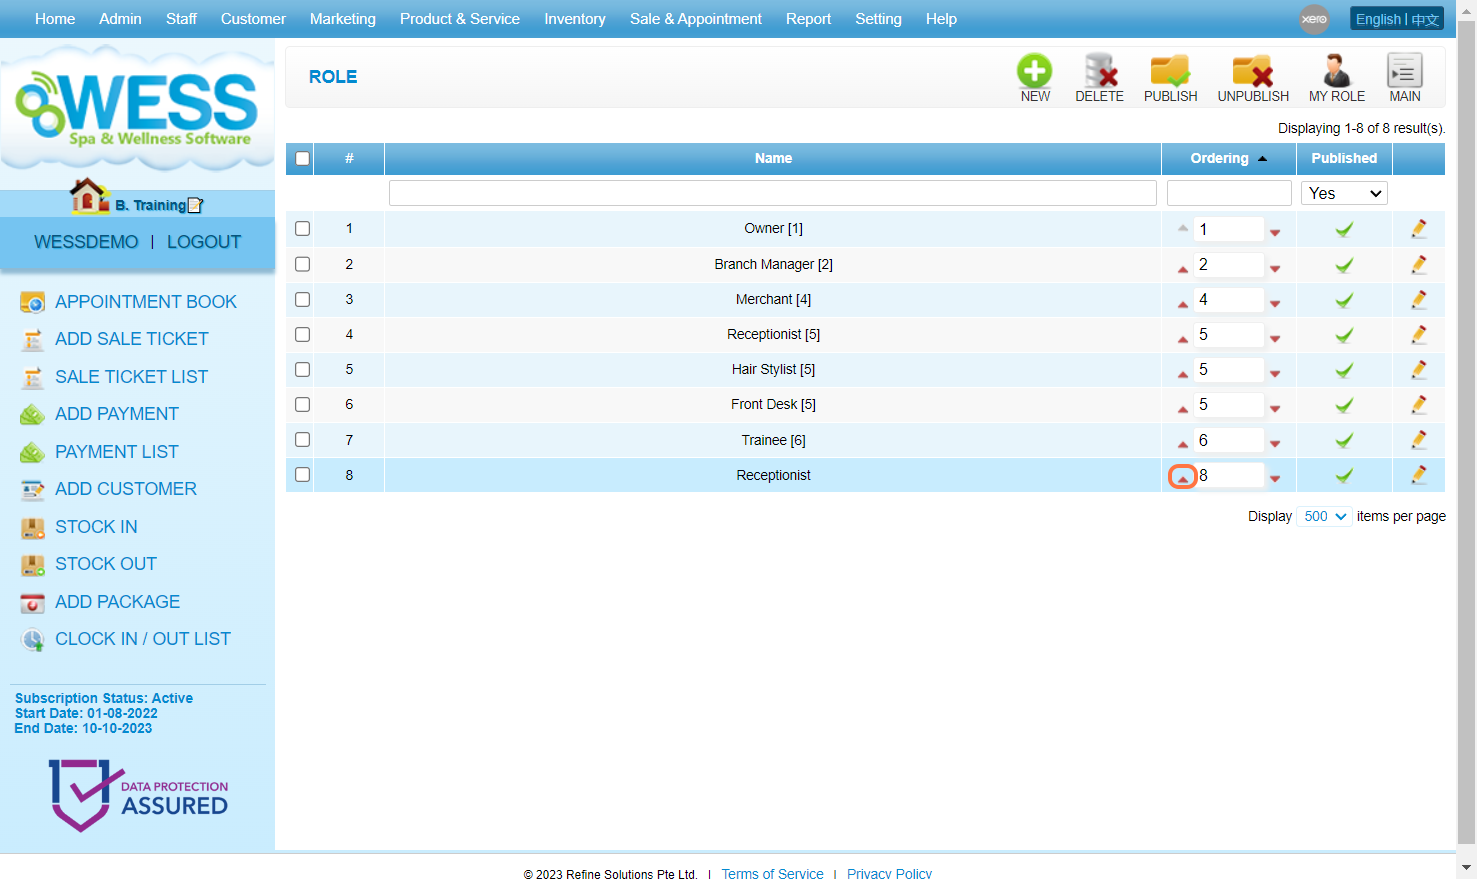
步骤4: 确保 更改 已 保存.
步骤5:点击 下移图标"🔻" 以用来 降低 · 优先角色/职位.
步骤6:确认 更改 已 保存.
最后更新: 七月 2024年
https://wesshelp.wessconnect.com/2023/11/14/why-am-i-not-able-to-delete-the-user-role/
一旦用户/角色 有记录(有登录记录,已分配给用户),这些将 不 · 能 · 删除.
ℹ️ 解决方案:
2. 用户: 将用户设置为注销
3. 角色: 将角色设置为注销
最后更新于:2023年11月
1. 这可能是由几个与互联网相关的问题引起的:
a. 您使用的网络(Wi-Fi/热点/蜂窝数据)不是白名单网络。
b. 您连接了正确的调制解调器,但其 IP 地址已更改。
c. 您正在使用蜂窝数据。
d. 打开和关闭调制解调器。
e. Wi-Fi 连接不稳定。

ℹ️ 解决方案:
2. 找出你当前的 IP 地址
3. 检查并更改合法主机设置中的白名单IP地址
最后更新于:2023年11月