
https://wesshelp.wessconnect.com/2021/06/17/where-can-i-download-google-chrome/
Step 1: Download the installation file here ↓↓
Download Link: Google Chrome installation page
or
search Google Chrome on your browser (any browser with Microsoft Edge, Firefox, Internet Explorer, Opera, Chromium or etc)
Click the Link
Step 2: Click Download Chrome
Step 3: Click on the Downloaded ChromeSetup file
Step 4: If prompted, click “Yes” or “Install anyway” on the dialog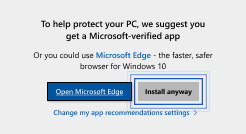
Step 5: The installation is running and Google Chrome will open automatically when it is done
Last update: April 2021
https://wesshelp.wessconnect.com/2021/06/17/where-can-i-download-mozilla-firefox/
Step 1: Download the installation file here ↓↓
Download Link: Mozilla Firefox installation page
or
search Firefox on your browser (any browser including Google Chrome, Microsoft Edge, Internet Explorer, Opera, Chromium or etc)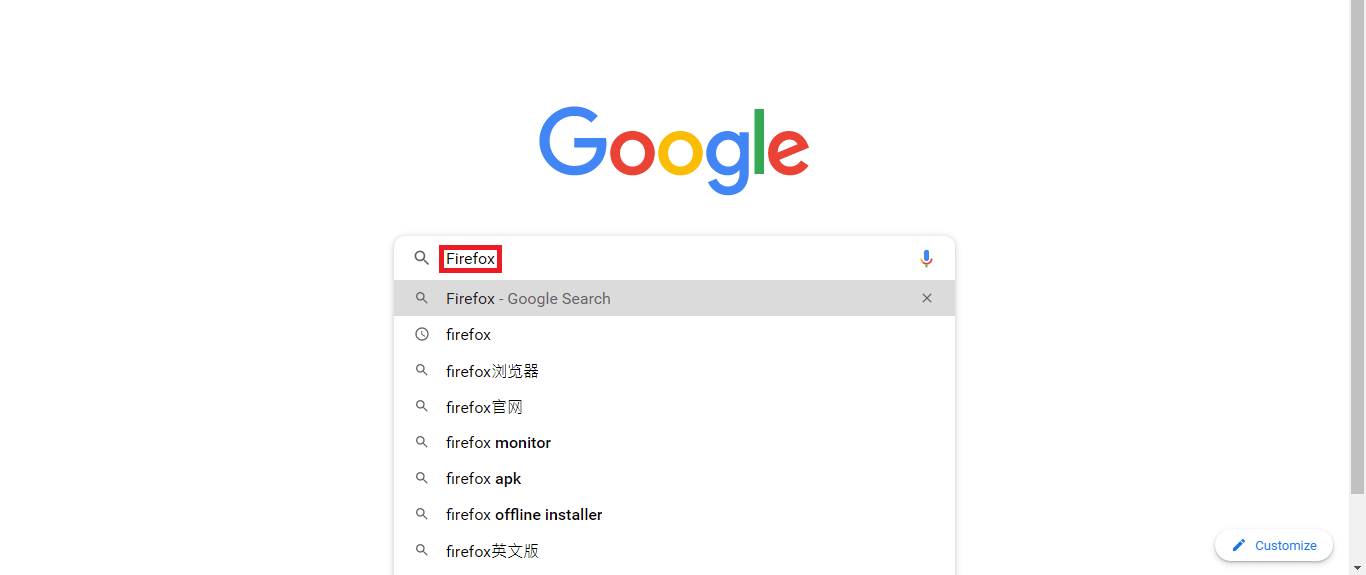
Click the Link
Step 2: Click Download Firefox
Step 3: Click on the Downloaded Firefox installer file
Step 4: If prompted, click “Yes” or “Install anyway” on the dialog
Step 5: The installation is running and Firefox will open automatically when it is done
Last update: April 2021
https://wesshelp.wessconnect.com/2021/06/17/where-can-i-download-teamviewer/
Step 1: Download the installation file here ↓↓
Download Link: TeamViewer installation page
or
search TeamViewer on your browser (any browser including Google Chrome, Firefox, Microsoft Edge, Internet Explorer, Opera, Chromium or etc)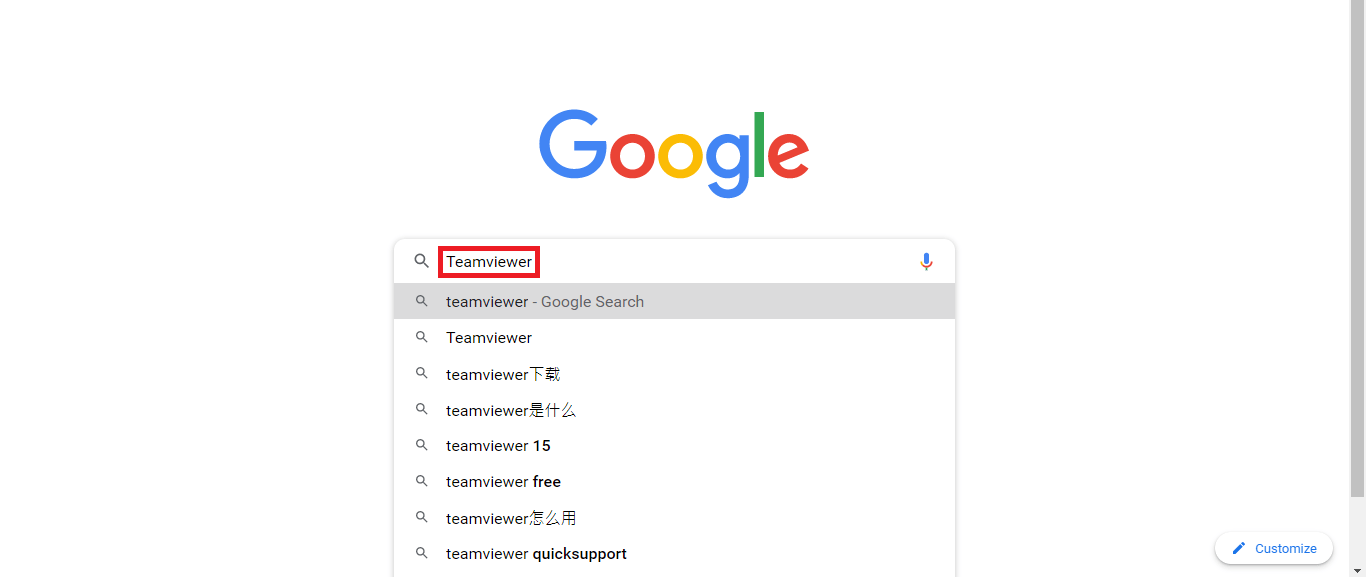
Click the Link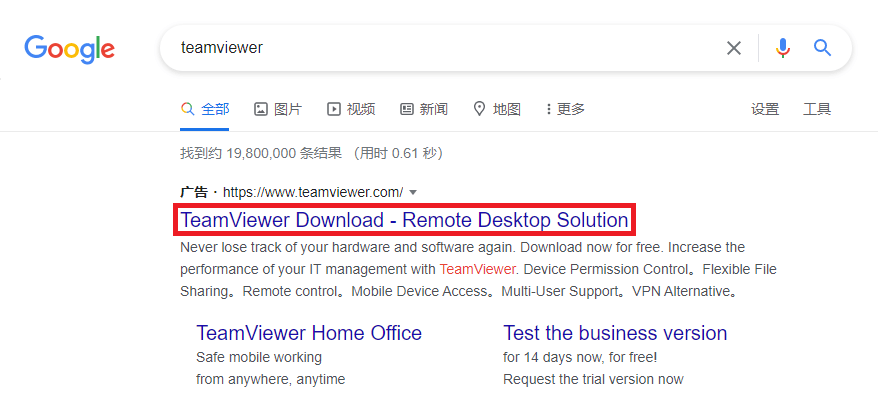
Step 2: Click Download TeamViewer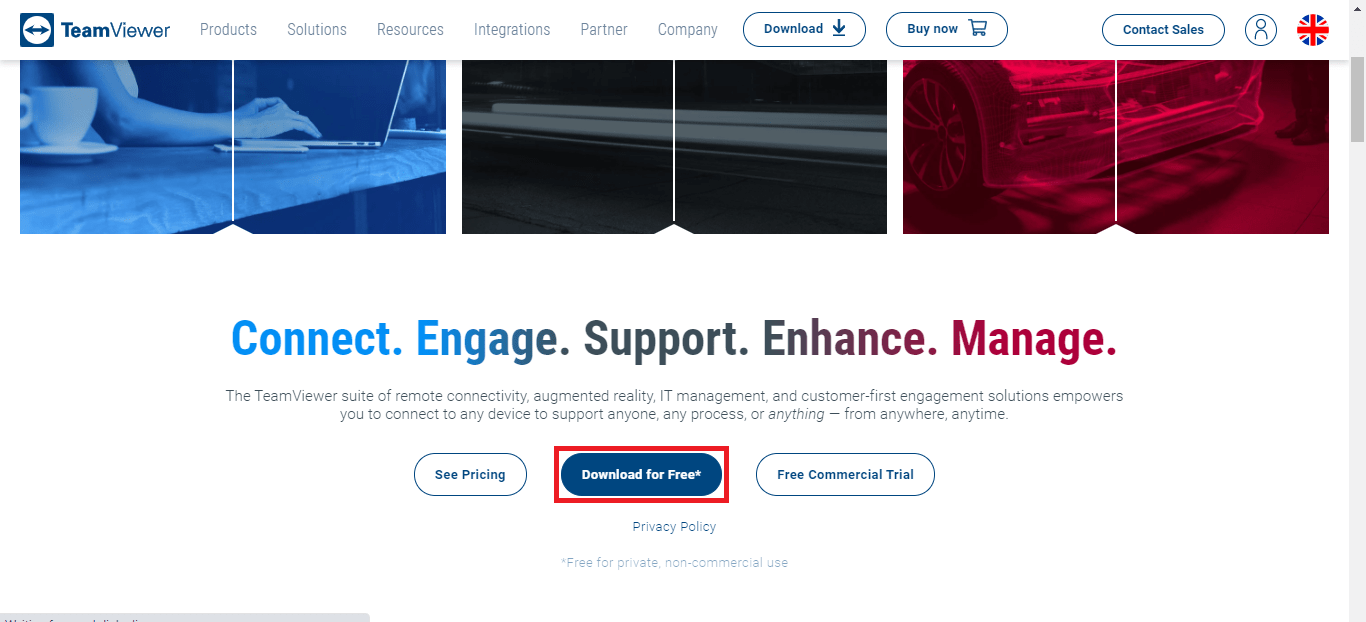
Step 3: Click on the Downloaded TeamViewer_Setup file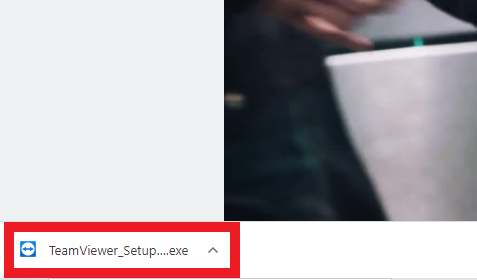
Step 4: If prompted, click “Yes” or “Install anyway” on the dialog
Step 5: Pick Default installation and click Accept – next to proceed 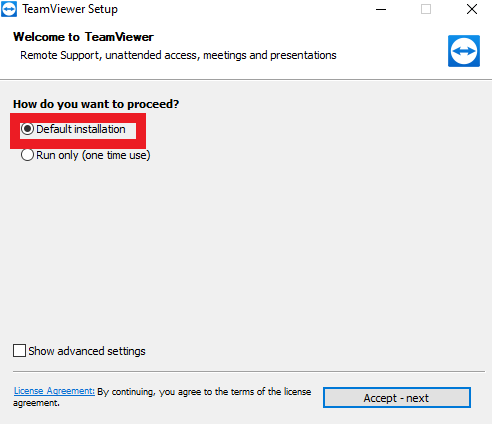
Step 6: Pick I want to use the free version for personal use and click Finish to proceed. The installation is done. 
Last update: April 2021
https://wesshelp.wessconnect.com/2021/06/17/where-can-i-download-anydesk/
Step 1: Download the installation file here ↓↓
Download Link: AnyDesk installation page
or
search AnyDesk on your browser (any browser including Google Chrome, Firefox, Microsoft Edge, Internet Explorer, Opera, Chromium or etc)
Click the Link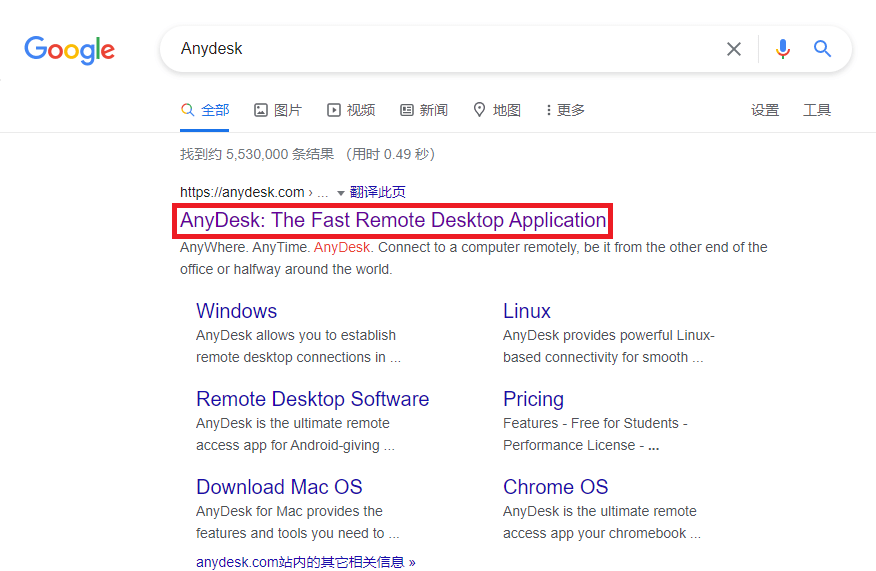
Step 2: Click Download Now
Step 3: Click on the Downloaded AnyDesk setup file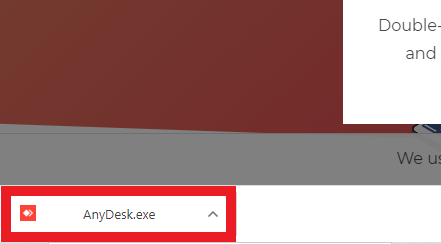
Step 4: Click install AnyDesk
Step 5: If prompted, click “Yes” or “Install anyway” on the dialog
Step 6: Click Accept & Install to proceed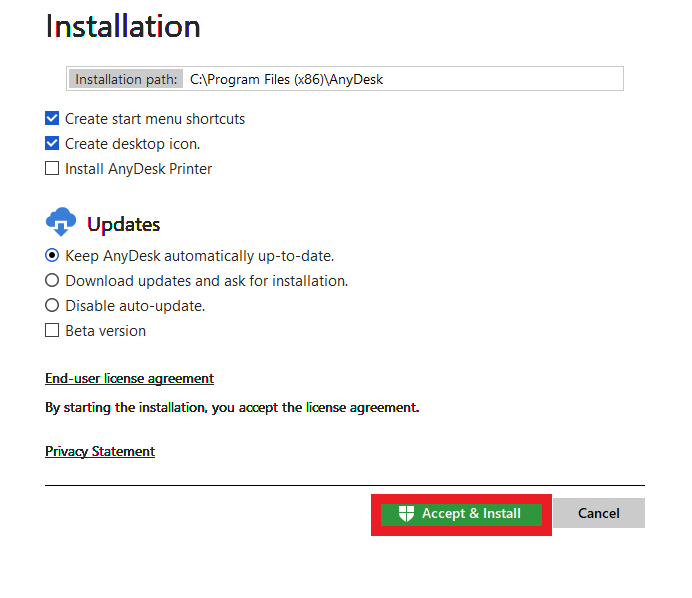
Step 7: Wait for connecting to the network and click Get Started! The installtion is done.
Last update: April 2021
https://wesshelp.wessconnect.com/2024/01/10/how-to-install-anydesk-on-android-mobile/
[!] Be warned, this guide contains actions which can let other people HAVE ACCESS to your device.
Step 1: Tap on the Play Store.

Step 2: Search and download AnyDesk.
Official website: https://anydesk.com/en/downloads/android
[!] Make sure you have downloaded the legitimate app to avoid malicious app.

Step 3: Tap on the AnyDesk app.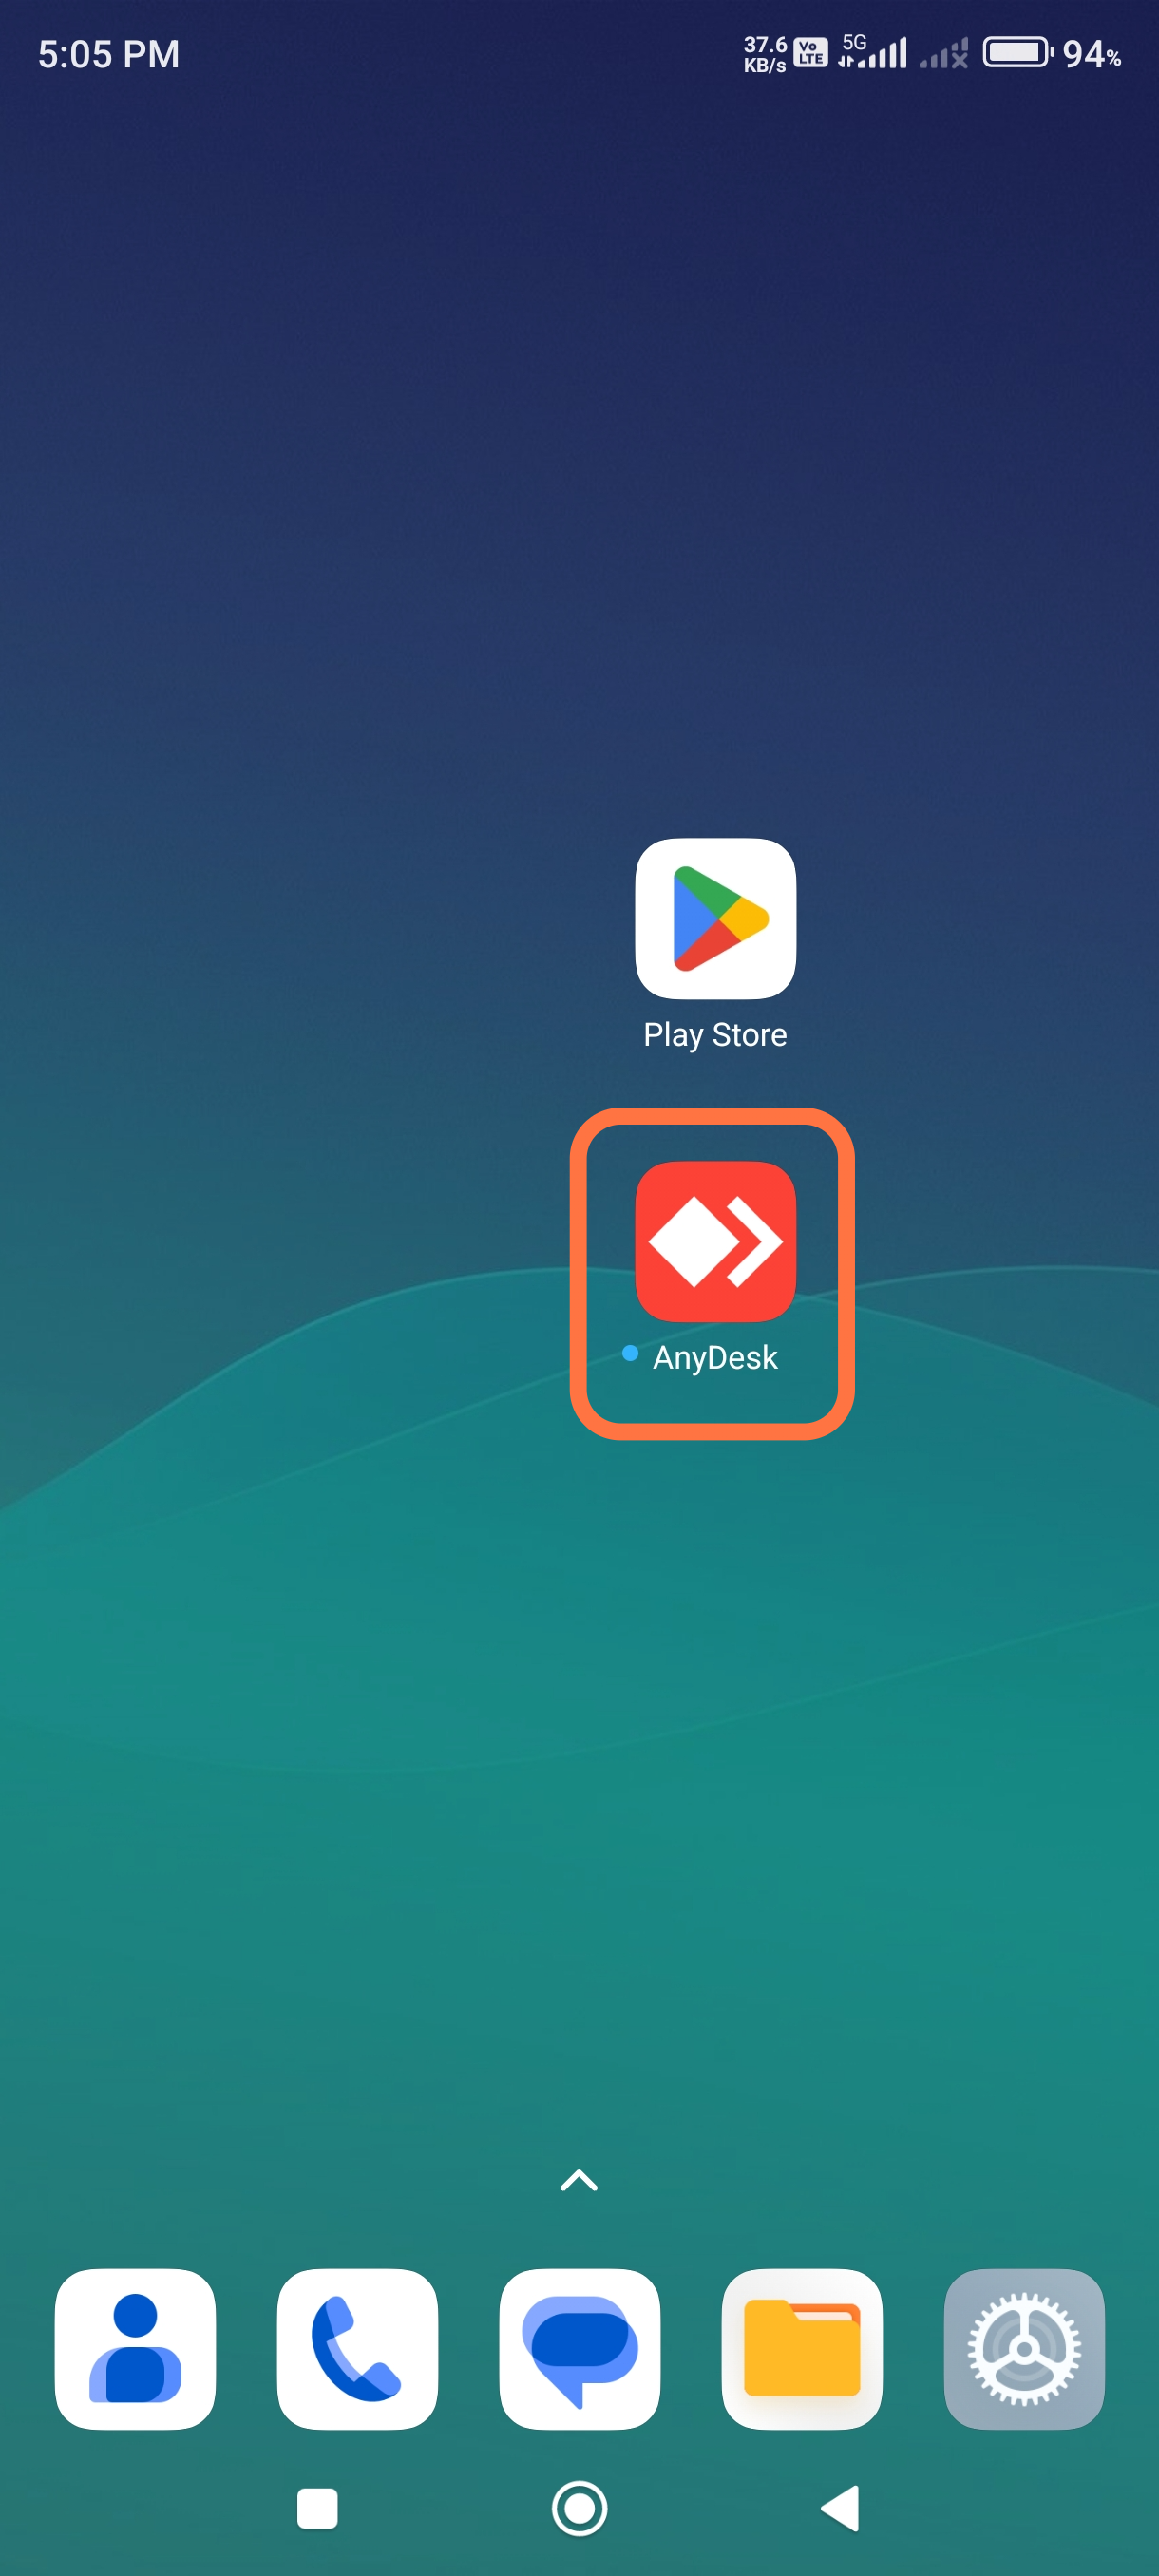
Step 4: Tap on “OK” to download the necessary Plugins.
[!] Make sure you have downloaded the legitimate app to avoid malicious app.
Step 5: Tap on “AGREE” to go to the setting which enables the plugin to work.
Step 6: Tap on “Downloaded Apps” in the General section of Accessibility Settings.
Step 7: Select the downloaded plugin.
Step 8: Tap on “Use AnyDesk Control Service AD1“.
Step 9: In Settings, find and tap on “Apps“.
Step 10: Tap on “Permissions“.
Step 11: Tap on “Other permissions“.
Step 12: Select the downloaded plugin “ADControl-AD1“.
Step 13: Set “Open new windows while running in the background” to “Allowed“.
Step 14: Provide the AnyDesk address code to the support.
[!] Be warned, this action will permit them to access your device. Think twice before sharing this code.
Step 15: If the support is accessing your device, read the instructions and tick the checkbox.
Step 16: Tap on “ACCEPT” to allow it.
Step 17: Select actions to permit it.
[!] Click on these icons to enable or disable specific permissions to control what the other party can do once they connect.
Step 18: Tap “ACCEPT“.
Step 19: Tap on “Start now” to begin the session.
Last Updated: Aug 2024
https://wesshelp.wessconnect.com/2023/01/19/how-to-clear-browser-cache-in-safari/
iPhone / iPad
Step 1: Go to Settings
Step 2: Find Safari and tap on it
Step 3: Tap Clear History and Website Data
ℹ Clearing your history, cookies, and browsing data from Safari won’t change your AutoFill information
Step 4: To clear your cookies and keep your history, tap Advanced on the Safari page
Step 5: Tap Website Data
Step 6: Tap Remove All Website Data
Video Guide: https://drive.google.com/file/d/1ebBu-NgdaRBZVF0VszJYYbX_QFcEDTLa/view
Last update: January 2023
https://wesshelp.wessconnect.com/2023/07/13/how-to-clear-browser-cache-in-microsoft-edge/
Step 1: Click Three Dots icon “···” menu button.![]()
Step 2: Click “Setting” .![]()
Step 3: Click “🔒Privacy, search, and services” .![]()
Step 4: Click on Choose what to clear beside Clear browsing data now.![]()
Step 5: Select a Time range, “All time” is suggested.![]()
Step 6: Tick the “Cookies and other site data” and Cache images and files” checkbox “☑️” .![]()
Step 7: Click “Clear now” .![]()
Last update: Aug 2024
https://wesshelp.wessconnect.com/2023/07/13/how-to-clear-browser-cache-in-mozilla-firefox-2/
Step 1: Click Three Lines icon “☰” menu button.![]()
Step 2: Click “Settings ” .![]()
Step 3: Click “🔒 Privacy & Security ” .![]()
Step 4: Click “Clear Data” under Cookies and Site Data.![]()
Step 5: Make sure have ticked all checkboxes below.![]()
Step 6: Click “Clear” button.![]()
Step 7: Click “Clear Now” .![]()
Last update: Aug 2024
https://wesshelp.wessconnect.com/2023/07/12/how-to-clear-browser-cache-in-google-chrome-pc/
Step 1: Click Three Dots icon “⋮” menu button.![]()
Step 2: Click “Setting” .![]()
Step 3: Click “🛡️Privacy and security” .![]()
Step 4: Click “🗑 Clear browsing data” .![]()
Step 5: Select a time range. “All time” is suggested. ![]()
Step 6: Tick the checkbox “☑️” for “Cookies and other site data” and “Cached images and files” .![]()
Step 7: Click “Clear data” .![]()
Last update: Aug 2024
https://wesshelp.wessconnect.com/2023/07/13/how-to-clear-browser-cache-in-google-chrome-android/
Step 1: Tap on Three Dots icon “⋮” of menu button.![]()
Step 2: Tap on “Settings“.![]()
Step 3: Tap on “Privacy and security” .![]()
Step 4: Tap on “Clear browsing data” .![]()
Step 5: Tap and select a time range. “All time” is suggested.![]()
Step 6: Tick the checkbox “☑️” for “Cookies and site data” and “Cached images and files” .![]()
Step 7: Tap on “Clear data” .![]()
Last update: Aug 2024
Step 1: Relogin WESS.
Step 2: Click “Clear data” to clear internet browser cache.
Step 3: Update the internet browser to the latest version.
Step 4: Make sure the device’s time zone is correct.
Step 5: [Optional] Use another internet browser if the issue still exists.
Last Updated: Aug 2024
Step 1: Right click your clock.
Step 2: Click “Adjust date/time”.
Step 3: Set time automatically to “On”.
Step 4: Set time zone automatically to “On”.
Step 5: Click “Sync now” under synchronize your clock.
Last Updated: April 2025
https://wesshelp.wessconnect.com/2023/06/28/how-to-set-the-working-time-for-specific-branch/
Step 1: Click “Setting“.
Step 2: Click “BRANCH“.
Step 3: Check the current branch name on the left, select and click branch on the right. Step 4: Click “Edit“.
Step 5: Set “Start time” for each day needed. 
Step 6: Set “End time” for each day needed.
Step 7: Click “SAVE“.
Step 8: Make sure the setting has been saved.

Last Update: Aug 2024
https://wesshelp.wessconnect.com/2023/09/13/how-to-add-new-price-group/
Step 1: Click “Setting“.
Step 2: Click “PRICE GROUP“.
Step 3: Click “NEW“.
Step 4: Enter all necessary information.
Step 5: Click on Save icon “💾” or other disk icons to save.
Step 6: Make sure the record has been saved.
Last Update: Aug 2024
https://wesshelp.wessconnect.com/2023/09/13/how-to-edit-consumer-web-app-cwa-setting-2/
Step 1: Click “Setting“.
Step 2: Click “CONSUMER WEB APP SETTING“.
Step 3: In the General section, you can change the information shown in CWA.
Step 4: In Booking Setting section, you can set how the booking should work.
Step 5: In Banner section, you can add a maximum of 3 images for your business activities.
Step 6: In Promotion section, you can change the information that will be displayed in the promoted service list.
Step 7: In Payment Method section, you can set the available method to do the payment in CWA.
[!] If you wish to implement credit/debit payment, you need to contact WESS support for setup.
Step 8: Click “SAVE“.
Step 9: Make sure the changes has been saved.
Last Update: Aug 2024
https://wesshelp.wessconnect.com/2023/09/27/how-to-set-reference-code/
Step 1: Click “Setting“.
Step 2: Click “REFERENCE CODE“.
Step 3: Select an item type and click pen icon “✏️” to Update.
Step 4: Enter the “Prefix” of the code.
Step 5: Enter the “Next No” number for the new item.
Step 6: Enter the code “Minimum length“.
Step 7: Enter the “Suffix” for the item.
Step 8: Click on “APPLY” or other disk icons to save.
Step 9: Make sure the setting has been saved.
Last Update: Aug 2024
https://wesshelp.wessconnect.com/2023/09/27/how-to-set-the-account-session-lifetime/
Step 1: Click “Setting“.
Step 2: Click “BRANCH“.
Step 3: Check the current branch name on the left, select and click branch on the right.
Step 4: Click pen icon “✏️” next to the current branch to edit it.
Step 5: Click “PREFERENCE“.
Step 6: Enter minutes for the “Session Lifetime“.
[!] Active account will be automatically logged out after this amount of minutes.
Step 7: Click on “APPLY” or other disk icons to save.
Step 8: Make sure the setting has been saved.
Last Update: Aug 2024
https://wesshelp.wessconnect.com/2025/05/28/how-to-enable-customer-sharing-branch/
1. Go to “Setting”.
2. Click “BRANCH”.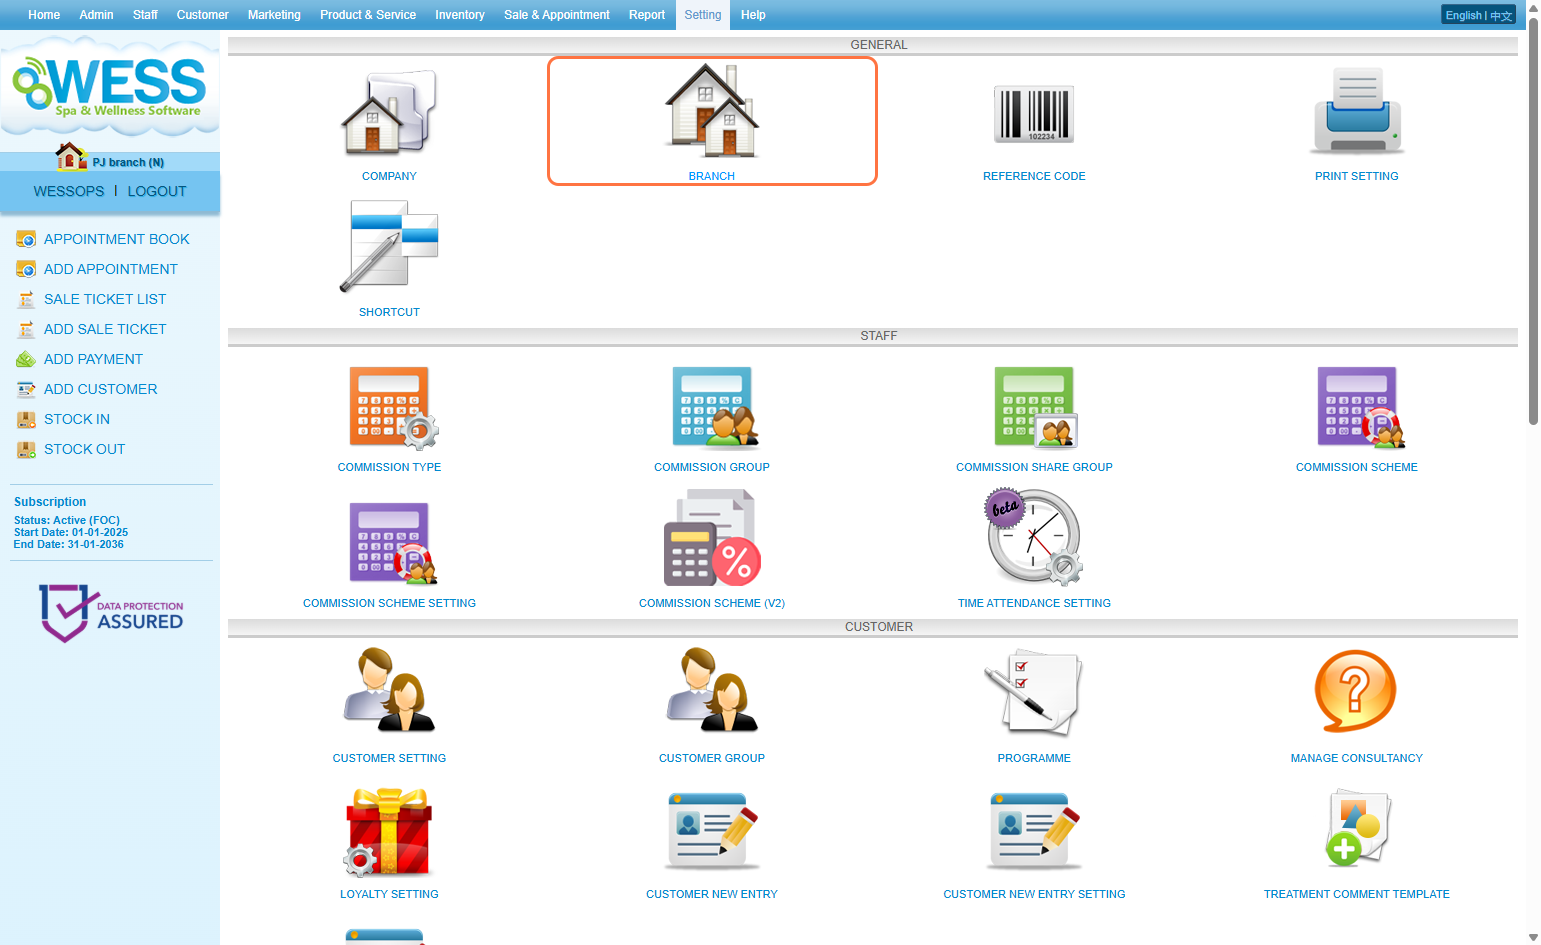
3. Select the current branch (branch that you are access now), for example PJ branch (N).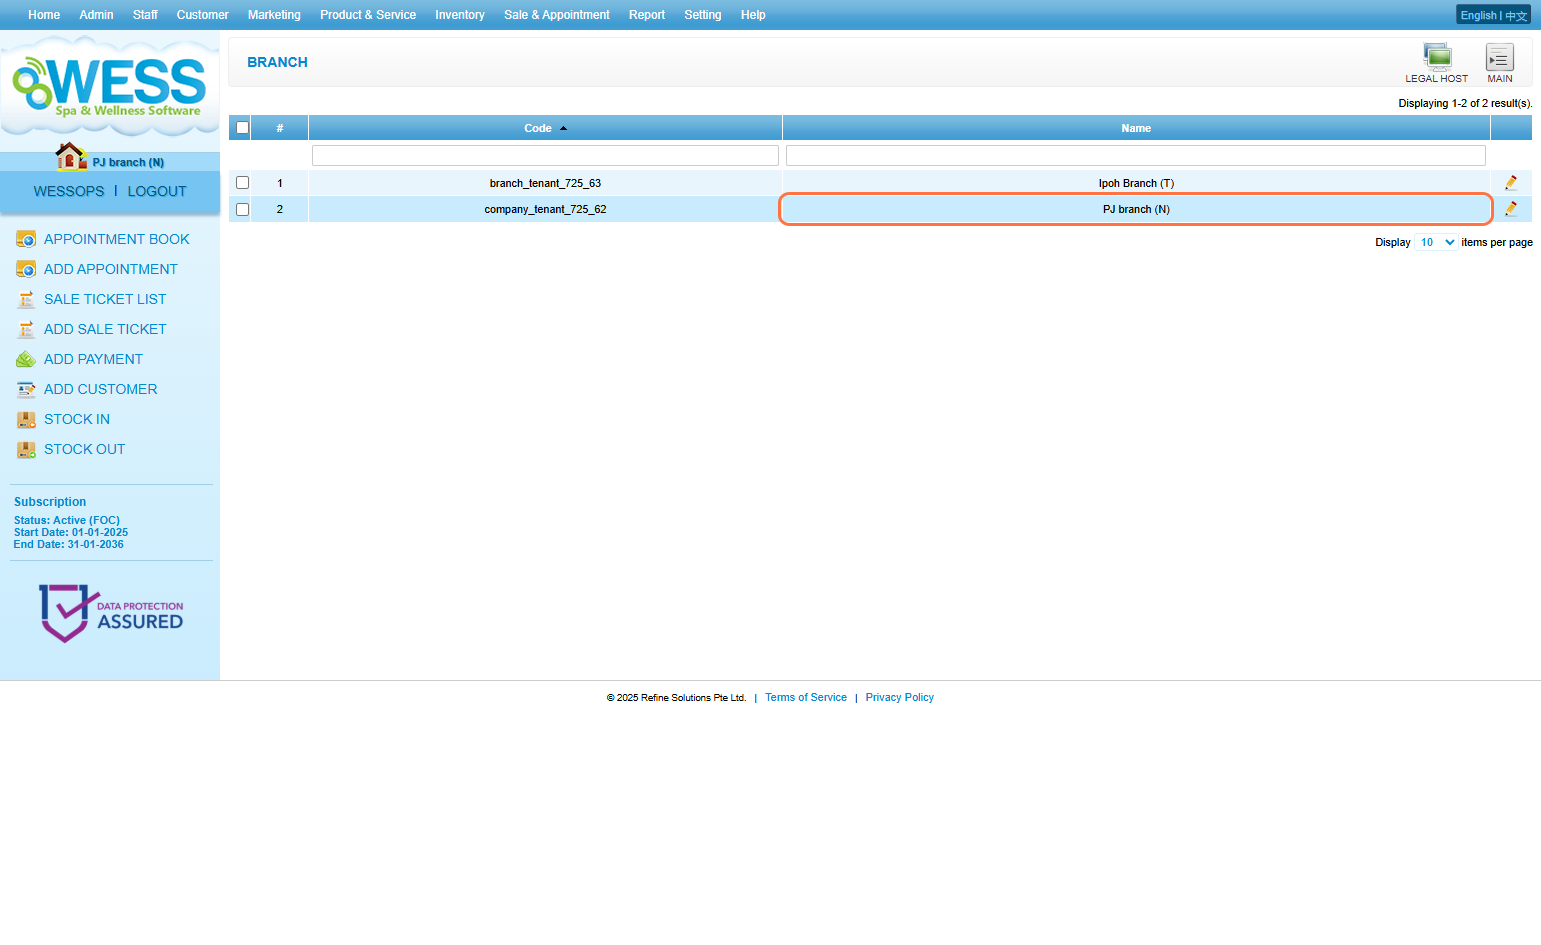 4. Click “EDIT”.
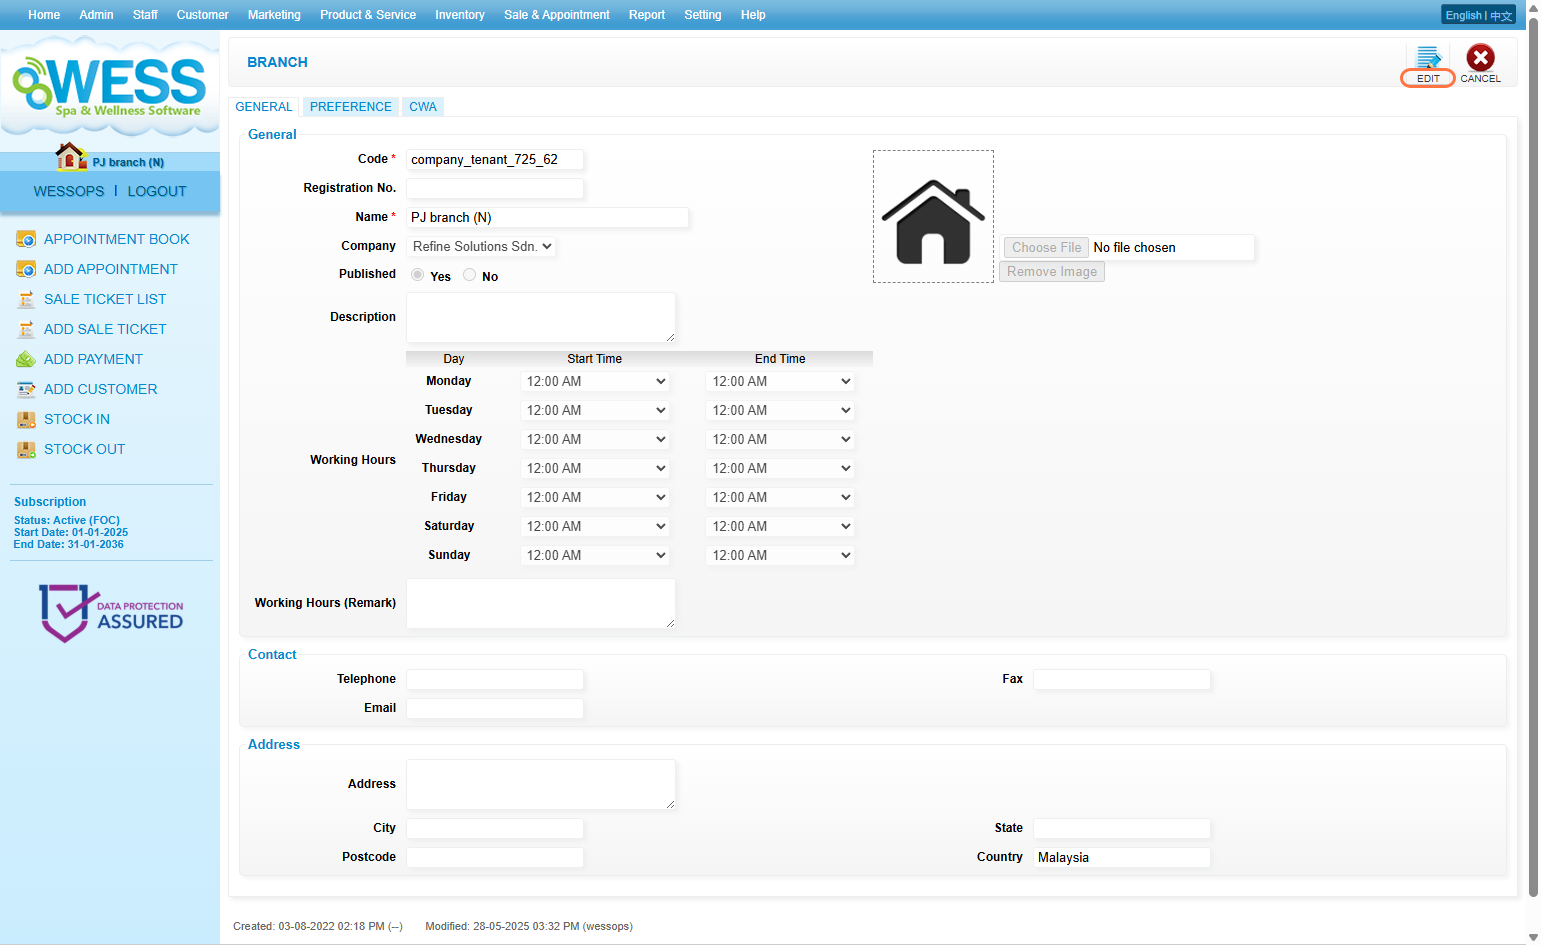
5. Click “PREFERENCE”.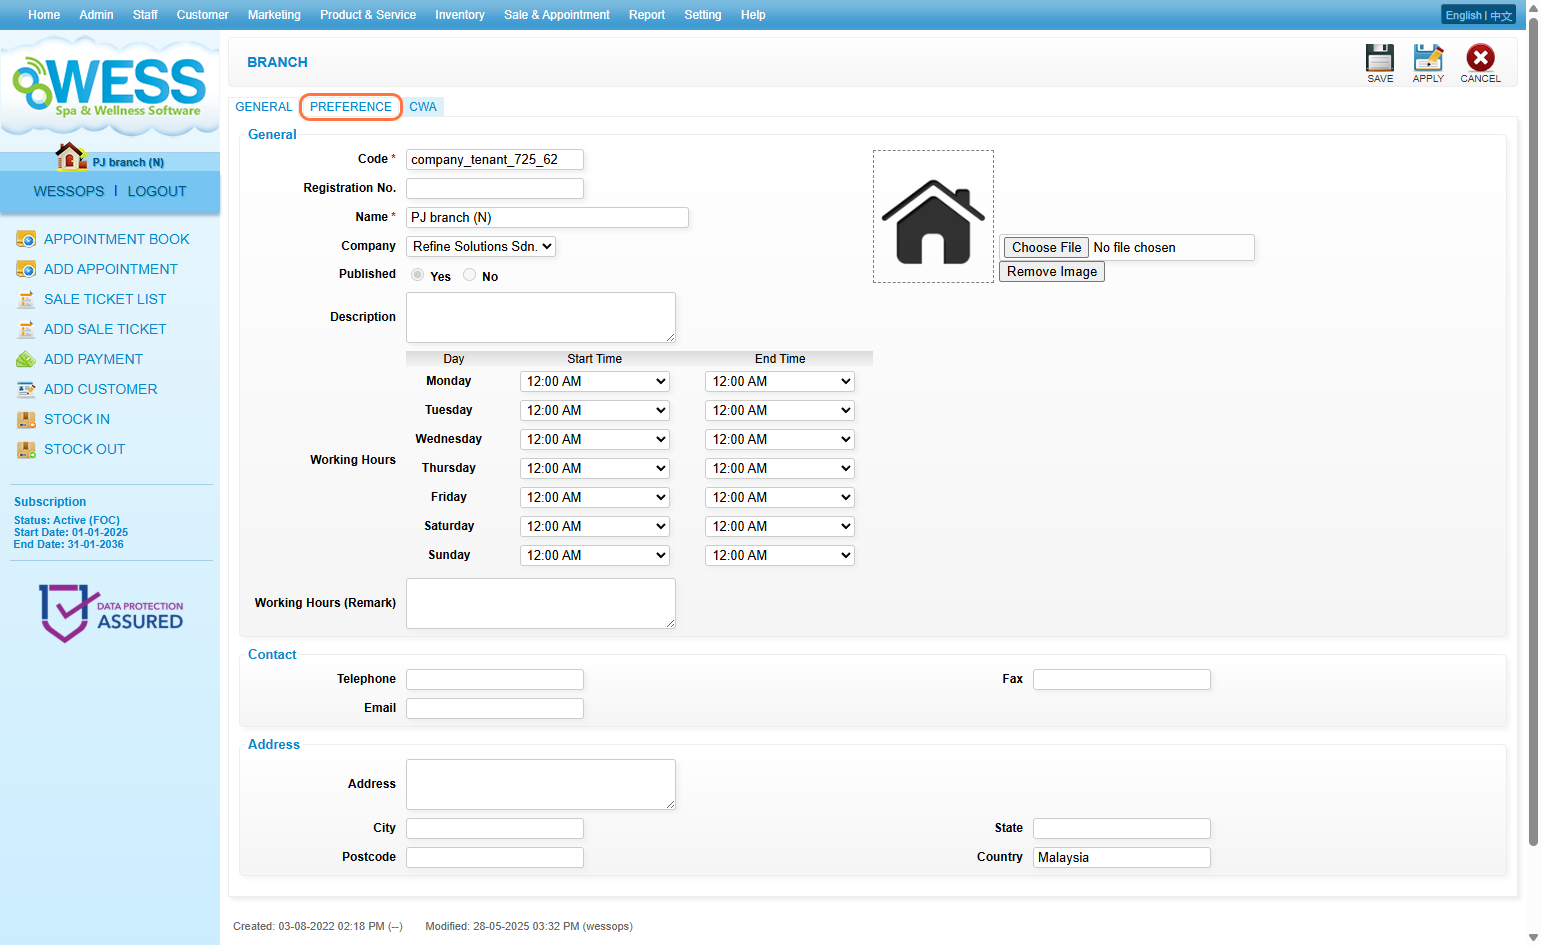
6. Tick the branch would like to share with. 7. Click “SAVE”. *Note that only customers created in current branch will share to selected share branch.
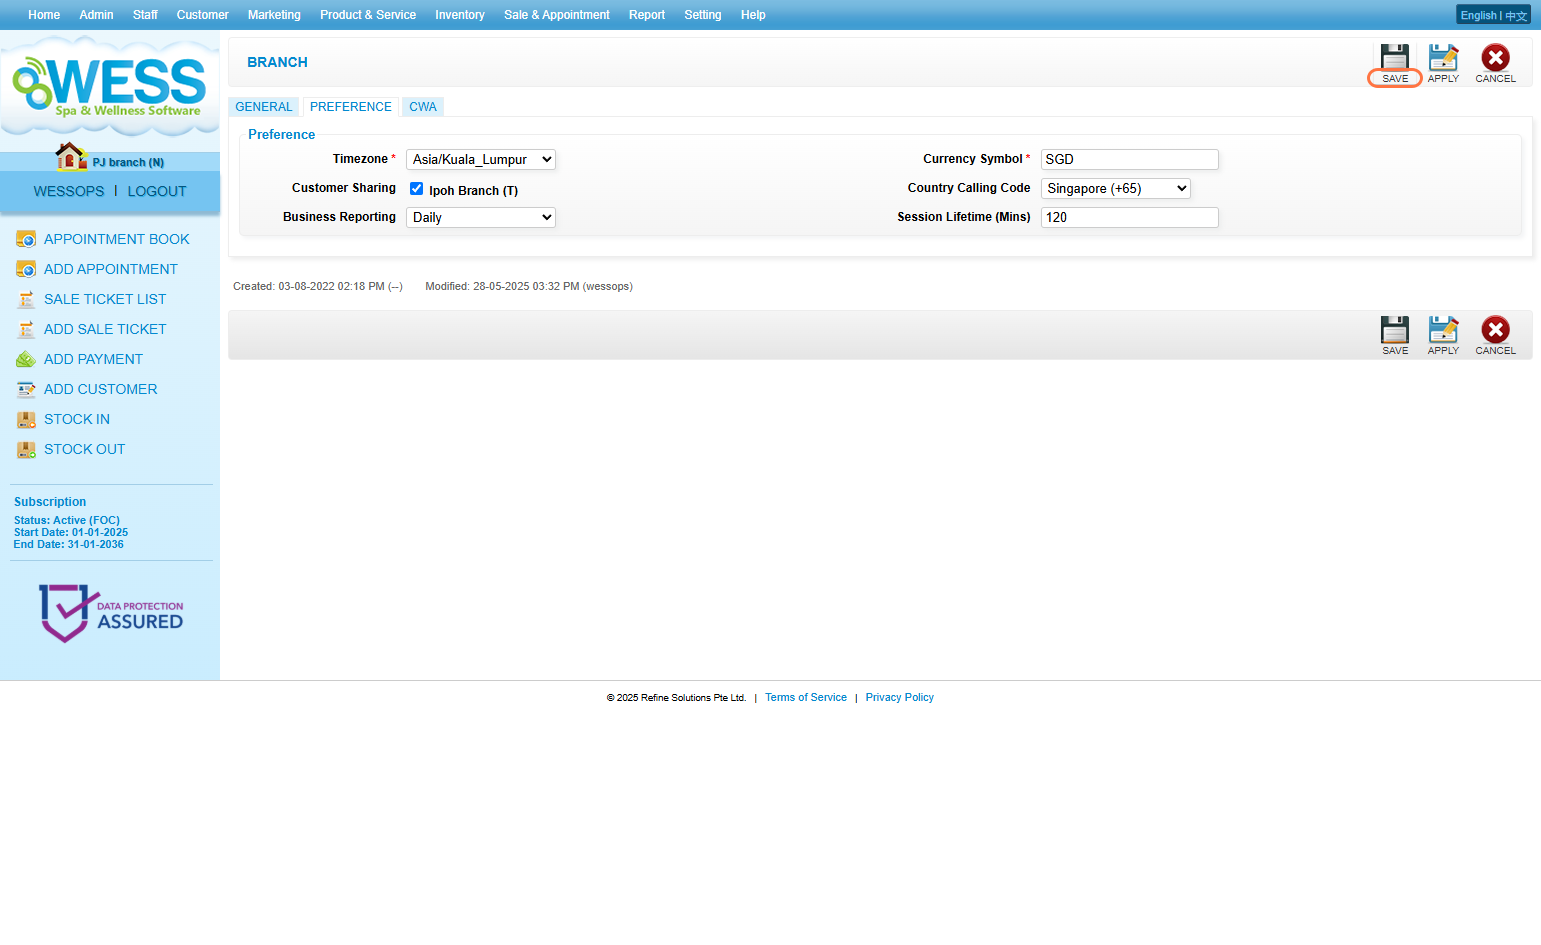
Last Updated: May 2025
https://wesshelp.wessconnect.com/2023/09/27/how-to-convert-the-exported-report-to-excel-file-format/
Step 1: Click “Report“.
Step 2: Click on any report type.
Step 3: Click “Generate” button.
Step 4: Click “EXPORT“.
Step 5: Save the report in an accessible folder.
[!] Notice that the saved file is called Comma Separated Values File, it is not the same as Excel Workbook as you normally see.
Step 6: Double-click on the downloaded file.
Step 7: Click on “File“.
Step 8: Click “Save As“.
Step 9: Click on the “mentioned accessible folder“.
Step 10: Click on Save as type.
Step 11: Select “Excel Workbook“, the file type commonly used for Excel.
Step 12: Click “Save“.
Last Update: Aug 2024
https://wesshelp.wessconnect.com/2024/08/06/how-to-print-the-report-or-convert-it-to-pdf-format/
Step 1: Click “Report” .
Step 2: Select and click on any report that needs to be generated.
Step 3: Enter or tick the checkbox or select to filter the required report information. Step 4: Once confirmed, click on “Generate” button.
Step 5: Confirm that the information is accurate and click PRINT icon “🖨️”. 
Step 6: The left side is show of the required information, the right side is to set the format of the print or set the format of the PDF.
Step 7: If need to generate PDF files can be selected, if to print out on the choice of the printer name. 
Step 8: This is the more detailed setup.
Step 9: Click “Print” button to successful print or generate a PDF.
* The green field is used to turn on or off the Header and Footer.
* The yellow field turns the Background graphic on or off.
Last Update: Aug 2024
https://wesshelp.wessconnect.com/2023/10/12/how-to-add-more-commission-types/
Step 1: Click “Setting” .
Step 2: Click “COMMISSION TYPE” .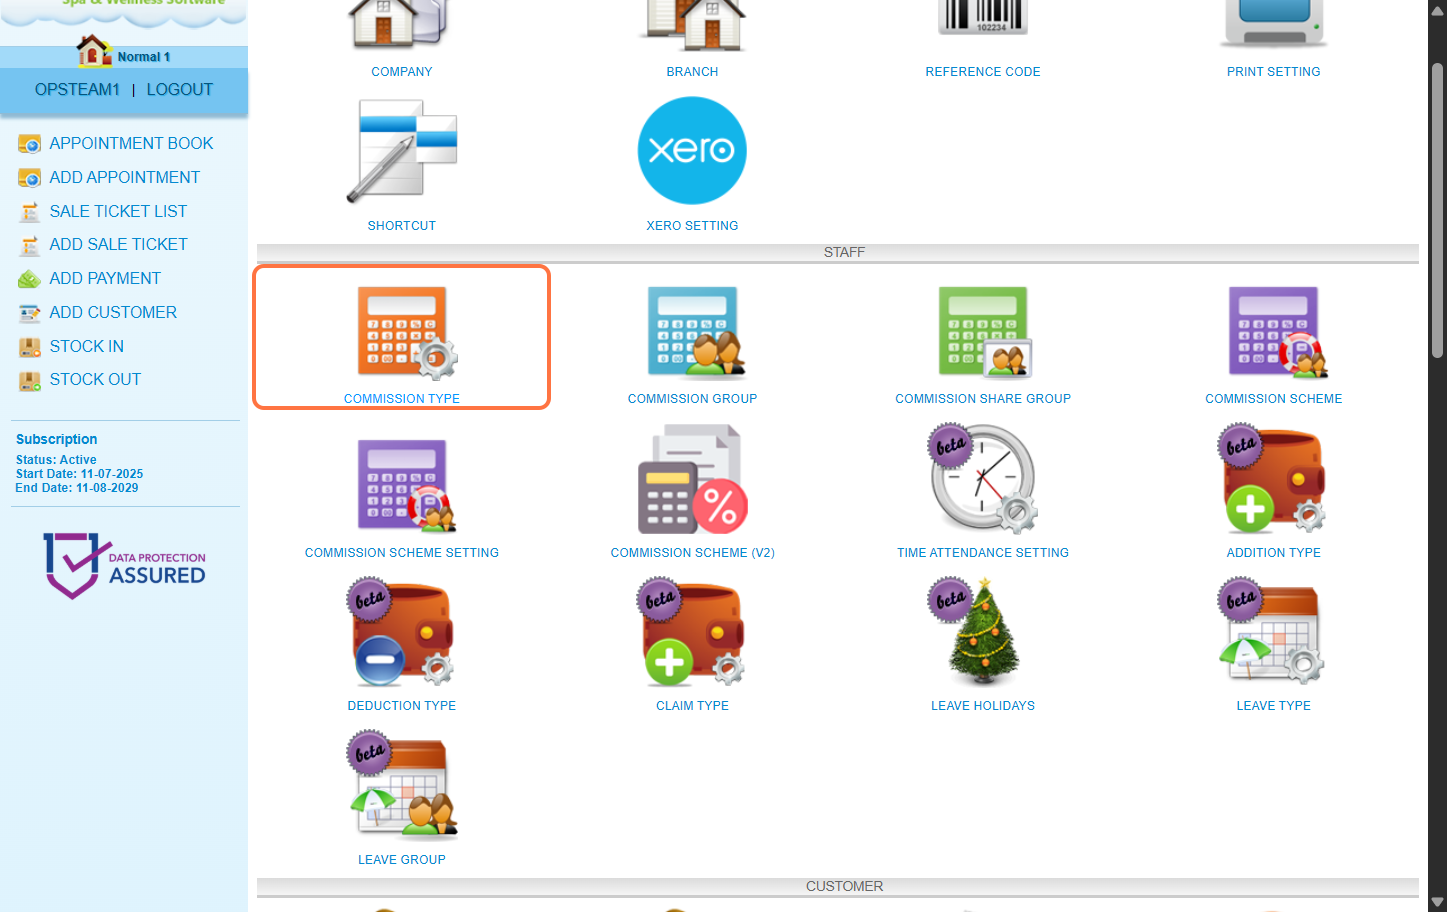
Step 3: Click “NEW” .
Step 4: Enter a “Name” for the new commission type.
Step 5: [OPTIONAL] You can leave a description here to tell others about this commission type.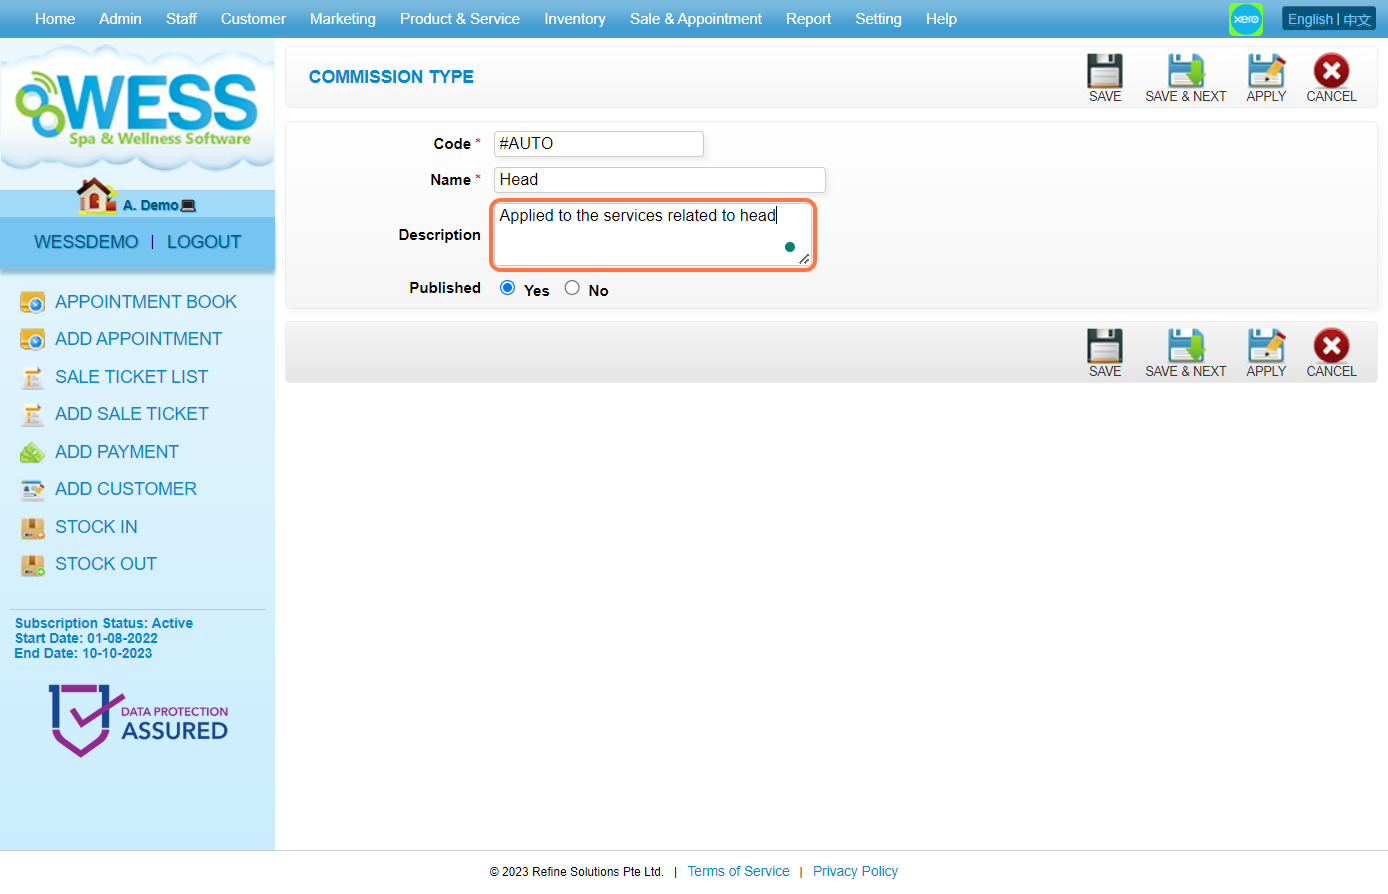
Step 6: Make sure you have set “Published” to “Yes” .
Step 7: Click on “APPLY” or other disk icons to save.
Step 8: Make sure the details have been saved.
[!] You need to assign this commission type to items (products, services, packages…) to work.
Last Update: Aug 2024
https://wesshelp.wessconnect.com/2023/10/12/how-to-change-the-commission-percentage-for-commission/
Step 1: Click “Setting” .
Step 2: Click on “COMMISSION SCHEME” .
Step 3: Click on the pen icon “✏️” to edit.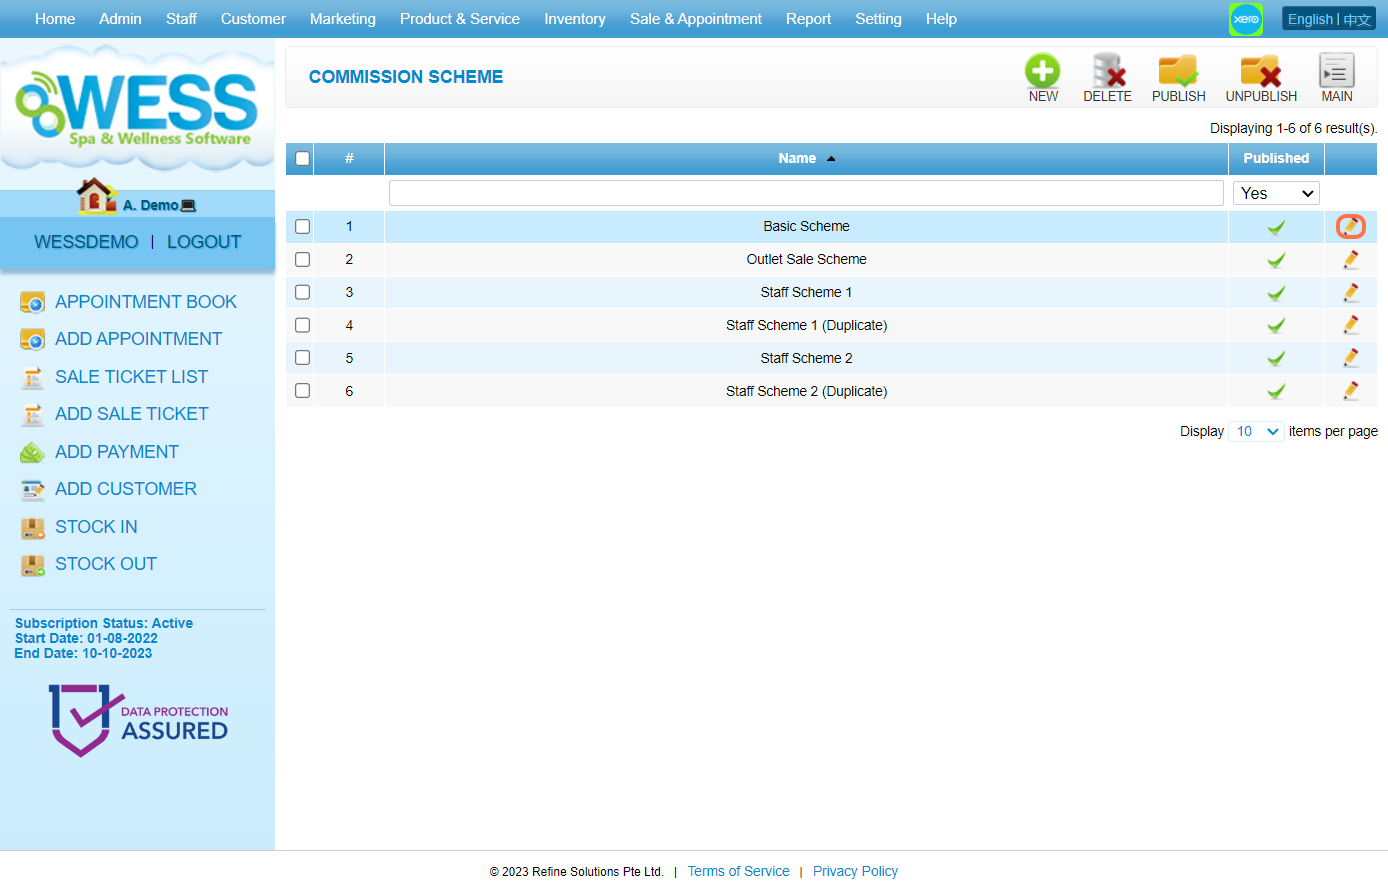
Step 4: Here can change the rate value for item type (products, services, packages…).
[!] Some of the commission scheme does not have this calculation logic.
Step 5: You can change the targets for a multiple-tier rate commission.
[!] Some of the commission scheme does not have this calculation logic.
Step 6: Then, you can change the rate for each tier for a multiple-tier rate commission.
[!] Some of the commission scheme does not have this calculation logic.
Step 7: You can change the rate for each commission type.
[!] Some of the commission scheme does not have this calculation logic.
[!] For this commission type, you need to apply it by assigning it to the items.
Step 8: Click on “APPLY” or other disk icons to save.
Step 9: Make sure the changes have been saved.
Last Update: Aug 2024
https://wesshelp.wessconnect.com/2023/10/12/how-to-edit-the-commission-scheme-name-commission-v-2/
Note:
Commission V2 is a new version of the commission calculation system inside WESS.
It DOESN’T AFFECT your original commission calculation system (V1).
Step 1: Click “Setting” .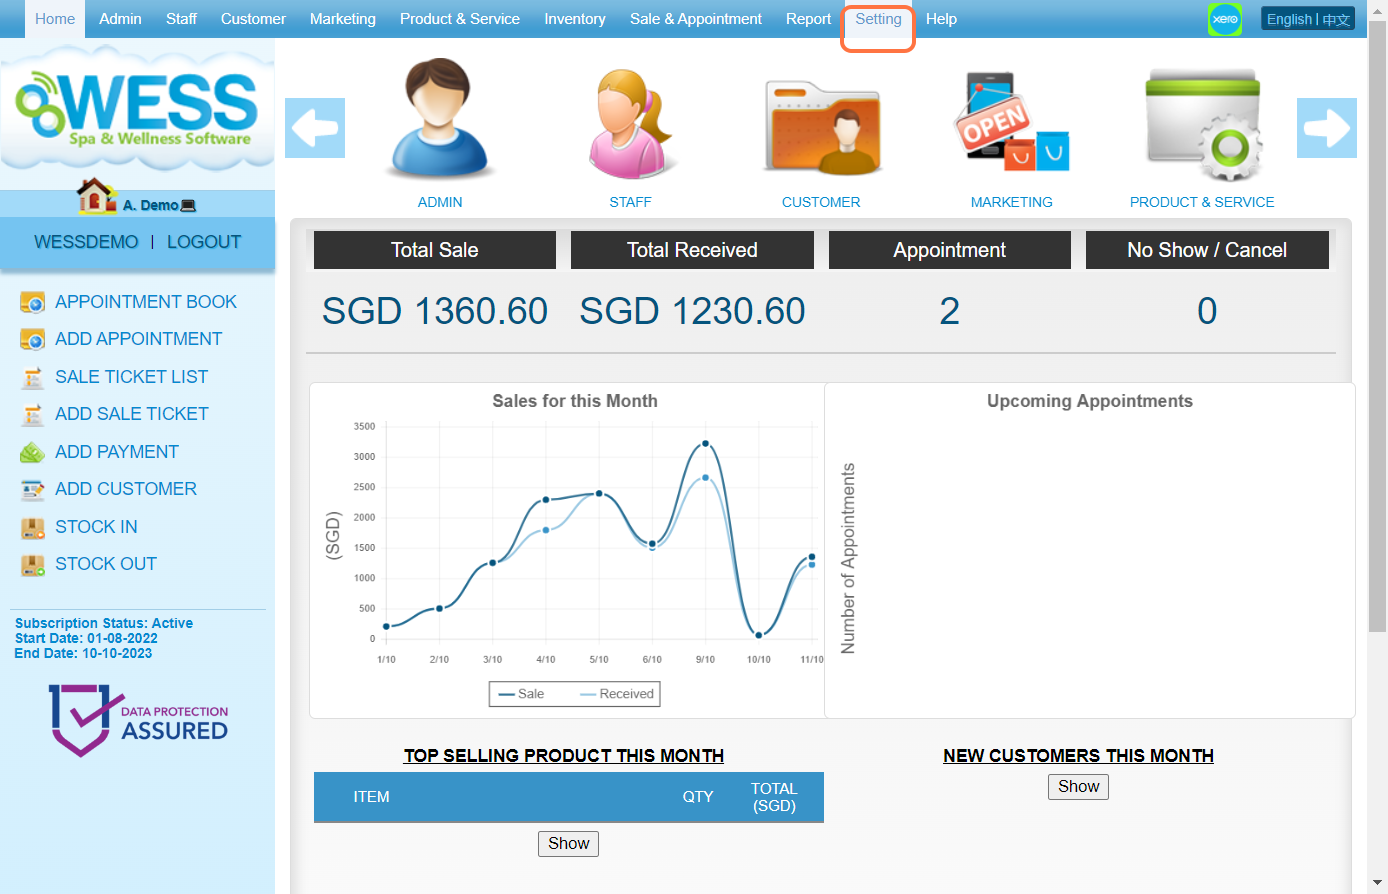
Step 2: Click “COMMISSION SCHEME (V2)” .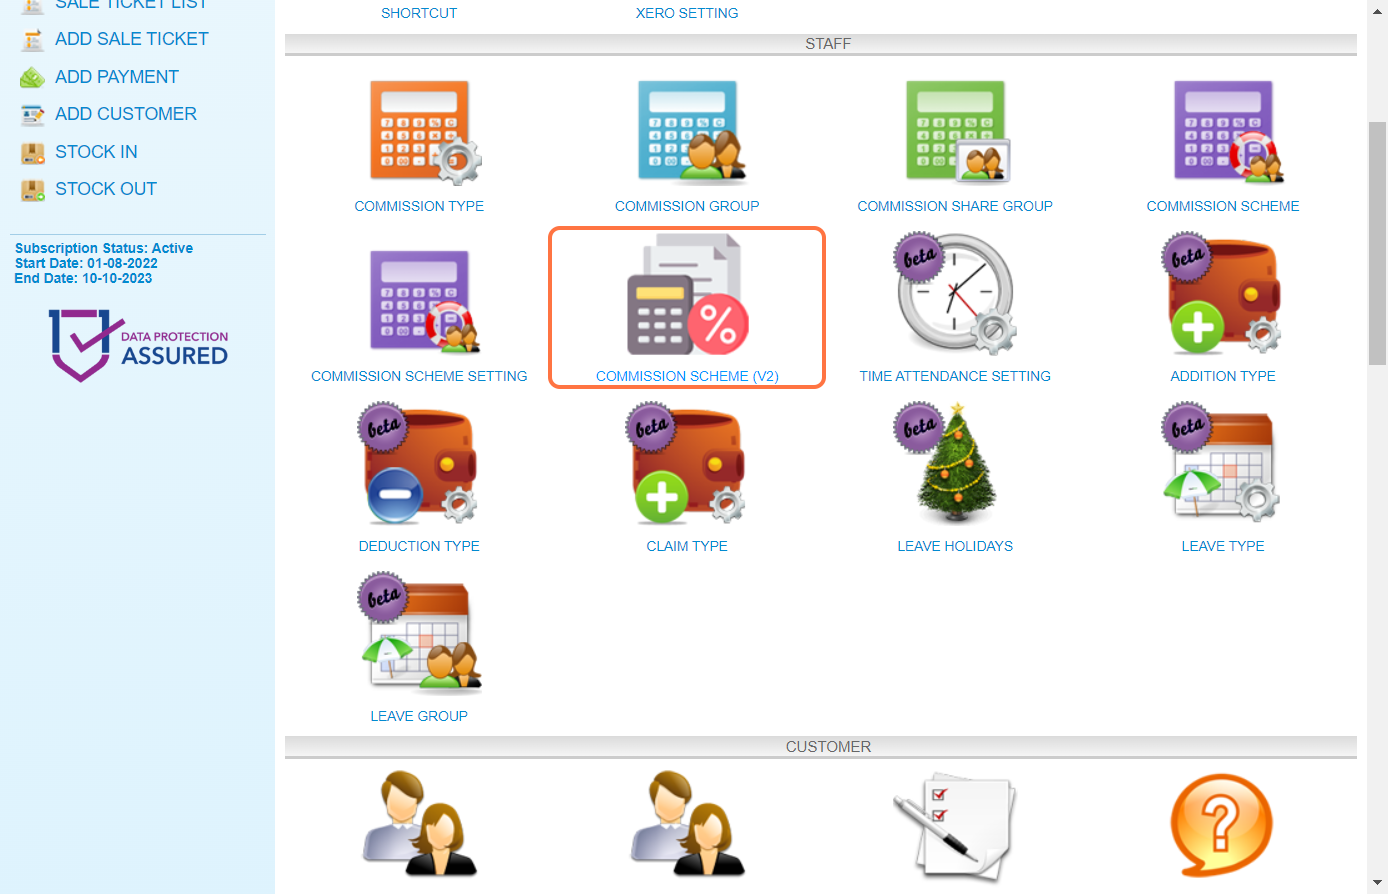
Step 3: Click on the pen icon “✏️” to edit the selected commission scheme.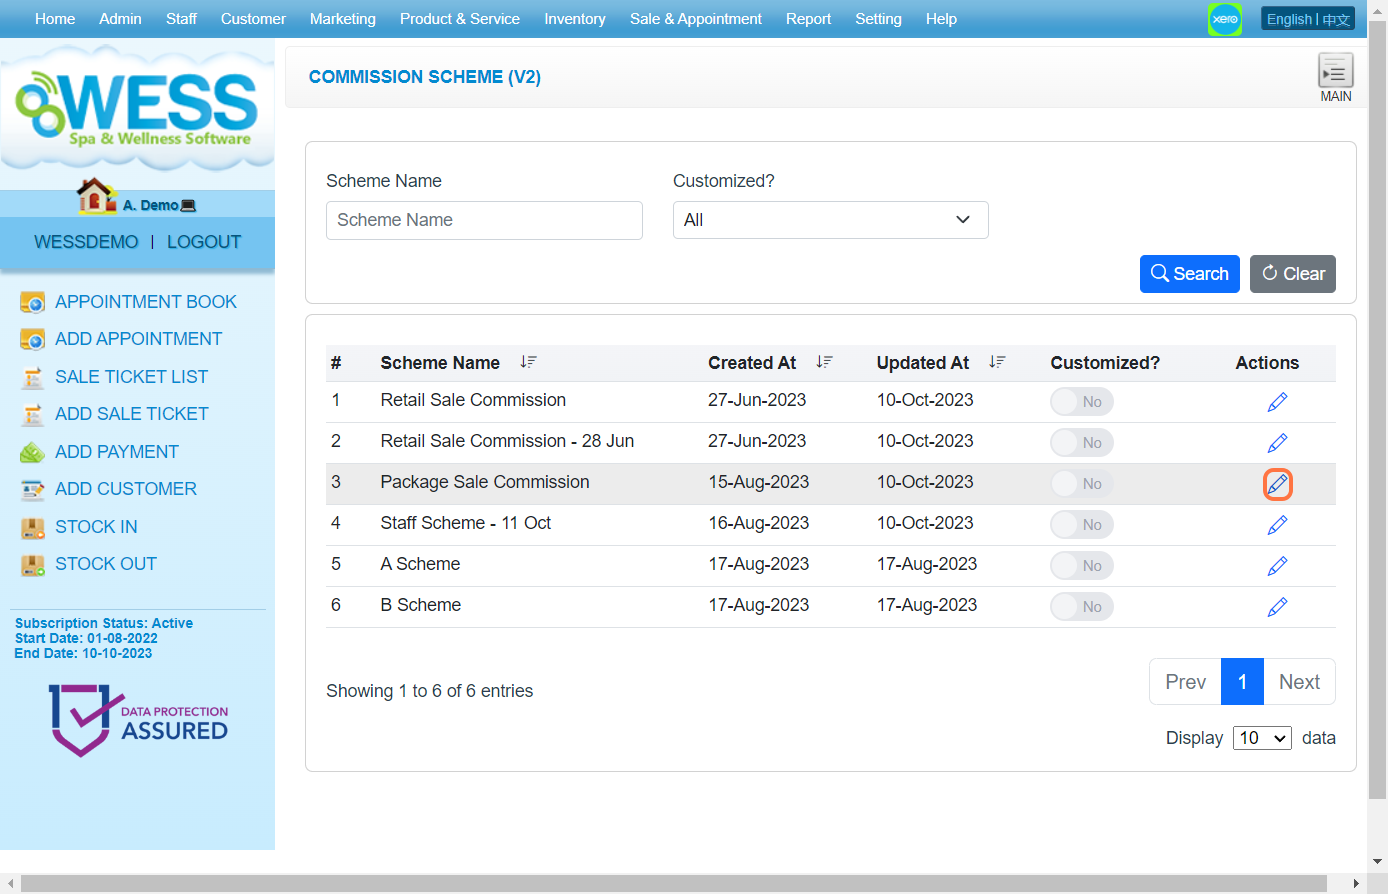
Step 4: You can change the scheme name here.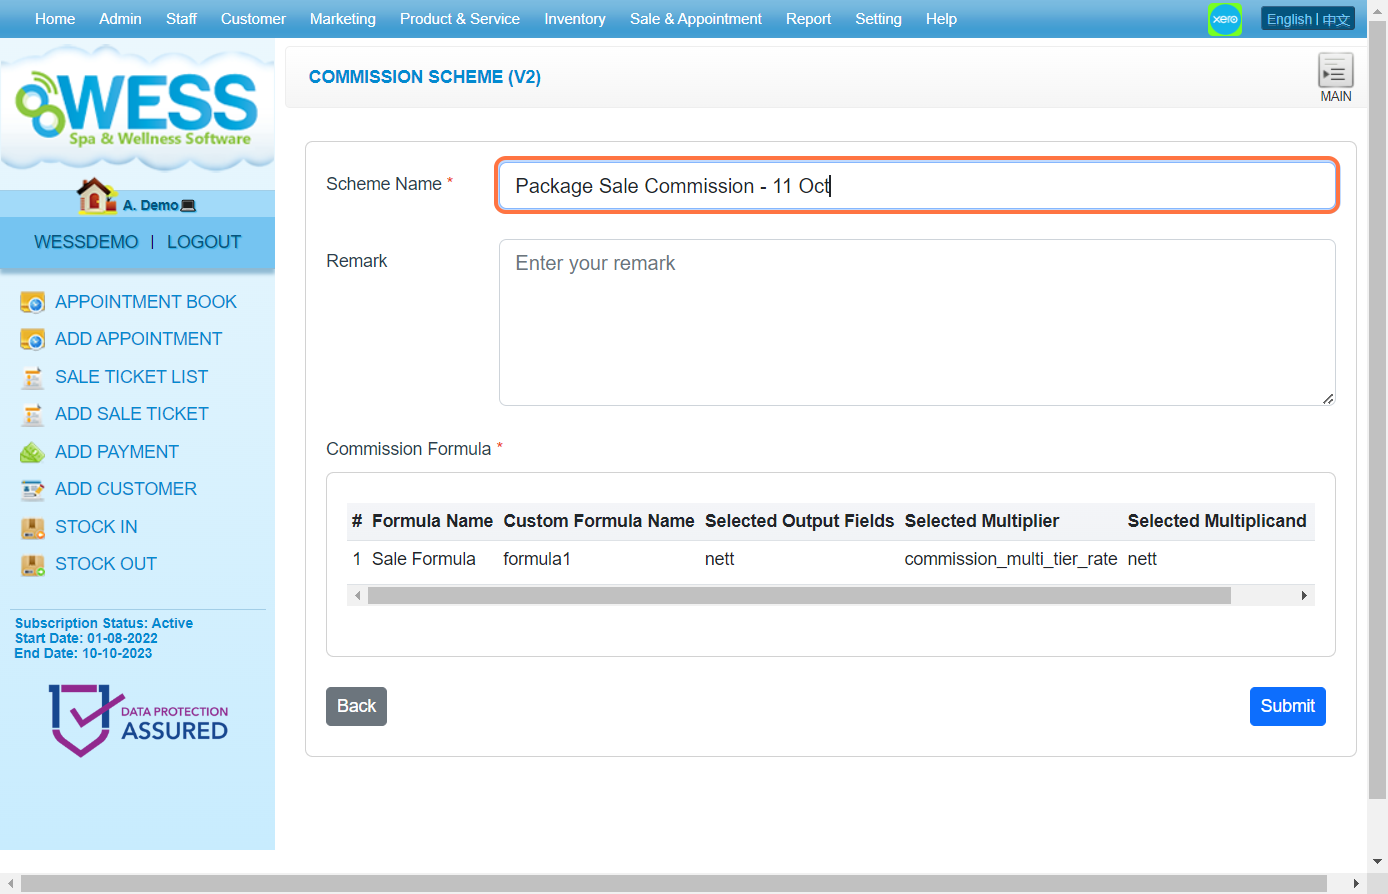
Step 5: You can enter a remark to show details or the aim of the scheme.
Step 6: Click “Submit” button.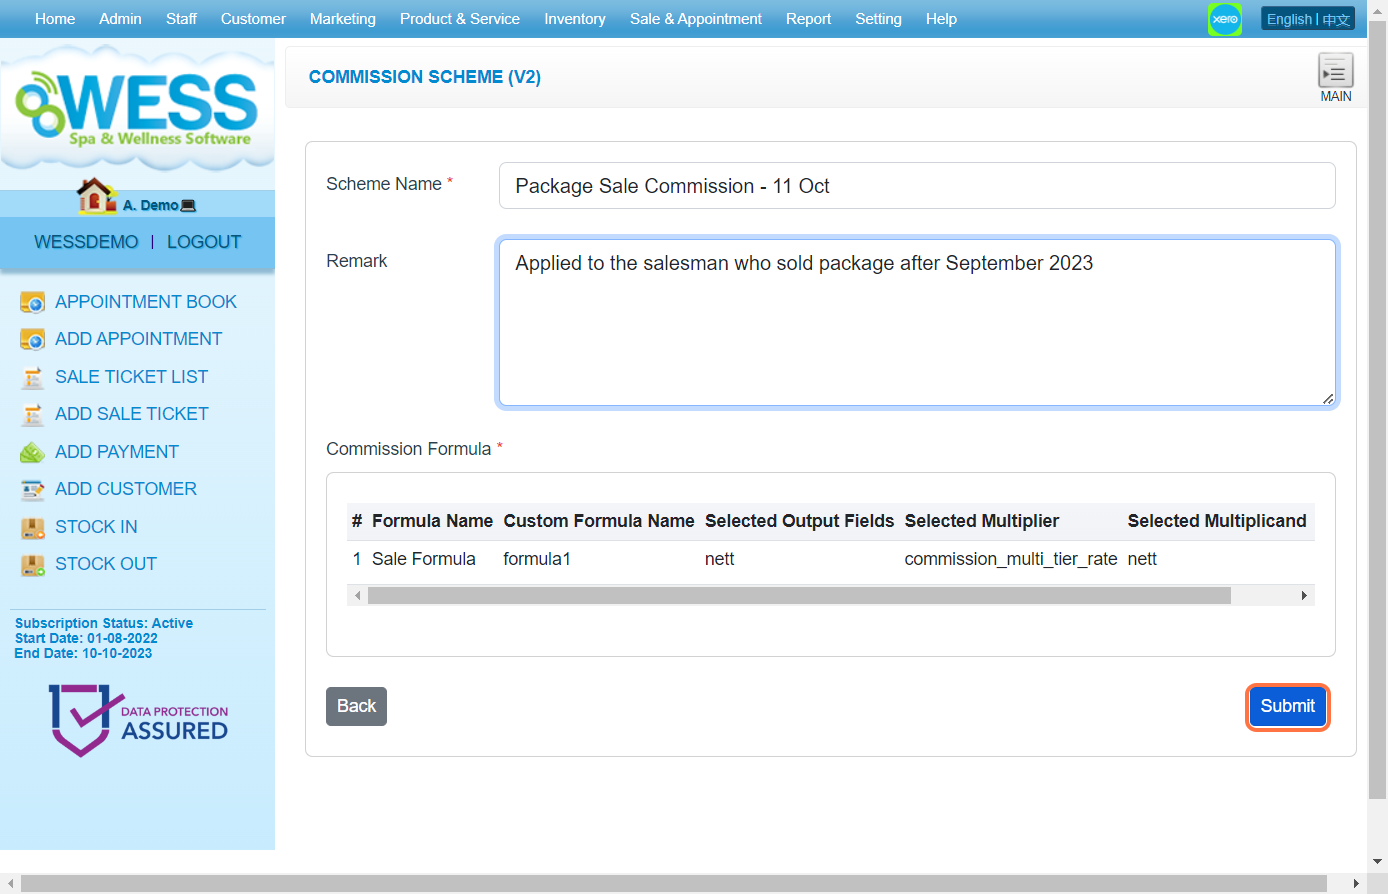
Step 7: Make sure the changes have been saved.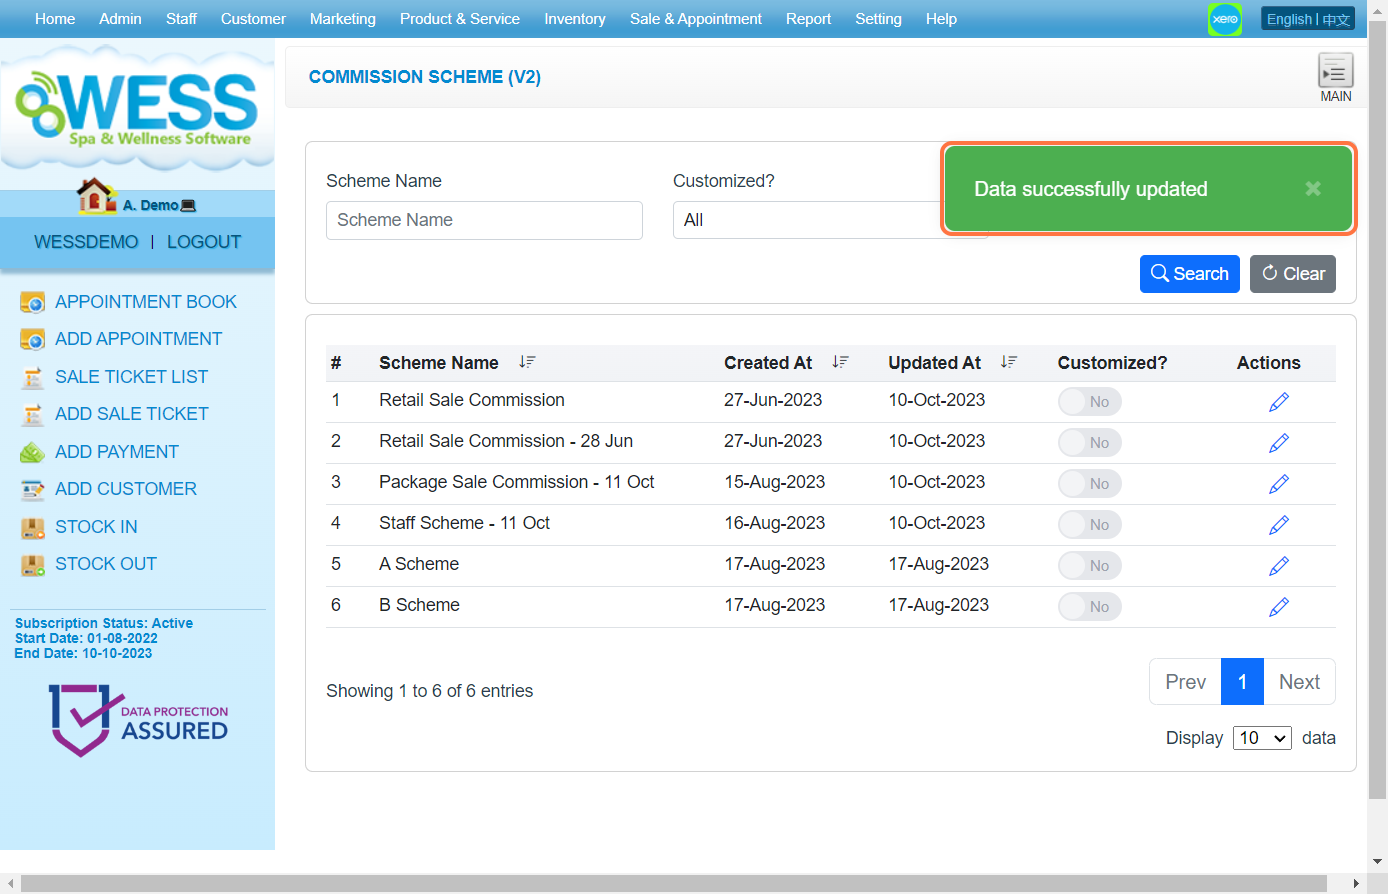
Last Update: Aug 2024
https://wesshelp.wessconnect.com/2023/10/12/how-to-change-the-commission-rate-value-commission-v-2/
Note:
Commission V2 is a new version of the commission calculation system inside WESS.
It DOESN’T AFFECT your original commission calculation system (V1).
Step 1: Click “Setting” .
Step 2: Click on COMMISSION SCHEME (V2).
Step 3: Click on the pen icon “✏️” to edit the commission scheme.
Step 4: Click on the pen icon “✏️” to edit the selected formula.
Step 5: You can edit the target for multi-tier rate commission.
Step 6: You can change the rate value for each tier for a multi-tier rate commission.
[!] Some of the commission formula does not have this calculation logic.
Step 7: Click on the green add button to add more tier levels.
Step 8: Enter a target for the new tier.
Step 9: Enter a value for the new tier.
Step 10: Click on “Draft” button.
Step 11: Click “Submit” to apply the changes.
Step 12: Make sure the changes have been saved.
Last Update: Aug 2024
Note:
Commission V2 is a new version of the commission calculation system inside WESS.
It DOESN’T AFFECT your original commission calculation system (V1).
Step 1: Click on “Staff” .
Step 2: Click “COMMISSION (V2) EMPLOYEES” .
Step 3: Click on the pen icon “✏️” to edit the selected employee.
Step 4: Click on “Scheme” to select a commission scheme.
Step 5: Select a commission scheme to apply.
Step 6: Click “Submit” button.
Step 7: Make sure the change has been saved.
Last Update: Aug 2024
iPhone / iPad
Step 1: Tap on the “Safari“.
Step 2: Search this link in Safari.
Website Link: https://wess.wessconnect.com/
[!] User can simply click on the link from the Home Screen to access the login page, avoiding any issues with expired login information.

Step 3: Tap on the bottom share button.
Step 4: Tap “Add to Home Screen“. 
Step 5: Tap “Add“. 
Step 6: Make sure the website shortcut has been created on the Home Screen.
Last Update: Nov 2024
iPhone / iPad
Step 1: Tap on the “Chrome” .
Step 2: Search this link in Chrome.
Website Link: https://wess.wessconnect.com/
[!] User can simply click on the link from the Home Screen to access the login page, avoiding any issues with expired login information.
Step 3: Tap on the top right hand side more button.
Step 4: Tap “Add to Home Screen“. 
Step 5: Tap “Add“. 
Step 6: Make sure the website shortcut has been created on the Home Screen.
Last Update: Nov 2024
Step 1: Tap on the “Chrome” .
Step 2: Search this link in Chrome.
Website Link: https://wess.wessconnect.com/
[!] User can simply click on the link from the Home Screen to access the login page, avoiding any issues with expired login information.
Step 3: Tap on the top right hand side more button.
Step 4: Tap “Add to Home Screen“. 
Step 5: Tap “Install“. 
Step 6: Make sure the website shortcut has been created on the Home Screen.
Last Update: Nov 2024