
Step 1: Click “Setting“.
Step 2: Click “SALE SETTING“.
Step 3: Click “OTHERS“.
Step 4: Select “On” for “Commission Allocation” to enable using it.
Step 5: [Optional] Turn on this setting if you wish to keep payment value not more than its sale (refer Step 15)
[!] E.g.: Let’s say Product A sold for $500. The payment value cannot be $550.
Step 6: [Optional] Turn on this setting if you wish to keep the total allocation of the commission to 100% (refer Step 17 and after).
[!] E.g.: If Staff A has allocated 60% of the commission, Staff B cannot allocate another 65%.
Step 7: Click any Save icon “💾”.
Step 8: Make sure the setting has been saved.
Step 9: Click “Sale & Appointment“.
Step 10: Click “SALE TICKET“.
Step 11: Select an old sale ticket and click on the pen icon “✏️” to edit.
Step 12: Make sure these three sections are filled out and selected. 
Step 13: Click “Commission“.
Step 14: As commission calculation is based on payment, select a payment to allocate the commission.
[!] If you are not sure which to choose, you can keep selecting the latest one.
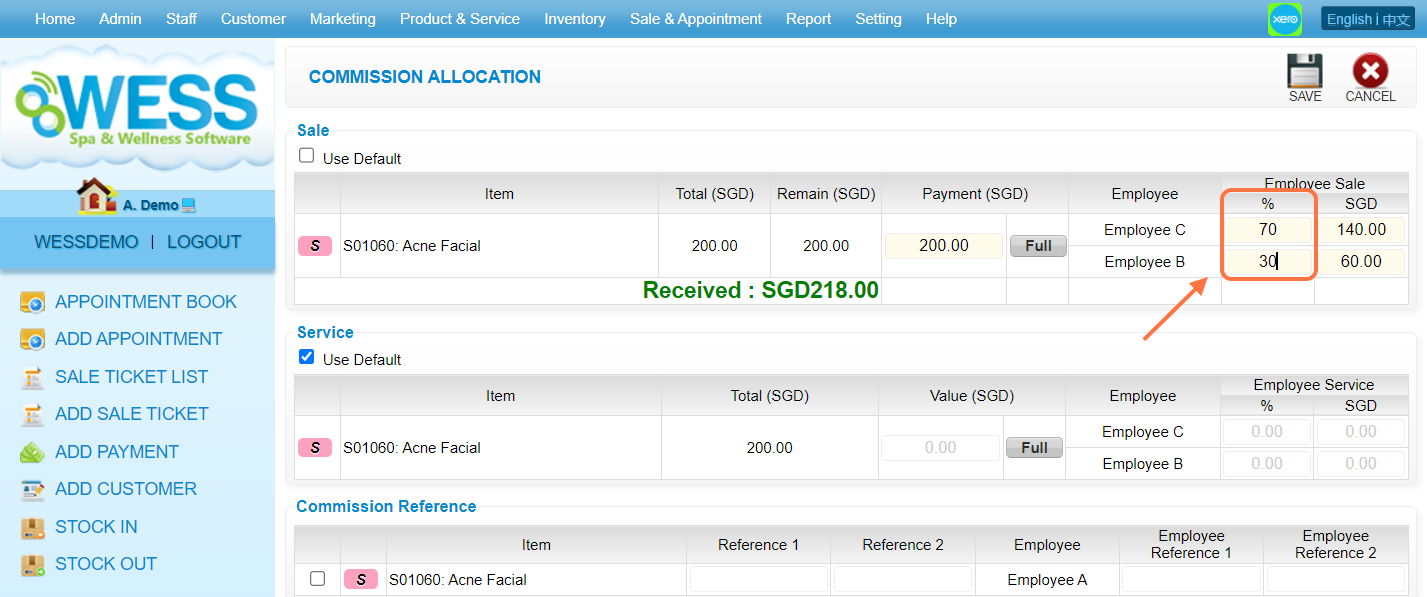
Step 15: Untick the “Use Default” checkbox “☑️” to do custom sale commission allocation.
Step 16: Enter a value for payment to calculate the commission.
[!] If you have done step 5, you will not be able to enter a value higher than the total sale.
Step 17: [Optional] You can click on “Full” to directly enter the total sales value.
Step 18: Enter the percentage of sale commission allocated to Staff A. Value will be reflected based on input. Then Staff B and so on.
[!] This step can be done differently, please refer to Step 19.
[!] If you did step 6, you will not be allowed to enter a value which causes a total percentage over 100%.
Step 19: [Optional] : Enter a value of the sale commission allocated to Staff A. Percentage will be reflected based on input. Then Staff B and so on.
[!] This step can be done differently, please refer to Step 18.
[!] If you did step 6, you will not be allowed to enter a value which causes a total percentage over 100%.
Step 20: This can be done by following the steps from step 15 to step 19.
Step 21: [Optional] You can add more details as references in this section.
Step 22: Click any Save icon “💾”.
Step 23: Make sure the record has been saved.
Last Update: Aug 2023